StraightSmile Solutions®
Should You Stop Expanding at 40mm with RPE/IPE?
Should You Stop Expanding at 40mm with RPE/IPE?
Introduction
- Dr. Amanda from Straight Smile Solutions addresses a common question: Should expansion stop when the transpalatal width reaches 40mm?
• Many clinicians use “40mm” as a benchmark after hearing her training material, but it is not a universal stopping point.
• Tooth size, arch size, and individual anatomy mean that the ideal expansion width varies widely.
Is 40mm the Rule?
- 40mm is not a fixed stopping measurement—it’s a reference point.
• Actual final width depends on tooth size and arch proportions.
• Patients with large teeth may reach 42–48mm.
• Patients with small teeth may finish at 38–40mm.
• Range typically falls between 38 and 48mm, depending on dentofacial anatomy.
What Clinicians Should Evaluate Instead
- Instead of relying solely on a number, consider full clinical indicators:
- Overall arch form
- Tooth size and spacing
- Symmetry and stability
- Posterior crossbite correction
- Palatal vault development
• Dr. Amanda’s expansion guidelines and techniques are available in her courses and videos for deeper case review.
Why Overexpansion Matters
- Slight overexpansion is preferred to avoid relapse.
• Under correction risks arch collapse and retreatment.
• Some relapse is expected; expansion must account for this.
Clinician Guidance
- Don’t stop just because the caliper reads 40mm.
• Review functional and structural goals:
- Stable occlusion
- Proper arch coordination
- Skeletal correction vs. dental tipping
• If uncertain, Dr. Amanda encourages doctors to email or review her course material for step-by-step criteria.
Conclusion
The “40mm rule” is a guideline, not a finish line. True expansion success depends on overall anatomy, tooth size, and clinical stability, not just a single number. When in doubt, aim slightly beyond the visible target to ensure long-term retention and avoid relapse. Expansion should stop when biomechanics and function confirm stability, not when a ruler says so.
Proclination, Bimax, and Overjet DEFINED for Braces and Invisalign
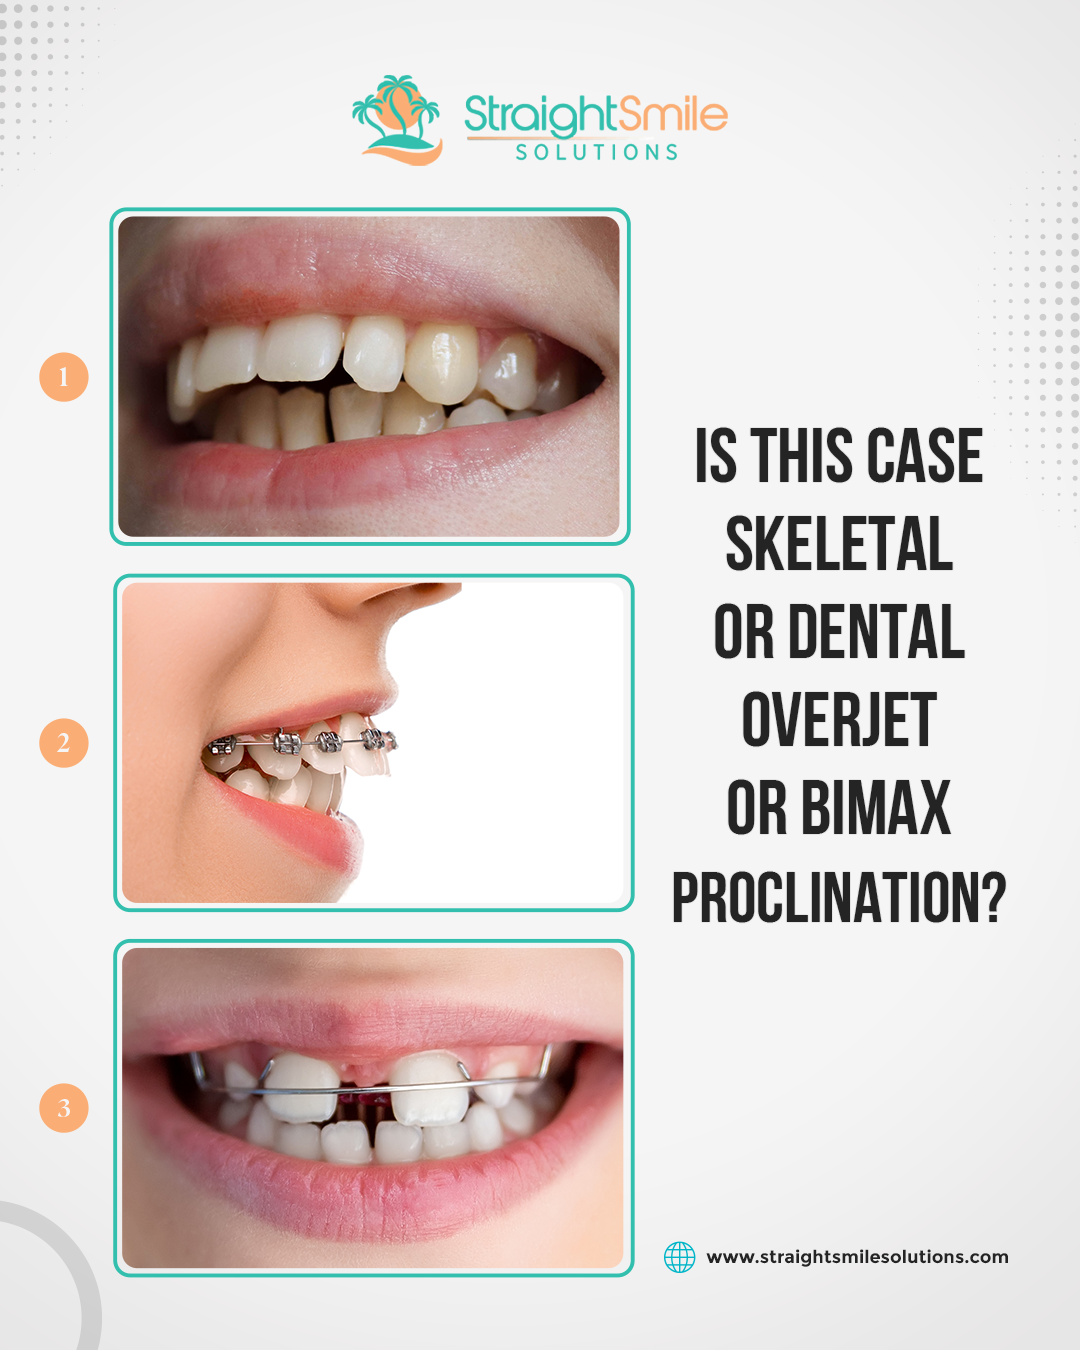
Proclination, Bimax, and Overjet DEFINED for Braces and Invisalign
Introduction
A lot of people, including doctors and ads online, incorrectly mix terms like overjet, overbite, proclination, and bimax. This confuses treatment planning. Here are the proper orthodontic definitions—no shortcuts, no slang.
Overjet
- Refers to teeth, not jaws.
- Means the upper front teeth sit ahead of the lower front teeth.
- Not the same as Class II. You can:
- Have overjet without Class II
- Be Class II without overjet (e.g., Class II div 2)
- Function rule:
- Front teeth should not touch at rest
- They should touch in function (chewing/bite movements).
- Measured at the most protruded tooth, not always the same value across incisors.
Proclination
- Refers to tooth inclination relative to the bone, not tooth-to-tooth relationship.
- Proclined incisors = teeth angled forward out of the jawbone more horizontally than ideal.
- Determined on ceph analysis (incisor angle/position).
- Example idea: more “driving outward” vs. vertical emergence.
Bimaxillary Protrusion (Bimax)
- Refers to both jaws, not the teeth.
- Both the maxilla and mandible sit more forward on the face (higher SNA & SNB).
- Often associated with:
- Fuller lips/soft tissue profile
- Usually good airway
- Not a bad thing — just a skeletal pattern. Not the same as “proclined teeth.”
Conclusion
- Overjet = tooth-to-tooth relationship
- Proclination = tooth-to-bone position
- Bimax = jaw position in the skull
To diagnose correctly, always label whether a condition is skeletal or dental, because both can differ. Correct terminology = correct treatment planning.
How Non-Compliance and Intermittent Wear of Aligners Can Cause the See-Saw Effect & Root Resorption
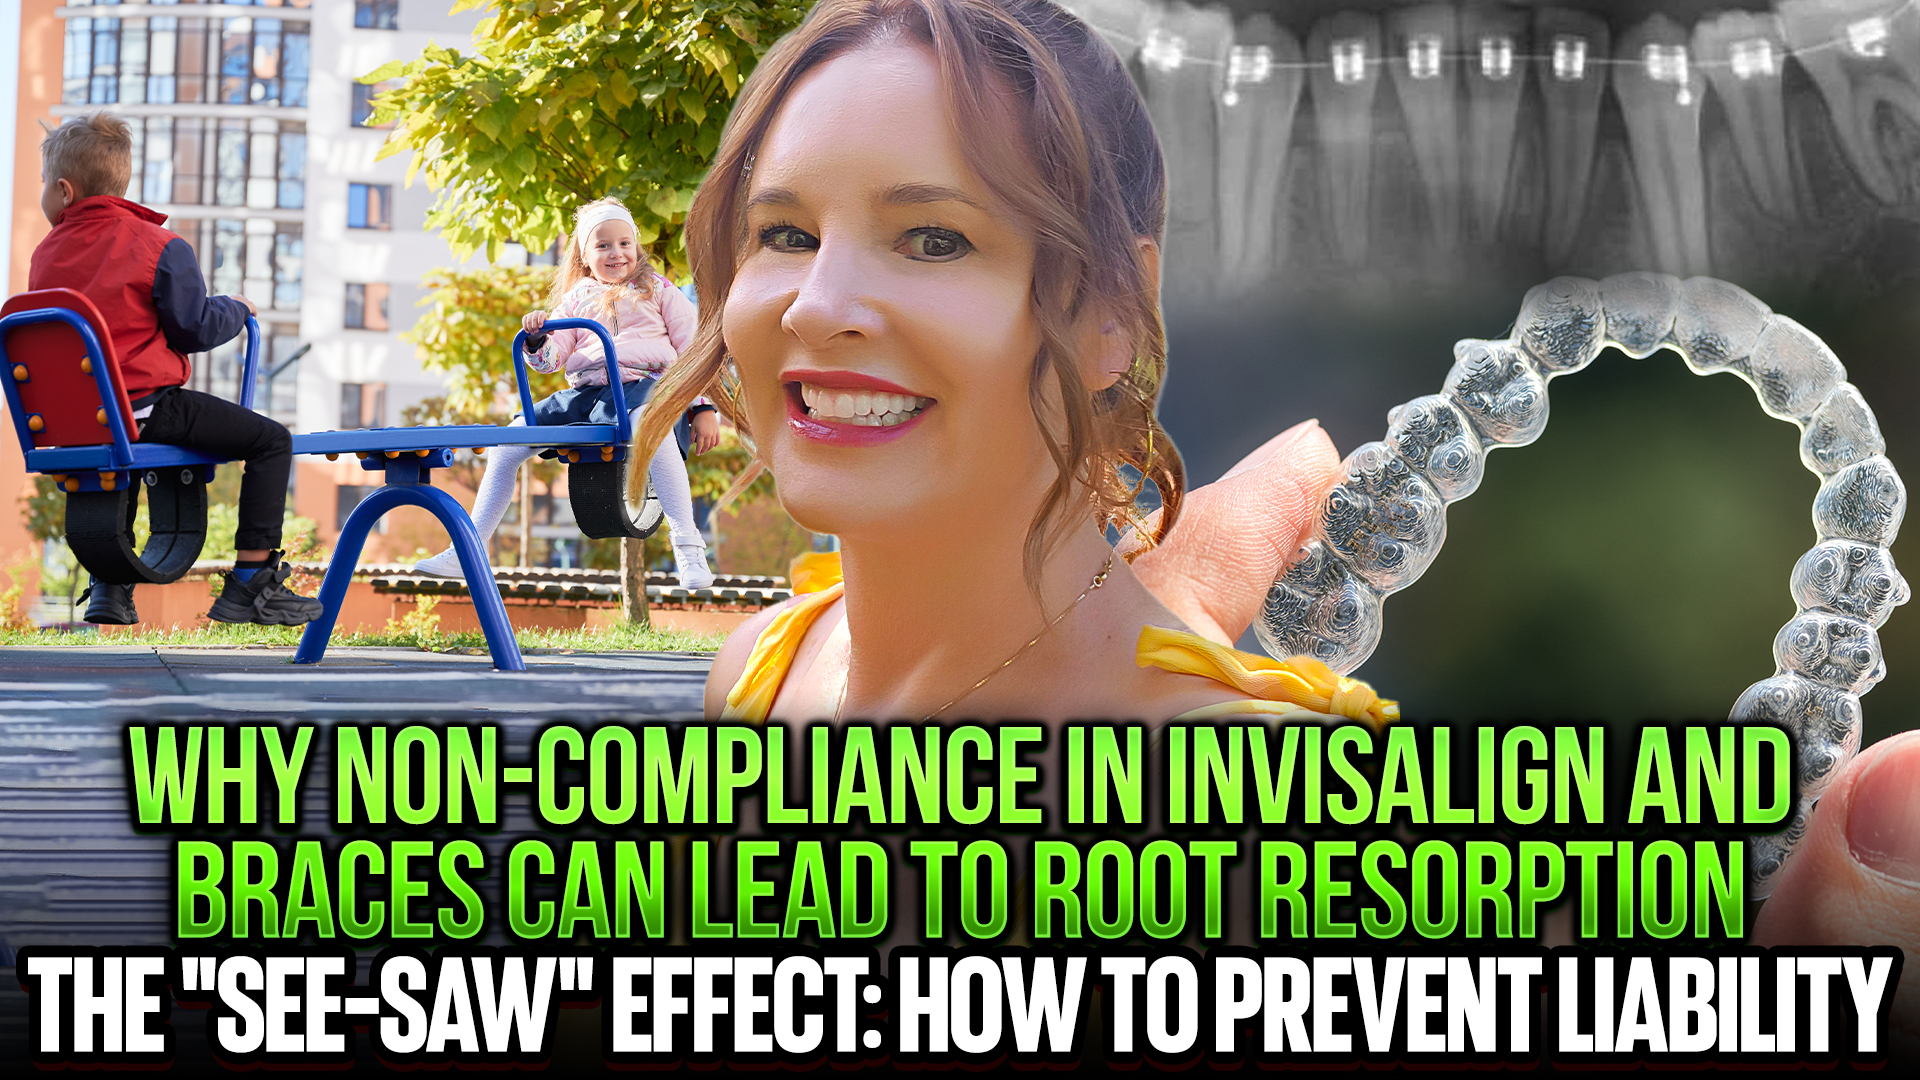
How Non-Compliance and Intermittent Wear of Aligners Can Cause the See-Saw Effect & Root Resorption
Introduction
Dr. Amanda introduces the concept of the “see-saw effect”, a term she coined to describe how intermittent or inconsistent wear of aligners (or other compliance-based orthodontic devices) can lead to damaging biological consequences, most notably, root resorption. She contrasts this with braces, which exert more controlled, consistent forces that don’t depend heavily on patient compliance.
- What Is the See-Saw Effect?
The “see-saw effect” occurs when forces on teeth fluctuate due to inconsistent appliance wear.- Example: A patient wears aligners only part-time. During wear, the teeth begin to move, but when the aligners are removed, the teeth relapse and experience opposing forces.
- This back-and-forth action leads to unstable pressure on periodontal ligaments (PDLs), stretching, compressing, and preventing proper bone remodeling.
- Over time, this instability results in root blunting, widened PDLs, and potentially permanent root damage.
- Why Aligners Are More Affected Than Braces
- Aligners rely entirely on patient compliance for consistent force application.
- Braces, on the other hand, provide continuous force even if the patient isn’t compliant except when elastics are involved, which are also compliance-based and can cause similar “see-saw” effects.
- Aligners with large step movements between trays can mimic this problem, increasing the risk of root resorption.
- Clinical Implications & Management
- Non-compliance should not be ignored. Continued treatment under intermittent wear can irreversibly damage roots.
- Progress X-rays and mobility checks should be routine for suspected non-compliance.
- If root damage or widening PDLs appear, treatment should be halted immediately, as switching to braces won’t fix the damage and may worsen it.
- For persistent non-compliance, clinicians may need to end treatment and offer a partial refund, depending on contractual terms.
Conclusion
Dr. Amanda stresses that orthodontic success requires steady, continuous forces. When patients don’t comply, the resulting on-and-off pressure creates a “see-saw effect” that destabilizes teeth and can cause permanent root damage. Clinicians need to monitor progress carefully, set clear expectations with patients upfront, and be willing to stop treatment when compliance fails.
Open Mouth Posture in Cephs – Numbers Invalid? Turning CBCT into Cephs with Extension Arms
Open Mouth Posture in Cephs – Numbers Invalid? Turning CBCT into Cephs with Extension Arms
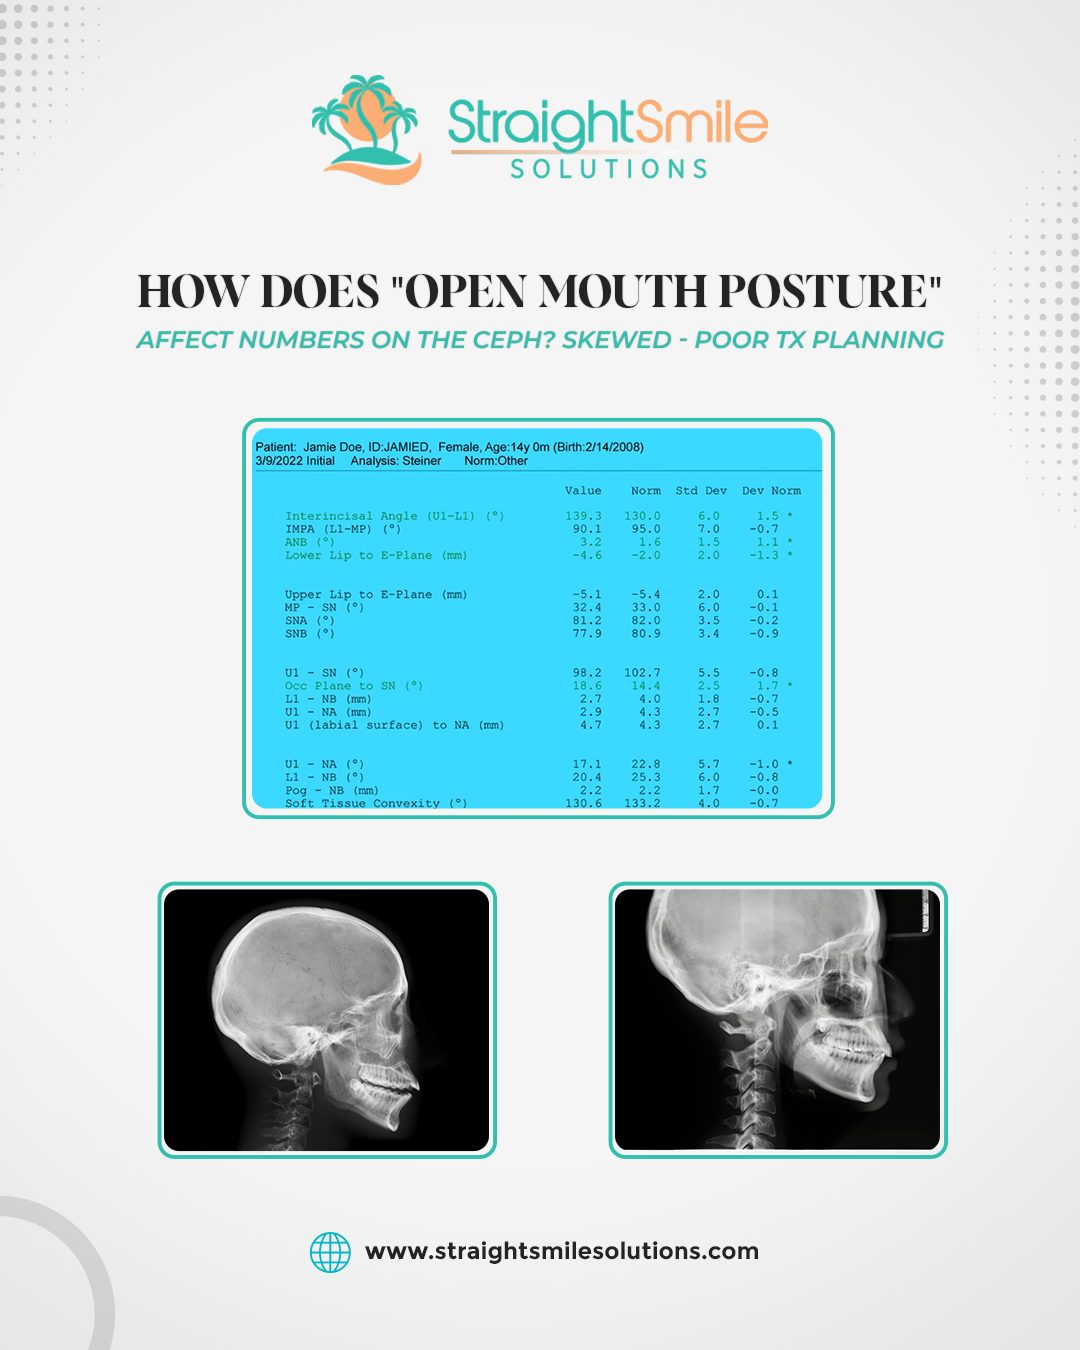
I. Introduction
Dr. Amanda explains how open mouth posture during cephalometric imaging leads to invalid or distorted measurements, particularly when converting CBCT scans to 2D cephs. As more clinicians adopt CBCT extension arms or outsource ceph conversions, understanding proper mouth closure protocols becomes critical for diagnostic accuracy. She emphasizes establishing a consistent workflow and verifying patient posture before image capture.
- Ceph Workflow and Equipment Setup
- Clinicians may use CBCT machines with extension arms or services like Beam Readers and 3DX to extract ceph images.
B. Dr. Amanda stresses the need to practice image acquisition before complex cases arise.
C. Each CBCT system differs in setup; clinicians should consult manufacturers for proper bite positioning tools and calibration settings.
III. Importance of Mouth Closure
- The mouth must be fully shut for accurate skeletal and dental relationships.
B. If “daylight” (visible space) is seen between both anterior and posterior teeth, the ceph is invalid.
C. Open-mouth posture skews mandibular readings, causing diagnostic errors in Class II or III evaluation. - Impact on Cephalometric Measurements
- Accurate values: SNA angle, upper incisor to NA, and maxillary metrics remain reliable.
B. Distorted values: SNB, ANB, mandibular position, and vertical skeletal dimensions.
C. An open mouth alters the hinge position of the mandible, lengthening facial height artificially. - Case Example and Clinical Insight
- In a Phase I case showing a possible Class III profile, ceph readings were misleading due to an open-mouth posture.
B. True diagnosis revealed a retrognathic maxilla (small SNA) rather than a prognathic mandible.
C. This highlights the importance of reviewing ceph posture before interpretation. - Clinical Recommendations
- Always confirm bite closure prior to scanning.
B. Request retakes if an imaging center returns open-mouth cephs; no patient should be recharged.
C. Develop internal standard protocols for CEPH imaging and posture verification.
VII. Conclusion
Open mouth posture compromises cephalometric reliability by distorting mandibular and interjaw measurements. While some maxillary readings remain usable, skeletal analysis becomes invalid for treatment planning. Clinicians must ensure proper bite closure, equipment calibration, and staff training to produce accurate cephs. Maintaining image quality protects diagnostic confidence, prevents re-radiation, and enhances orthodontic outcomes.
Risks of Using a Haas Expander Instead of IPE, RME, or RPE
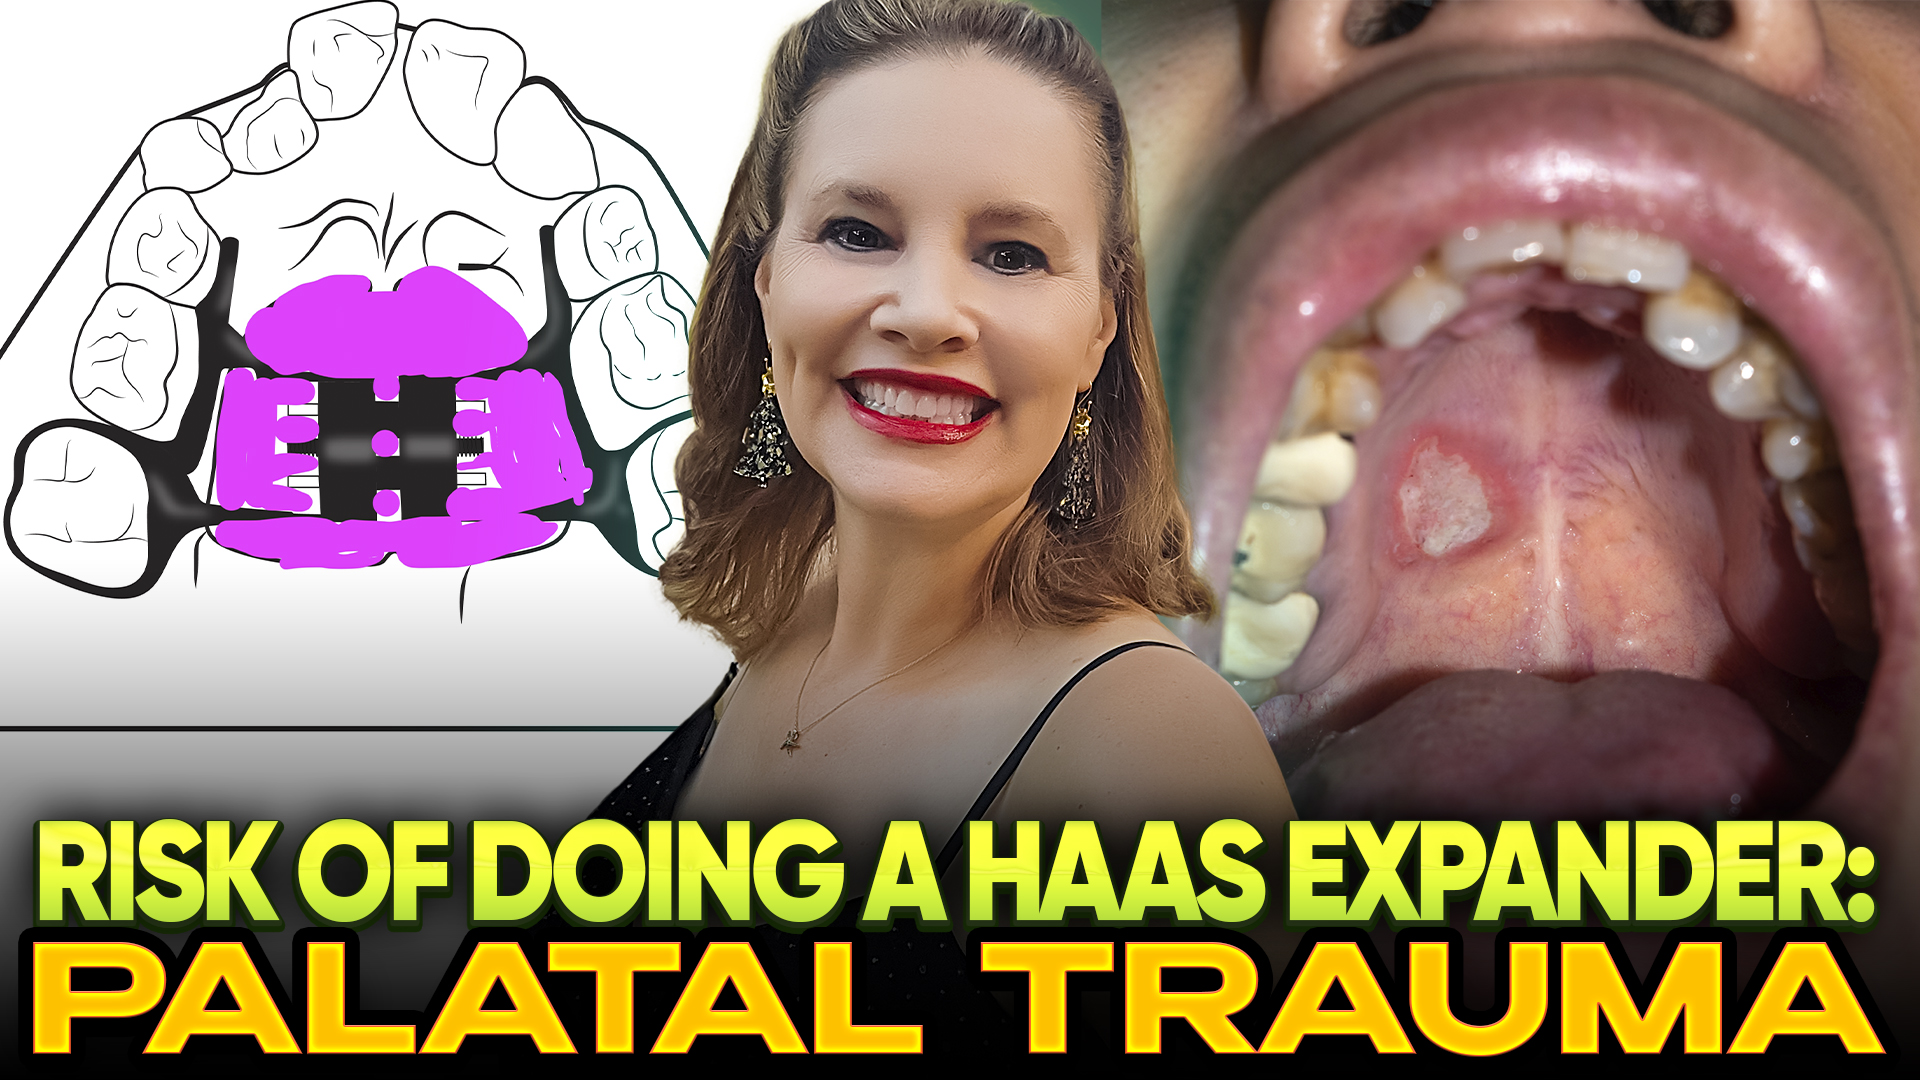 Risks of Using a Haas Expander Instead of IPE, RME, or RPE
I. Introduction
Dr. Amanda introduces the Haas expander, a traditional orthodontic device similar to a Hyrax expander but with an added layer of acrylic over the palate. While some clinicians consider it for improved retention and skeletal movement, Dr. Amanda explains why she generally does not recommend Haas expanders in modern orthodontics. She emphasizes that IPEs (Invisalign Palatal Expanders) and 3D-printed RPE/RME designs now offer better precision, comfort, and hygiene with fewer complications.
How Haas Expander Works
• Acrylic plate sits along palate → increases stability and adaptation
• Can improve force distribution
• Less buccal segment tipping compared to standard Hyrax
• Reduces posterior wedge effect (posterior opening more than anterior)
Why Some Clinicians Still Use It
• Historically used to achieve more predictable skeletal expansion
• Some clinicians believe it gives a stronger orthopedic effect vs. RPE/RME
• Occasionally chosen when doctors want maximum anchorage and force control
Modern Perspective: Is It Necessary?
• With current Interproximal Expansion (IPE) systems, Haas is often not required
• Many orthodontists prefer non-acrylic expanders for cleanliness and comfort
• Dr. Amanda rarely uses Haas today → considers it older-generation tech
Clinical Risks & Complications
• Acrylic can compress the palate, creating ischemia and soft-tissue trauma
• Improper seating → palatal blanching
• Potential outcomes if blanching is ignored:
o Painful ulcers
o Tissue necrosis
o Fistulas extending toward the sinus (severe but documented)
• Hygiene challenge: must be able to floss beneath the acrylic
• Without access, food/debris trap → inflammation and infection
Best Practices for Using Haas
• Use clear or light-pink acrylic to monitor tissue
• Ensure no blanching when seating before cementation
• Confirm floss access beneath the appliance
• Monitor tissue throughout activation period
V. Conclusion
While the Haas expander can achieve good skeletal movement, it carries significant risks of soft tissue trauma and hygiene complications due to its acrylic design. Modern 3D-printed and digital expansion systems provide comparable or better results with fewer side effects. Dr. Amanda concludes that the Haas expander is largely outdated, and clinicians should prioritize patient safety, tissue health, and predictable biomechanics over tradition.
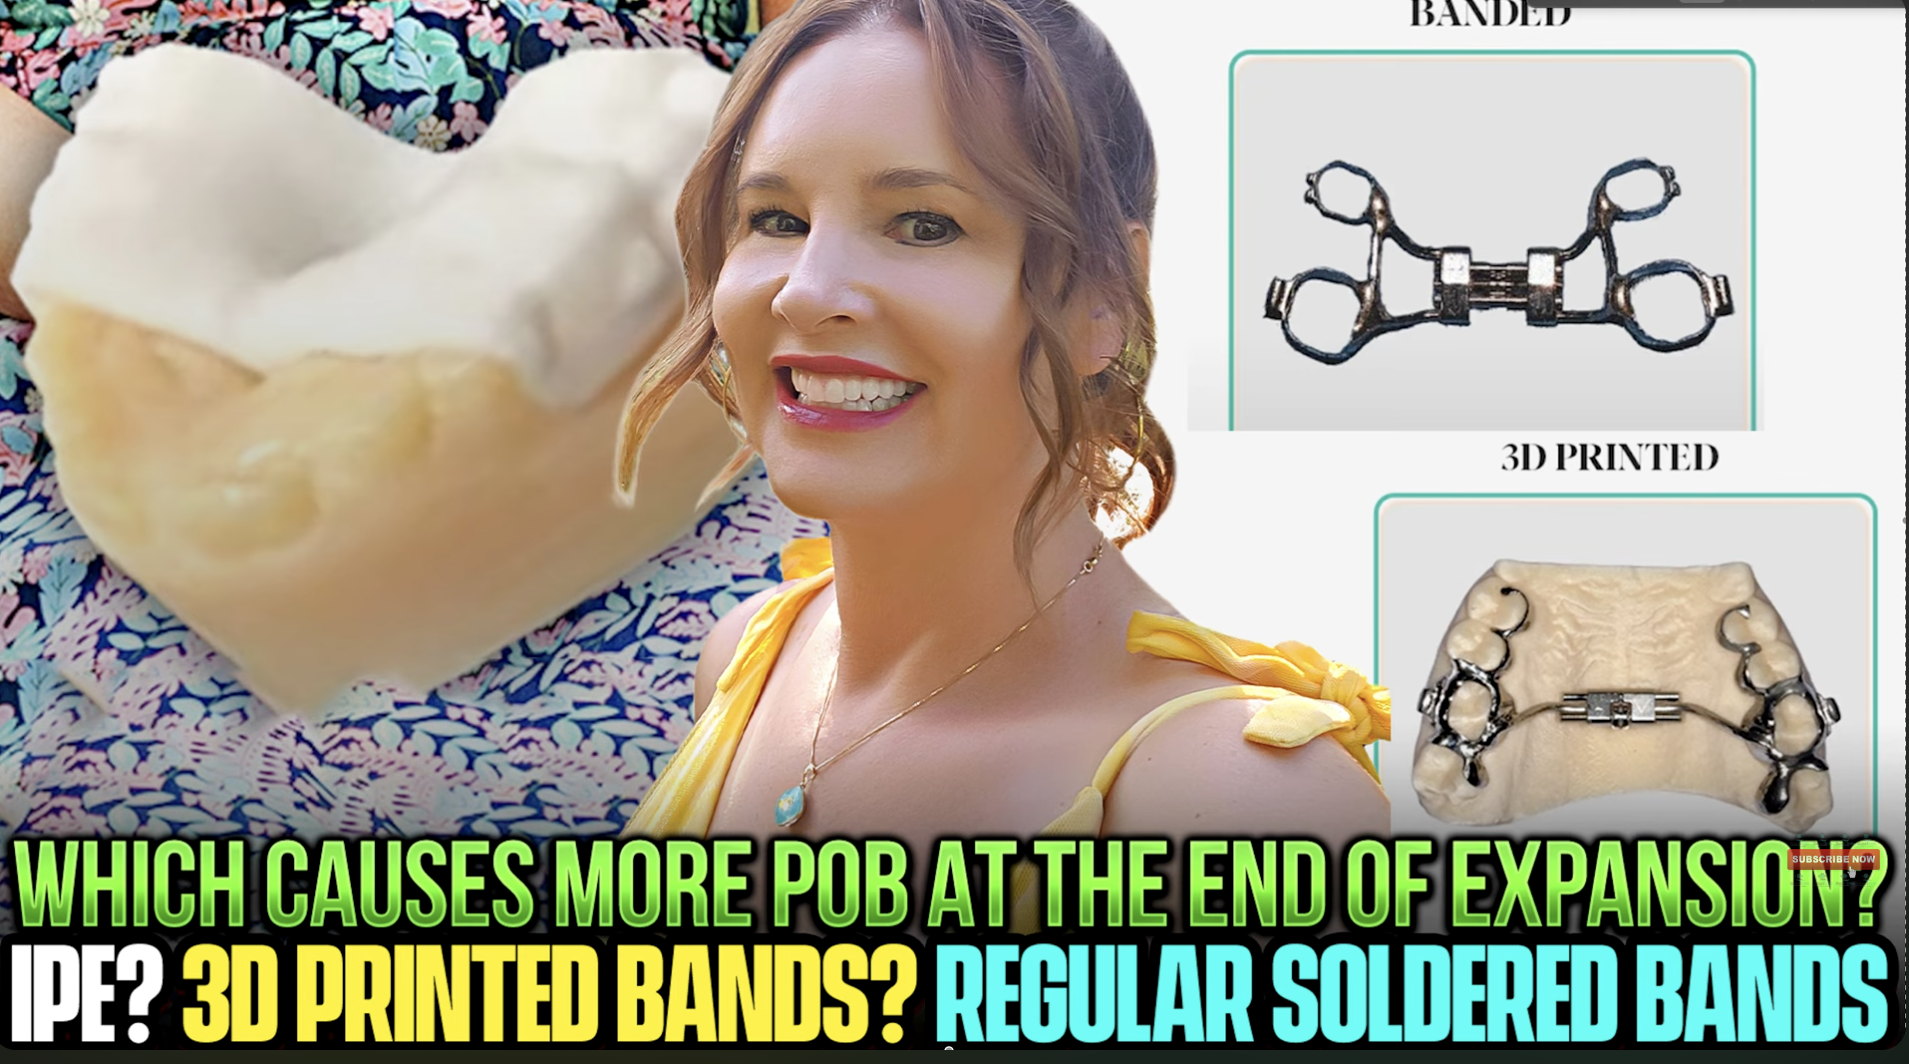
Which Makes the Worst POB (Posterior Open Bite) at the End of Expansion? RPE, IPE, or 3D Printed RME?
Which Makes the Worst POB (Posterior Open Bite) at the End of Expansion? RPE, IPE, or 3D Printed RME?
Dr. Amanda with Straight Smile Solutions addresses clinicians’ concerns about POBs post-expansion and reassures that this is often a normal, temporary occurrence.
Understanding Why POBs Occur
- Common Cause:
- Teeth become slightly intruded due to constant occlusal contact against thick expansion material.
- Bands, screws, or plastic components add vertical thickness → bite propped open.
- Material Thickness:
- 3D-printed RMEs and soldered band expanders are thicker than traditional banded devices.
- Repeated occlusal contact (“slam, slam, slam”) over months leads to minor intrusion of posterior teeth.
- Cuspal Interference:
- Hanging or misaligned cusps after expansion can create temporary posterior separation, appearing as open bites.
Clinical Management & Misconceptions
- Do not panic or overcorrect. POBs are typically self-resolving.
- Avoid forced eruption:
- Let gravity, occlusal settling, and muscle balance gradually close the bite.
- Forcing an eruption can cause unwanted vertical discrepancies or instability.
- Natural adaptation:
- Posterior teeth re-erupt and occlusion normalizes once the appliance is removed and function resumes.
- Reference to traditional orthodontics:
- In braces-era expansion with posterior acrylic blocks, similar POBs were common and resolved naturally during finishing.
Recommended Approach
- Allow natural settling post-expansion; avoid unnecessary mechanical intervention.
- Reassess occlusion during the retention or finishing stage, not immediately after appliance removal.
- Use deprogramming techniques (as covered in Dr. Amanda’s related content) if minor functional imbalance persists.
Key Takeaway
- All expansion types, RPE, IPE, and 3D-printed RME, can cause temporary POBs.
- The “worst” is usually linked to thicker expanders, not the expansion method itself.
- Patience > force: Nature and time resolve most posterior open bites.
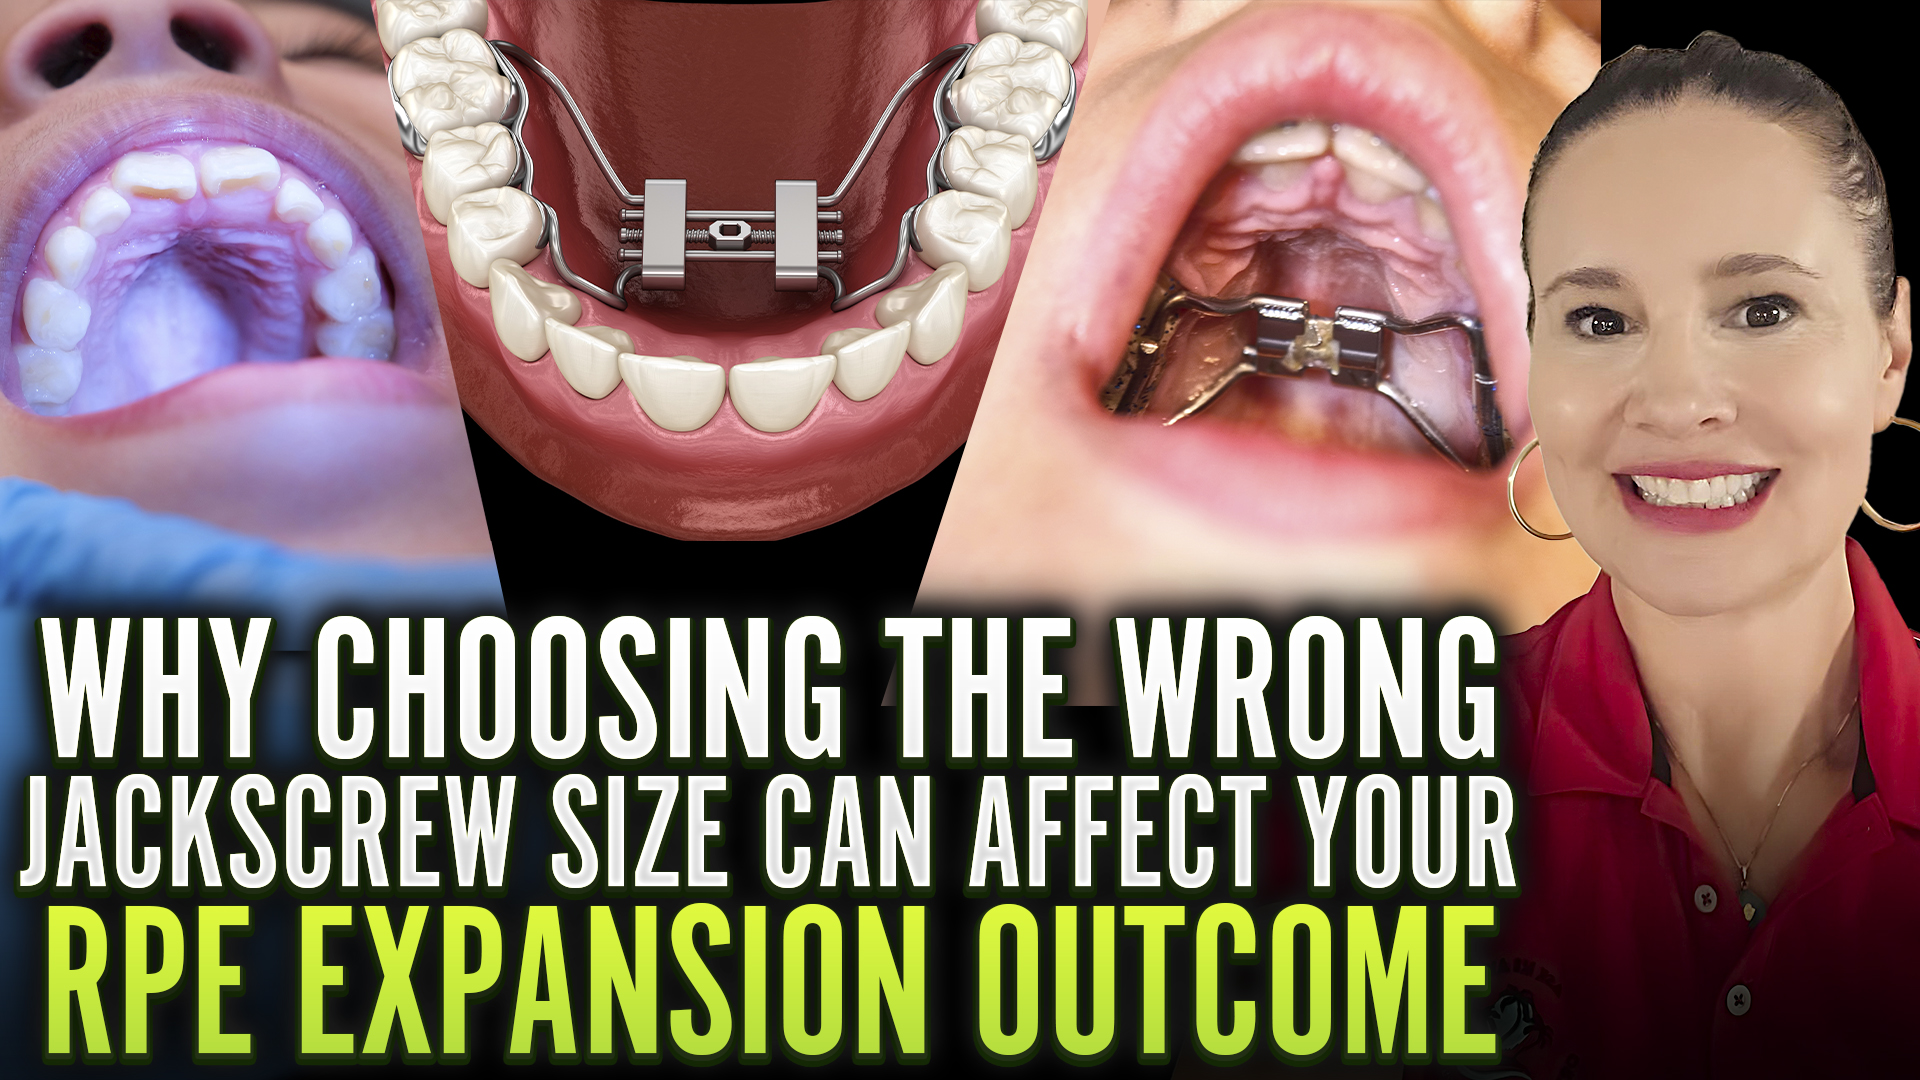
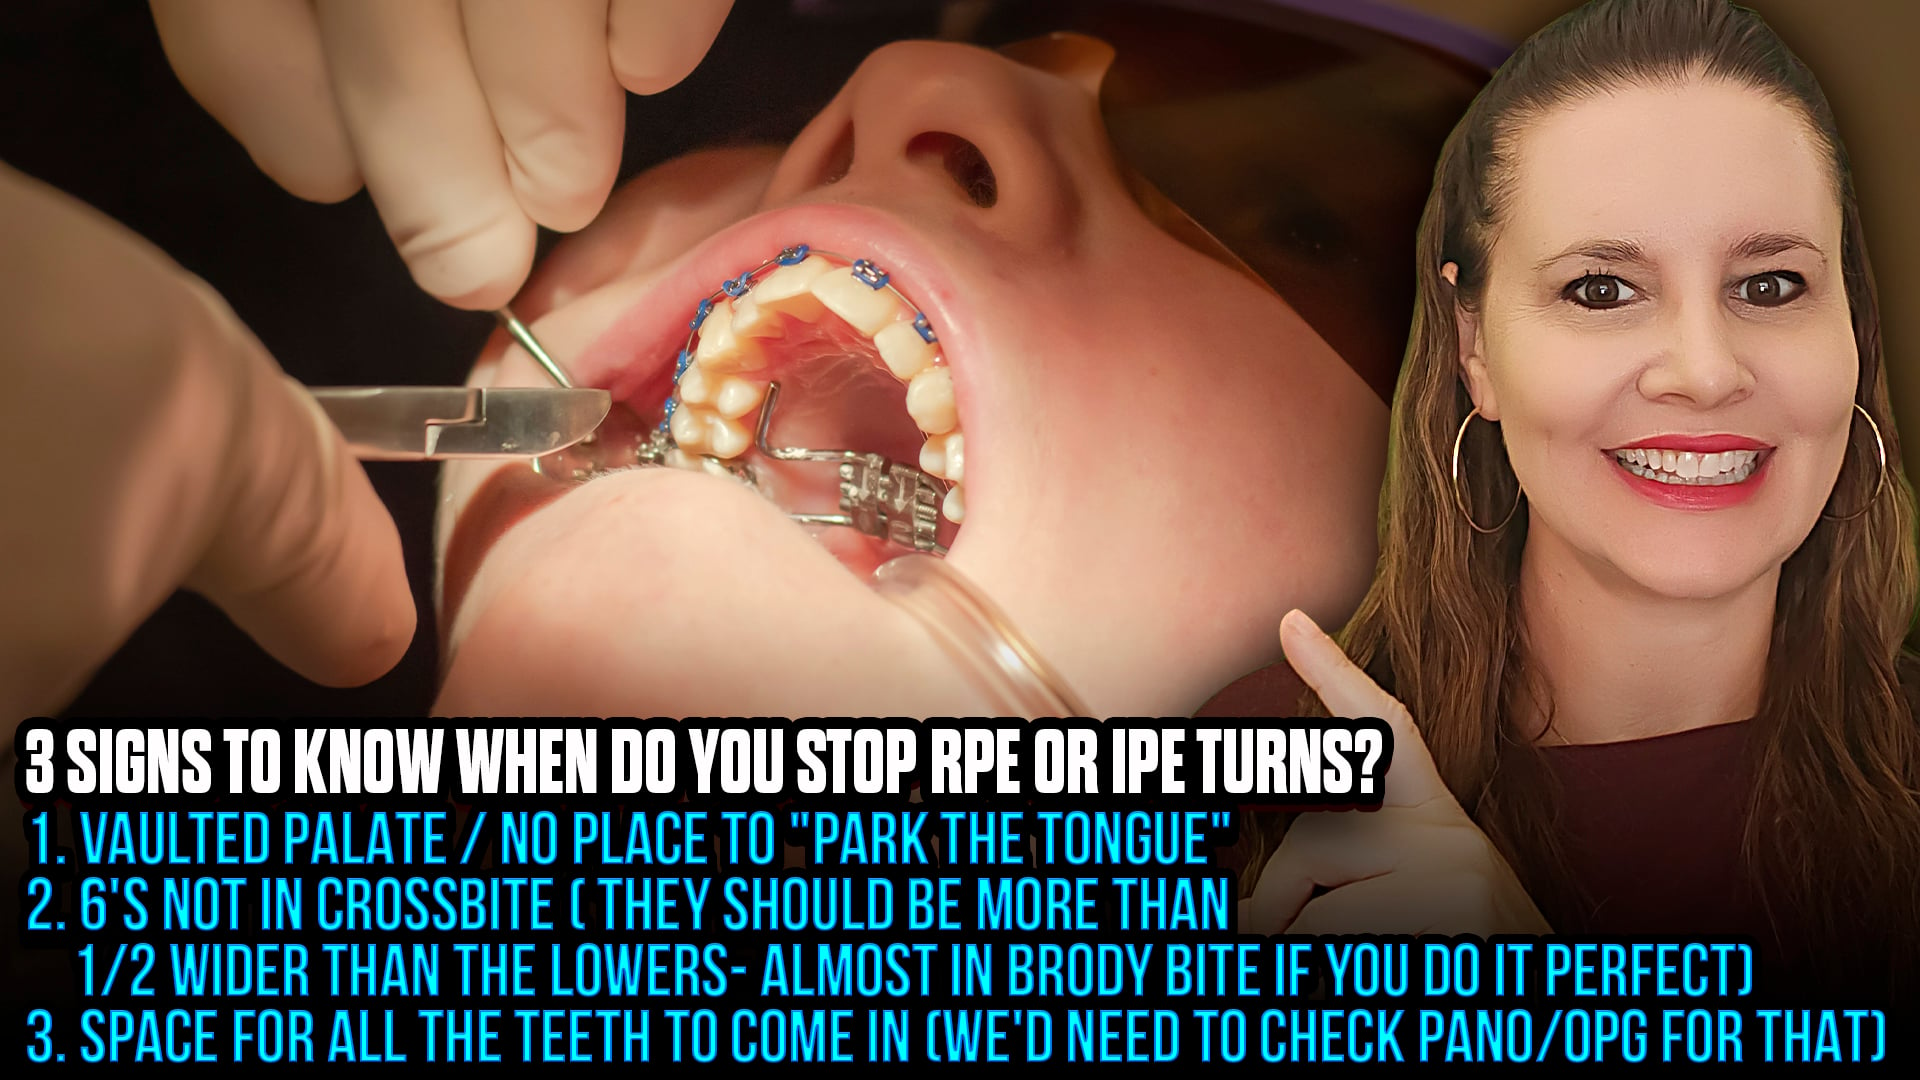
3 Reasons to STOP RPE, RME, Hyrax, or Invisalign IPE Turns (Expansion)
Introduction
- Dr. Amanda explains how to determine the right time to stop expansion using RPE, RME, Hyrax, or Invisalign IPE.
- Many clinicians struggle to know when enough is enough during expansion.
- Expansion goals vary, such as airway improvement, better tongue posture, or creating arch space.
- She emphasizes understanding the original purpose before continuing with more turns.
Reassess the Treatment Goal
- Always start by reviewing why expansion began.
- If the airway is improved, the tongue can now rest on the palate, and the arch width meets the function expansion, which can stop.
- If the tongue is still restricted, consider myofunctional therapy or frenectomy instead of more expansion.
Evaluate Arch Width and Retention Stability
- Ideal alignment: Upper arch ½ tooth wider than the lower.
- Slight overexpansion is acceptable to offset natural relapse.
- Overexpanding is safer than under-expanding; extra space can later be corrected.
- Proper retention (at least 3 months full-time) is key to maintaining results.
- Poor compliance with removable retainers leads to relapse.
Confirm Space for Developing Teeth
- In mixed dentition, use panoramic x-rays to ensure enough room for eruption.
- Teeth should be upright with clear eruption paths.
- Rapid expansion needs longer retention than slow, gradual turns.
Conclusion
- Stop expansion once the chief complaint is resolved, arches are proportionate, and eruption space is confirmed.
- Avoid unnecessary turns; stability matters more than extra widening.
- Proper retention and observation will preserve the final result.

How to Know if a Canine or Tooth is Ankylosed Before Taking the Case (Dr. Amanda – Straight Smile Solutions)
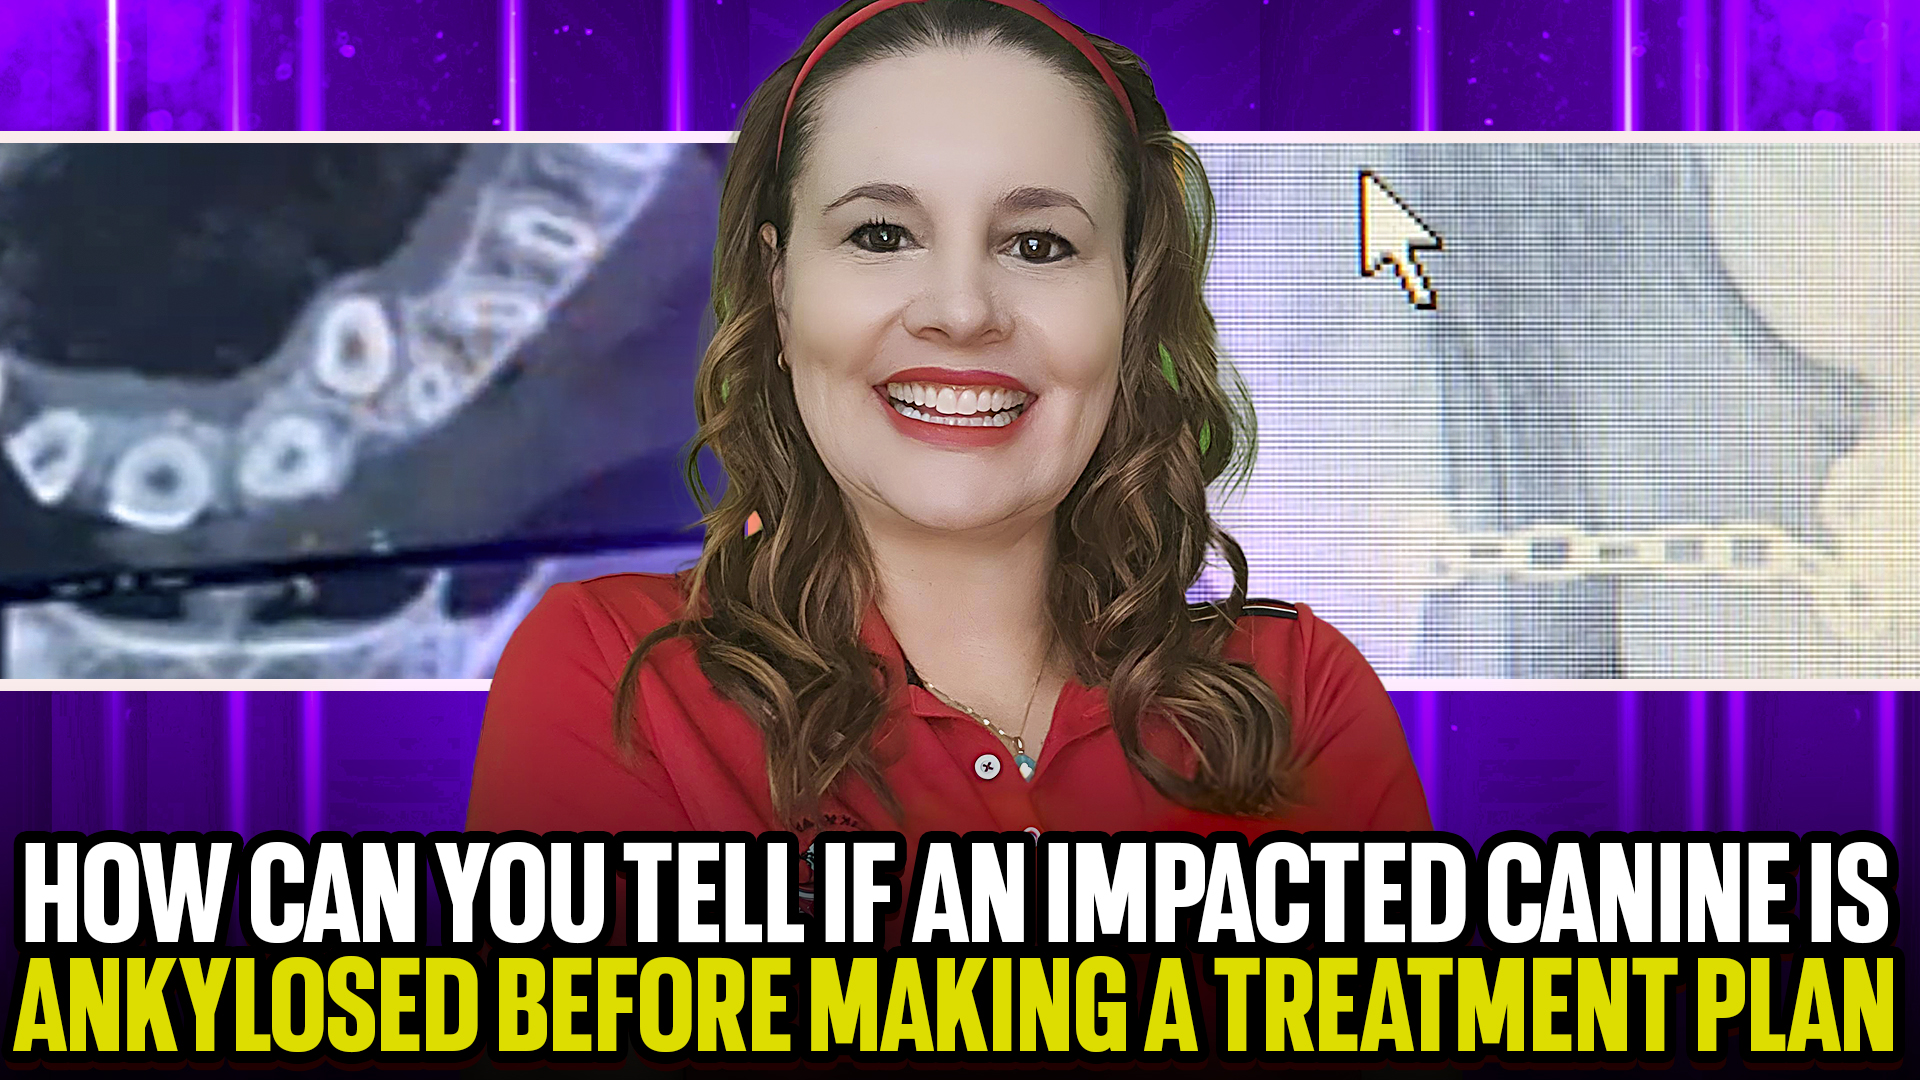
Introduction
- Amanda addresses the challenge of identifying ankylosed or impacted canines before orthodontic treatment.
- Clarifies that Straight Smile Solutions doesn’t handle surgical cases but provides educational support.
- Emphasizes that recognizing ankylosis early prevents financial, ethical, and clinical issues for providers.
Ankylosis Definition & Causes
- Ankylosis = the root surface fuses to bone, losing periodontal ligament (PDL) flexibility.
- The tooth becomes “glued” in place, behaving like an implant.
- Often caused by trauma, abnormal root structure, or developmental issues.
Commonly Affected Teeth
- Most often: canines, premolars, and sometimes upper incisors.
- Rare in growing children but more likely in adults (20s–30s).
Diagnosis Tools & Methods
- CBCT (3D imaging): Best for full root visualization in 360°.
- 2D PA X-rays: Limited view; consider taking angled shifts for more perspective.
- True confirmation often comes only when traction is applied and the tooth fails to move.
Clinical Red Flags & Risk Factors
- Stalled tooth movement despite traction.
- Root resorption (external or internal).
- History of trauma, palatal crown position, tapered or oddly angled root.
- Mature, non-growing root apex (no apexogenesis).
Patient Communication & Documentation
- Always disclose ankylosis risk in informed consent forms.
- Get written acknowledgment if risk factors exist.
- Be realistic—prepare patients for the possibility that a tooth might not move.
Conclusion
- Ankylosis can’t always be predicted, but CBCT improves detection chances.
- Be cautious, particularly with adult or complex cases—if ankylosis occurs, the provider may bear financial responsibility.
- Amanda advises erring on the side of caution, managing expectations, and avoiding risky adult ankylosed cases when possible.
Gen X and Boomer Dentists — Is Culture or Neurodivergence Killing Your Happiness in the Office?
 Gen X and Boomer Dentists — Is Culture or Neurodivergence Killing Your Happiness in the Office?
Introduction
• Dr. Amanda opens by addressing a growing issue among Gen X and Boomer dentists: a deep sense of unhappiness and burnout within their practices.
• She observes this daily through online dental forums, Facebook groups, and professional communities where doctors vent frustration about their teams, patients, and careers.
• Dentistry has shifted culturally, with fewer conventions, more isolation, and less real collaboration.
• Dr. Amanda believes the problem runs deeper: it’s not just business stress, it’s about mismatched culture and unrecognized neurodivergence within the dental profession.
The Cultural Disconnect
• Many older dentists (Gen X, Boomers) were raised in a “work hard, keep quiet” mindset, but younger generations (Millennials, Gen Z, Alphas) crave collaboration, feedback, and shared decision-making.
• Today’s staff want culture, not just a paycheck. They want to contribute to office dynamics, incentive systems, and overall mission.
• When older doctors ignore this, toxicity grows. Offices lose good employees because the culture doesn’t match modern expectations.
• Dr. Amanda warns: you can’t fight culture, it’s evolving, and ignoring it will destroy your practice faster than you realize.
Personality and Team Fit
• Understanding personality types is crucial. Dr. Amanda recommends tools like the Enneagram to assess how team members communicate and collaborate.
• When each staff member works in alignment with their strengths, productivity and morale improve.
• She urges dentists to invest in culture-building, even if it feels “too millennial,” because happy teams create thriving practices.
Neurodivergence Awareness
• Dr. Amanda candidly shares her own journey, discovering she’s neurodivergent, her brain processes faster and differently than others.
• Many Gen X and Boomer professionals may also be undiagnosed, having learned to mask and adapt since childhood.
• This long-term masking often manifests as irritability, burnout, or unhappiness at work.
• Recognizing and understanding neurodivergence can dramatically improve self-awareness and relationships within dental teams.
Conclusion
• The unhappiness many older dentists feel isn’t purely from stress; it’s a mix of cultural mismatch and unacknowledged neurodivergence.
• To restore joy in practice:
o Acknowledge the changing workplace culture.
o Invest in personality and communication training.
o Learn about neurodiversity and support differences rather than resist them.
• Dr. Amanda’s takeaway: modern success in dentistry isn’t just clinical, it’s cultural and emotional. Understanding yourself and your team may be the real cure for burnout.
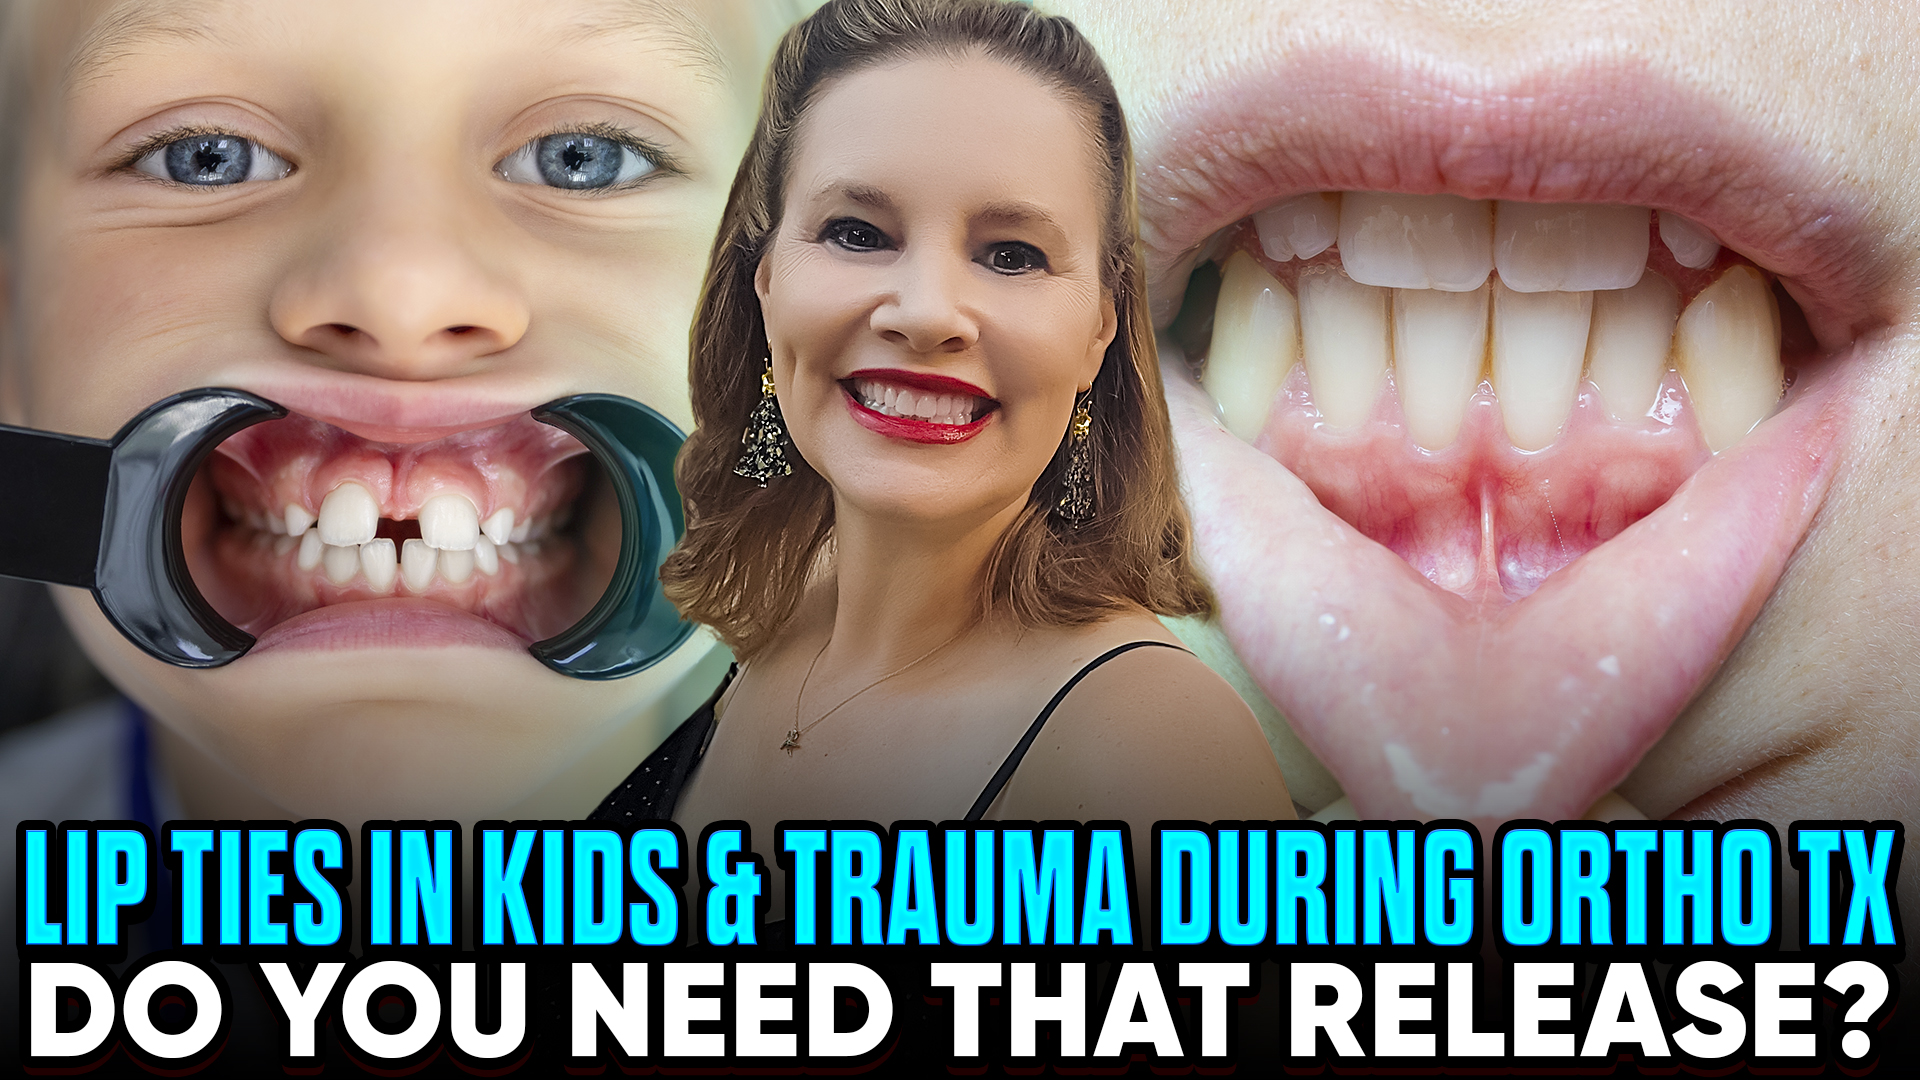
Tongue and Lip Ties in Kids and Adults: When to Trim the Frenum (Frenectomy)
Tongue and Lip Ties in Kids and Adults: When to Trim the Frenum (Frenectomy)
Dr. Amanda with Straight Smile Solutions
- Focus: tongue and lip ties in children and adults.
- Builds on prior content about maxillary labial frenectomies (timing with braces/Invisalign/Phase 1).
- Offers an orthodontist’s perspective on when trimming is necessary vs. avoidable.
Why/When Frenectomy is Indicated
- Upper lip ties:
- If a gap (diastema) between teeth exists, pulling the lip shows blanching and a visible tissue tag.
- Must close the space first with orthodontics before trimming → prevents scar tissue from blocking closure.
- Procedure timed after Phase 1, Phase 2, or comprehensive treatment and retention.
- Lower ties:
- Usually less of a concern unless affecting orthodontic closure/retention.
- Signs to trim:
- Space reopens quickly (within 12 hours) after removing the power chain/aligners.
- Persistent relapses despite retention.
- Requires bonded (permanent) retainer after trimming.
Testing Before Deciding on Surgery
- With braces:
- Remove power chain near the end of treatment → monitor if spaces pop open.
- If reopening occurs → frenectomy + bonded retainer.
- If not → surgery is often unnecessary.
- With Invisalign/aligners:
- “Day off” test → patient skips aligner wear during the day (under orthodontist’s supervision).
- If spacing reappears, → frenectomy may be indicated.
- Orthodontist verifies results in person, not just the patient’s word.
Clinical Decision Making
- Avoid trimming too early (can complicate closure).
- Base decision on relapse behavior rather than routine trimming.
- Collaboration with an OMT (orofacial myofunctional therapist) may guide lower tie management.
Key Takeaway
- Frenectomy should be timed strategically after space closure and retention testing.
- Not every tie requires trimming; only pursue it when relapse or spacing proves persistent.