StraightSmile Solutions®
“Old School” Ways to Localize Pathology without a CBCT
There are plenty of reasons why your office may not have a CBCT, whether it is because you don’t have the space or don’t want to have the responsibility that comes with taking them. Even though it can be nice to have a CBCT, we always recommend that you outsource their reading to more experienced sources for pathology.
But there are also ways in which you can localize pathology without doing a CBCT by just using regular old X-rays. In this article, we’ll discuss the “old school” way to localize pathology without using a CBCT.
“Old School” Ways to Localize Pathology without a CBCT
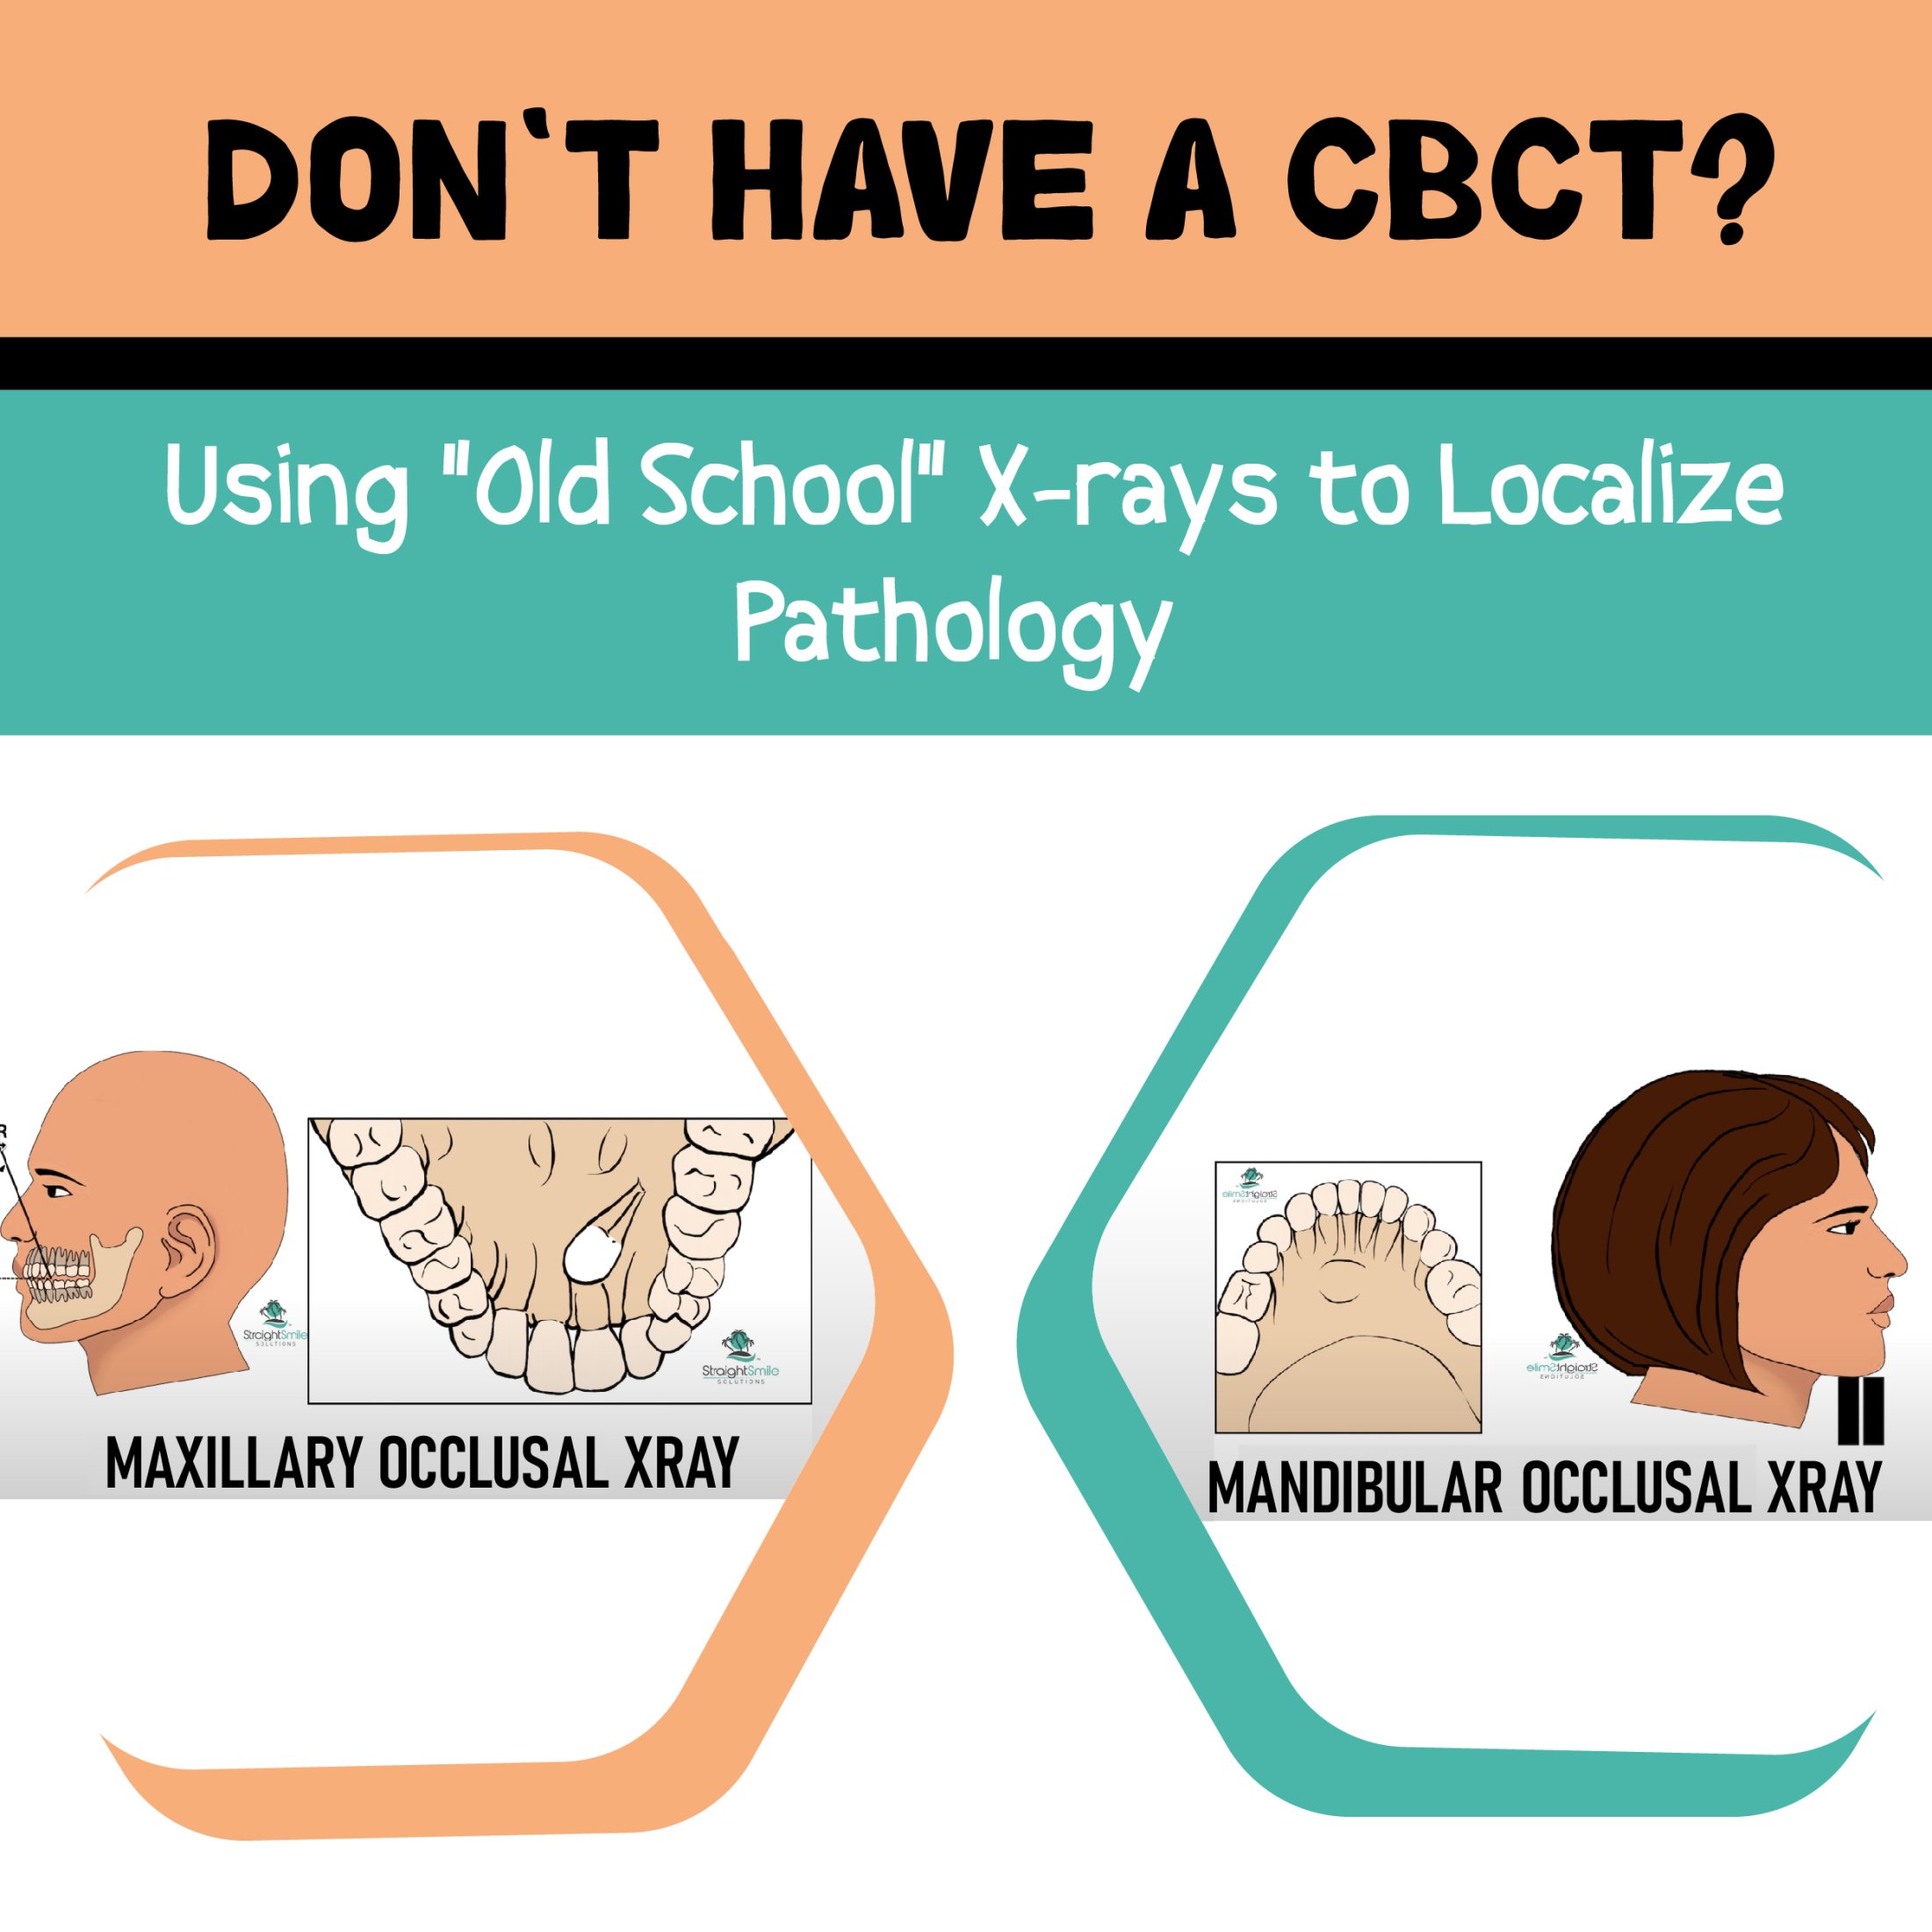
To localize pathology without a CBCT, you need to use a certain type of dental X-ray. You need to do an occlusal X-ray, which captures the roof or floor of the mouth. This is the way that pathology was done before the creation of CBCT, and these views will show you the tooth placement and development of both the roof and floor of the mouth.
To perform these, you will take the X-ray at a 60-degree angle over the nose for the maxillary occlusal X-ray. The X-ray will view through the nose and into the top of the mouth. Then, for the mandibular, you take the X-ray vertically into the chin. The mandibular X-ray is not taken at a 60-degree angle but rather parallel with the angle of the face. You can also perform some PAs with a shift to get a complete picture of the mouth for pathology.
Some people have issues with their digital X-ray machines because they don’t sense the occlusal size, but doctors have also told us they are able to use a size 2 and successfully complete these X-rays with a digital X-ray machine.
If these X-rays don’t give you the information that you need, you should consider referring the patient out for a CBCT and get the CBCT professionally read to avoid any liability.
What Makes Circumferential Hawleys So Great?
What Makes Circumferential Hawleys So Great?
When it comes to orthodontics, ensuring you’ve got the most effective treatment plans in place is hugely important – and dentist consultants need to understand the different solutions that might help. Fortunately, we’ve outlined some of the key things you should know about circumferential hawleys as follows to help you decide if they’re the right options for your cases.
A Classic, Professional Orthodontics Solution
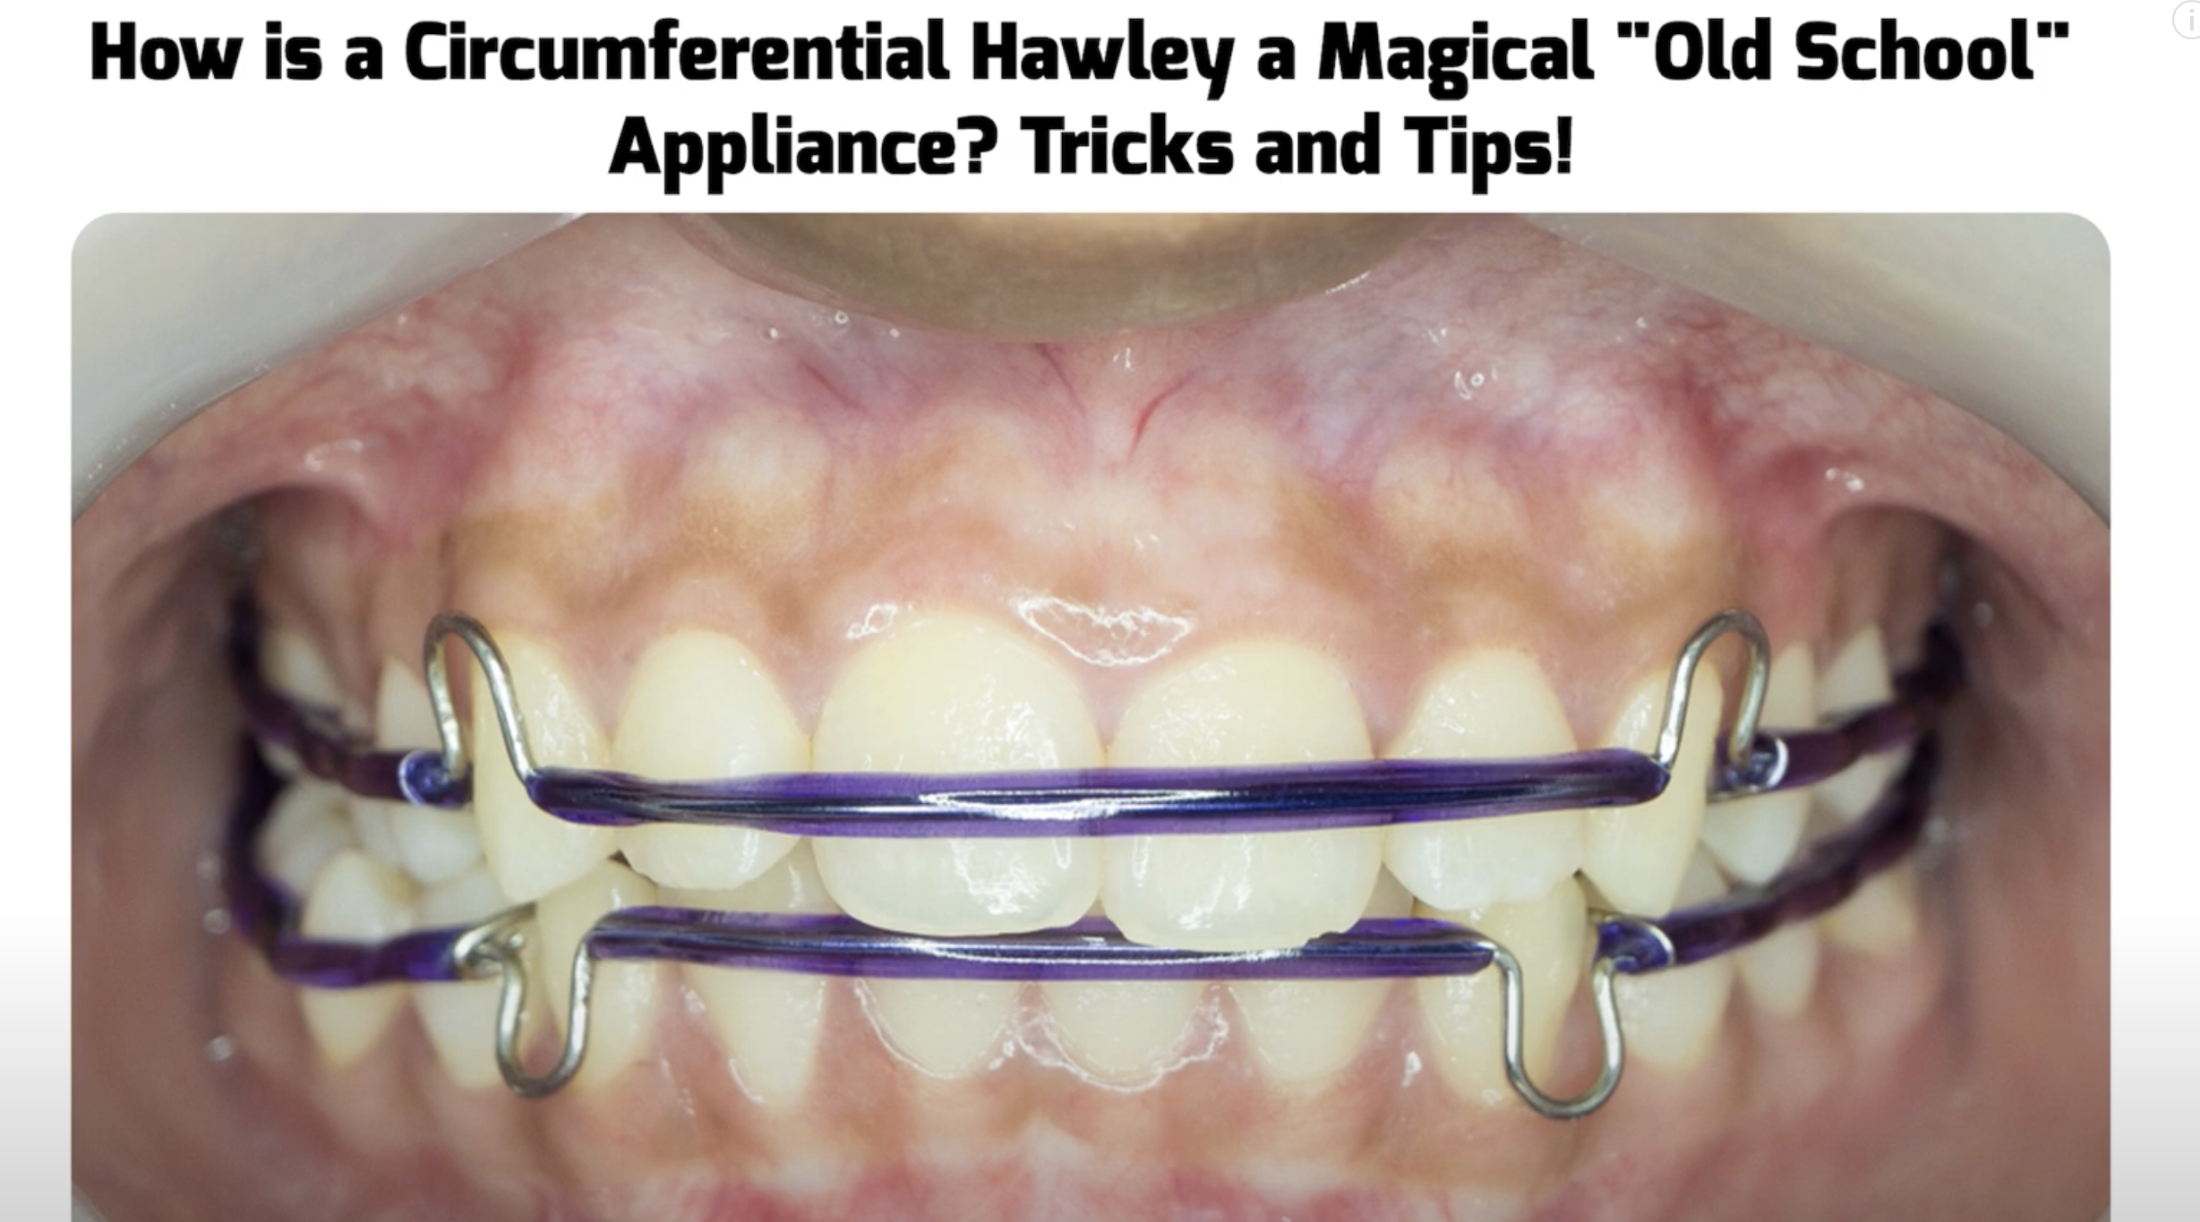
Let’s face it – in terms of orthodontics, circumferential hawleys have largely fallen out of fashion recently. However, as dentist consultants, it’s important to keep in mind that circumferential hawleys are a hugely versatile option.
Circumferential hawleys are designed to help with cases where a very small gap needs to be closed. These days, they come in a wide variety of colors, not just the traditionally bright and obtrusive options that many people are used to; as such, clear and metal designs are popular.
In many cases, circumferential hawleys are effective in cases where a very small gap appears after removing the patient’s aligners, and you need a way to prevent these from opening again (provided you have the authorization to do so from the patient, of course). In such cases, using circumferential hawleys can help prevent gaps from opening without having to invest in additional aligners.
Invisalign with CBCT and Palatal Fenestration: How Accurate is the AI?
Invisalign with CBCT and Palatal Fenestration: How Accurate is the AI?
Orthodontic treatments have been revolutionized in recent years by combining advanced technology and artificial intelligence (AI). One such advancement is the integration of Cone Beam Computed Tomography (CBCT) imaging and palatal fenestration in the Invisalign treatment process. This innovative approach aims to enhance the accuracy and effectiveness of aligner therapy. However, the question arises: How accurate is the AI in this context?
CBCT imaging provides detailed three-dimensional images of the patient’s teeth and jaws, allowing orthodontists to diagnose dental issues and plan treatment accurately. By incorporating CBCT scans into the Invisalign process, the AI algorithms can create a highly accurate digital model of the patient’s teeth and design custom aligners tailored to their unique needs. This technology lets orthodontists visualize the teeth from every angle, ensuring precise tooth movement predictions.
Palatal fenestration, however, involves creating a small window-like opening in the patient’s palate to gain direct access to the teeth roots. This technique allows orthodontists to place attachments precisely on the tooth surface, facilitating more accurate aligner placement. By integrating palatal fenestration with AI algorithms, Invisalign aligners can apply the necessary forces to move teeth efficiently and achieve desired outcomes.
While combining CBCT and palatal fenestration with AI in Invisalign treatment holds great promise, it is important to understand the limitations. The accuracy of AI is dependent on the quality of the input data, including the CBCT scans and the information provided by the orthodontist. Additionally, treatment success relies on the patient’s compliance with wearing the aligners as prescribed.
Wrapping Up
CBCT feature provides valuable information an experienced Invisalign practitioner can assess based on anatomy, gingiva, patient age, and para charting. CBCT helps prevent pushing teeth too far forward or outward, avoiding damage to the teeth, roots, and bone. Depend on experience and periodic checks during treatment rather than solely on ClinCheck. Overall, Invisalign with CBCT and palatal fenestration, coupled with AI technology, represents a significant advancement in orthodontic treatment. The precision and accuracy offered by this combination can greatly improve the outcomes of aligner therapy. However, it is essential to recognize that AI is a tool that works in collaboration with orthodontists, and their expertise remains crucial for successful treatment. By harnessing the power of AI while valuing the experience of skilled professionals, you can achieve more accurate and effective orthodontic results for patients.

Outlining Comprehensive Benefits and Drawbacks for Compromised Treatment Plan Cases
As an orthodontic consultant, making sure you’ve come up with the most effective treatment plan that matches your patients’ expectations is hugely important. This is something that we here at Straight Smile Solutions LLC understand better than most – and so we’ve summarized some of the key things you should stress about comprehensive treatment plans (and why it’s so crucial to make sure compromised cases know what perfect is – and how they’ll miss out).
Why You Should Always Let Patients Know What a Fully Comprehensive Treatment Plan Looks Like
Not every patient will necessarily want a service that’s “perfect.” After all, a completely comprehensive plan will often cost more, and if a patient is happy with a less-than-perfect solution, why would they want to pay more?
With that being said, it’s vital to remember that, as an orthodontic consultant, you should always highlight what the perfect result could look like. Even if the patient is adamant they don’t want this, covering your chosen treatment plan’s risks, benefits, and alternatives is crucial to ensure the patient is well informed – even if you can’t provide the alternative.
Of course, as an orthodontic consultant, it’s worth getting training on all different types of procedures – even if you don’t intend to offer this service. However, knowing about the different options can help you know when you’re providing a suitable service, and if you’re not quite sure you can do the job right, you may want to send the patient to another specialist instead.
Always Outline the Final Results/Risks with Compromised, Non-Comprehensive Cases
Make sure to clarify what will improve and whether there are any features that don’t improve – or could even get worse – by doing a non-comprehensive case. This allows the patient to make an informed decision, knowing that settling for a compromised treatment plan could cause complications or give a result they weren’t quite anticipating. Things can be especially risky if you’re dealing with a Class 3 case, or the like.
Failing this, you could end up with dissatisfied patients who need a lot of revisions or whose cases eventually cost a lot more than you originally charged. Don’t get caught out!
Don’t Settle for Compromised Cases Without Outlining the Pros and Cons of Comprehensive First
If you have any further questions about comprehensive treatment plans and their benefits or how to explain the potential that perfect solutions can offer, please don’t hesitate to contact our experts at Straight Smile Solutions LLC today. We understand how important it is to clarify the features of a perfect treatment, after all – and we’ll help you develop the ideal case and treatment plan for your own patients.
The Biggest Bracket Placement Mistakes Preventing GPs From Finishing Cases

Have you ever wondered whether you’re making common mistakes in your dentist consultations? In many cases, determining the optimal treatment plan for your patients can seem tricky since there’s a lot that you’ll need to consider. However, getting bracket placement right shouldn’t be an impossible task, which is why our experts are on hand to help you develop the most effective treatment plans overall.
The Biggest Bracket Placement Mistakes Stopping You From Finishing Cases
If you’ve been struggling with finishing cases, looking at your approach to treatment planning could help – and as part of this, it’s crucial to check whether you’ve been fitting brackets properly for your patients.
Indeed, the bracket should always sit flush with the tooth, and even excess glue should always be removed to ensure the final finish is as smooth as possible. In turn, this can help minimize the number of issues arising with cases while simultaneously helping give your patients the best possible results from their orthodontic treatment.
Final Thoughts
Finishing cases can undoubtedly be tough, especially when you’re new to orthodontics or your treatment planning approach isn’t quite right. Still, ensuring you’re avoiding some of the most common mistakes is a simple way to optimize your own cases. Why leave itto chance?
What You Should Know About Treatment Plans for Shovel-Shaped Teeth
What You Should Know About Treatment Plans for Shovel-Shaped Teeth
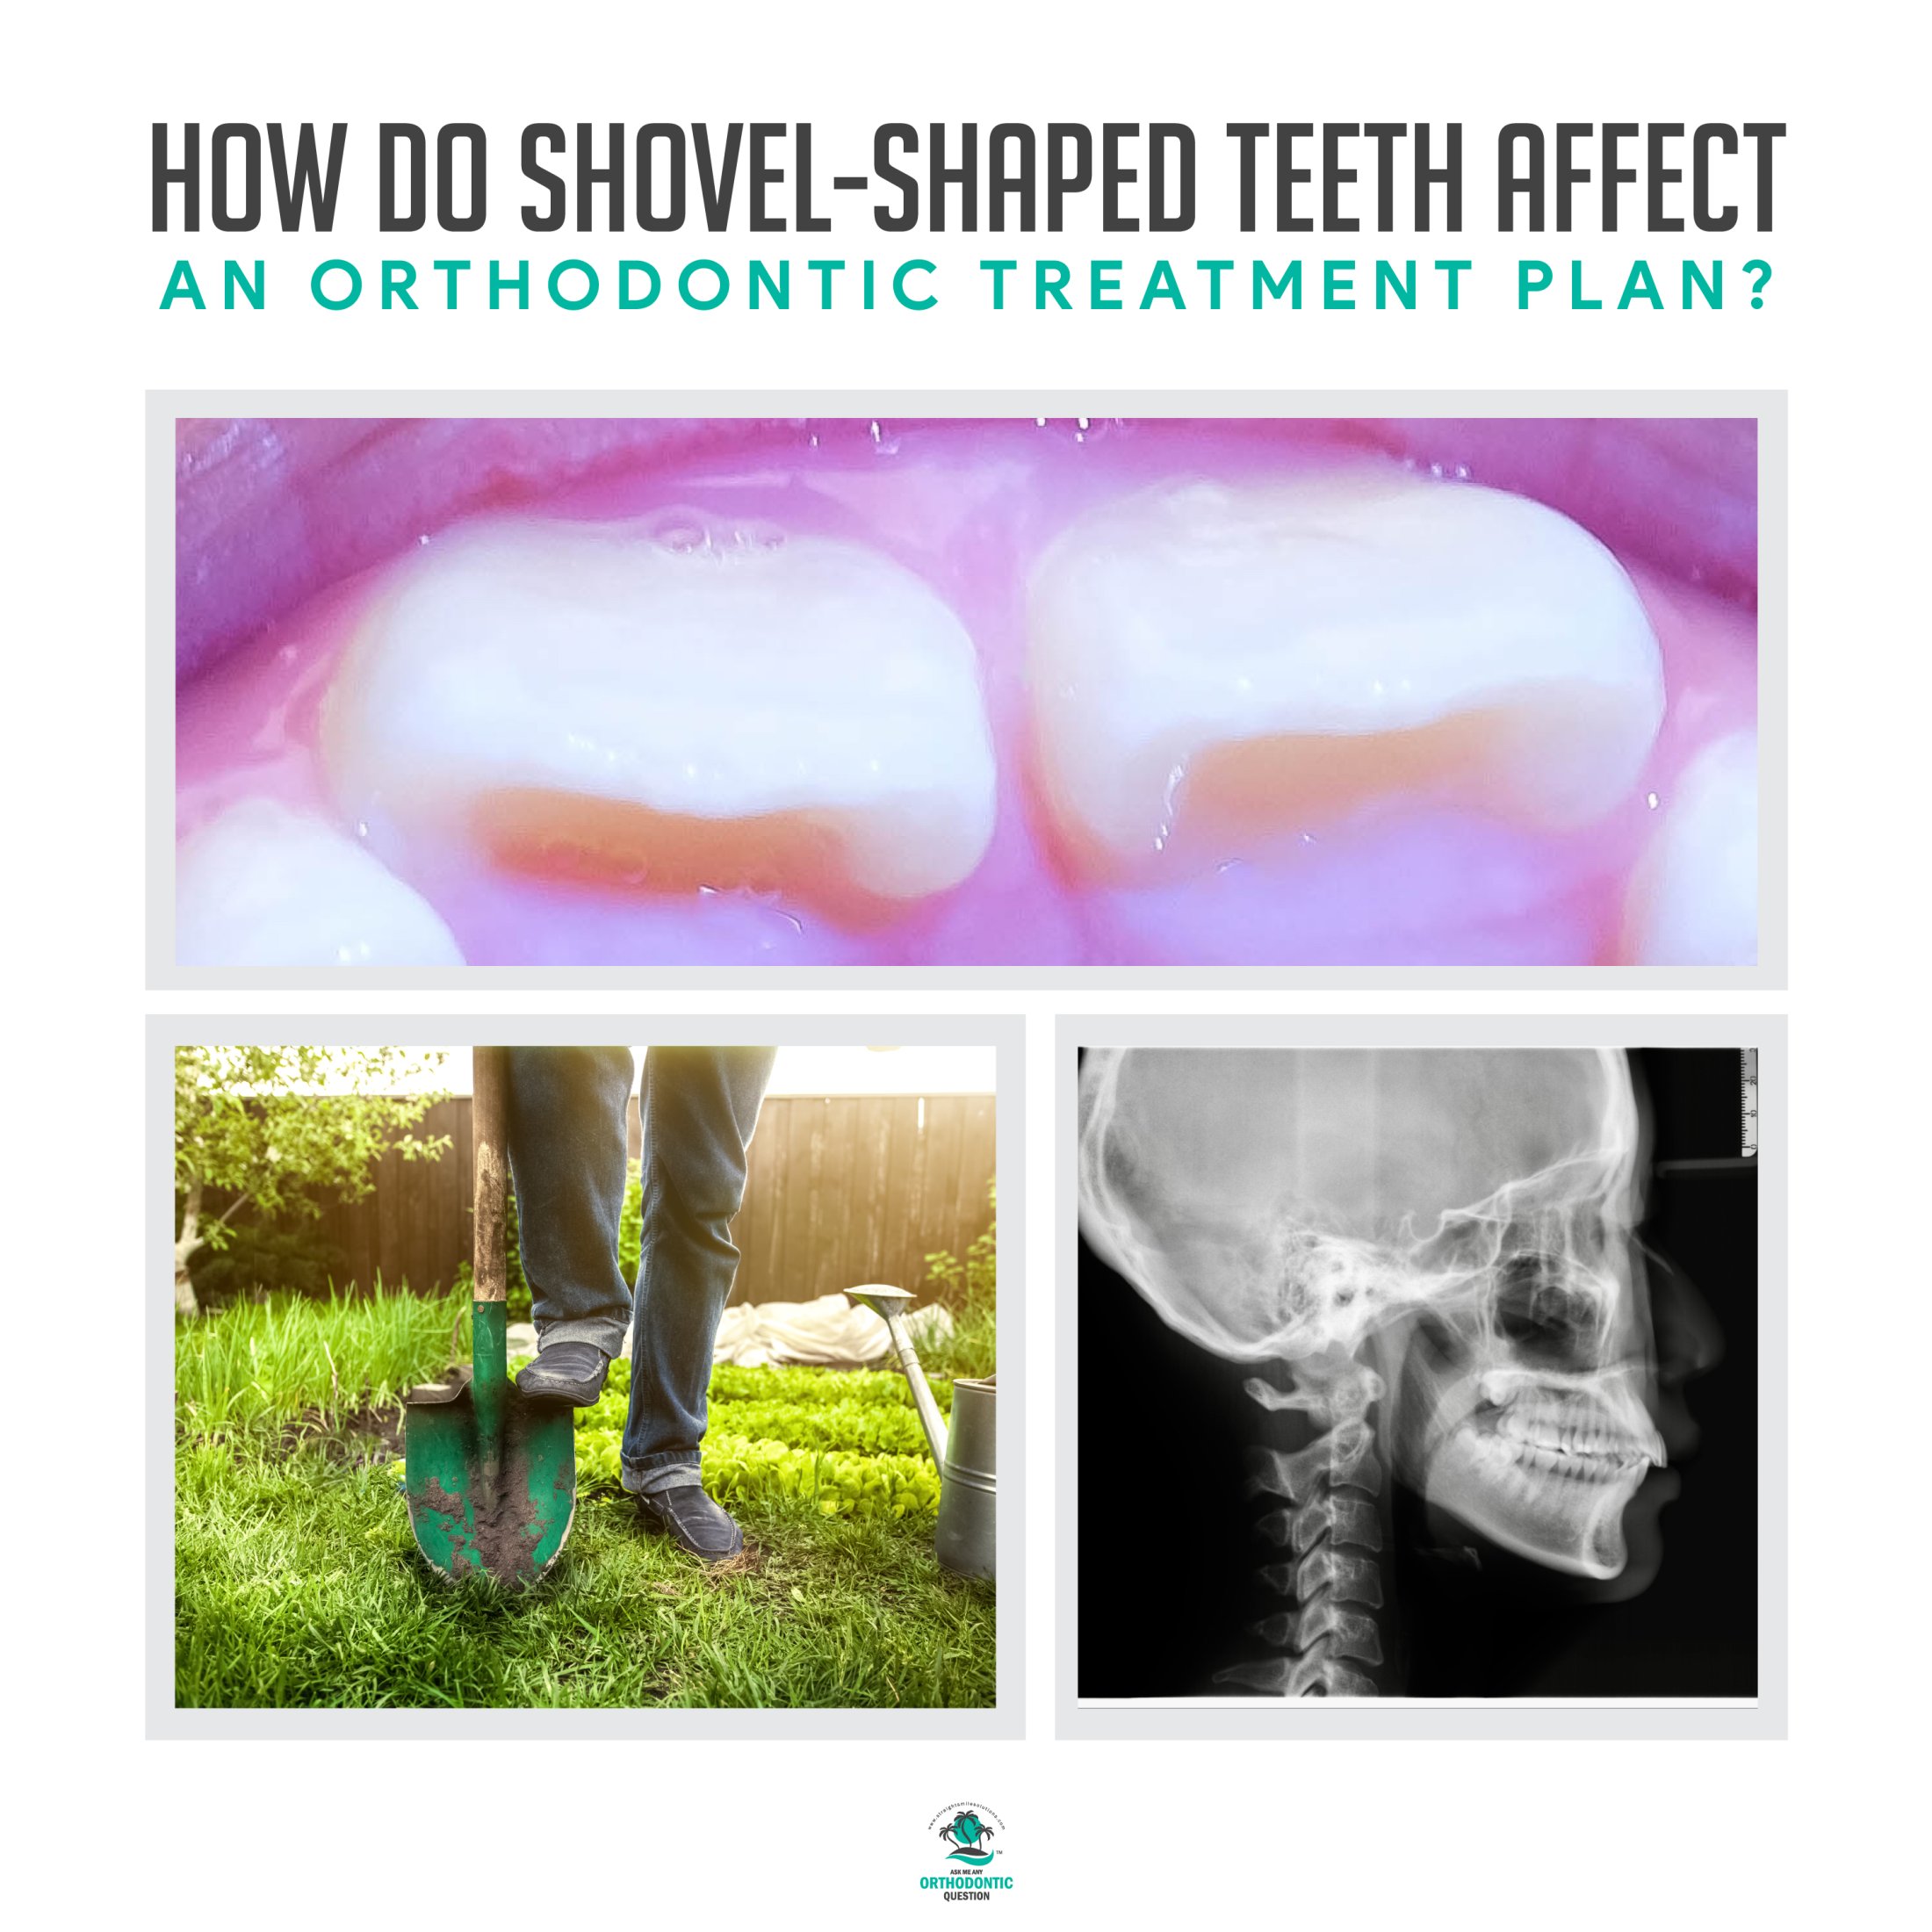
Have you experienced a patient who has a shovel-shaped tooth? It’s not impossible to come across cases where the tooth features lingual marginal ridges, resulting in a shape similar to shovels. But how do you formulate a treatment plan for these patients, and do you need to take any particular steps to treat a shovel-shaped tooth?
How Should a Treatment Plan Look for Shovel-Shaped Teeth?
If you’re developing a treatment plan for shovel-shaped teeth, it’s important to consider how these could impact your orthodontics approach. Notably, in the majority of cases, shovel-shaped teeth won’t need a vastly different treatment plan than regular teeth, so this is well worth keeping in mind as part of your decision.
However, it is worth considering that shovel-shaped teeth may have a small impact on overjet cases. Indeed, there will likely be some more overjet (by several mm) around the shovel-shaped teeth than the others.
Failing this, if the patient isn’t satisfied with the results you can offer, you may want to consider mentioning crowns to see if that might be of interest to them.
Don’t Promise the Impossible
Generally speaking, shovel-shaped teeth will have very similar treatment plans to regular teeth. However, when discussing the orthodontics treatment plan with your patient, consider carefully how the tooth’s shape will impact the final results you will be able to deliver. Failing this, you could end up with dissatisfied clients who aren’t happy with the final results of their treatment – especially for overjet cases.
What is Two-Front?

How Do Two-Front Invisalign Aligners Work?
Have you ever heard about the new Invisalign trend, two-front Invisalign? While it’s not a direct Invisalign portfolio addition, the two-front aligner is definitely making waves in the orthodontic field. As such, knowing what two-front Invisalign is, how it works, and the key features could be a major benefit for many people.
First of all, we need to consider what Two-Front is. Two-Front is a non-Invisalign-owned company, although it’s currently unclear whether or not Invisalign has invested in the company. The main goal of Two-Front is simple: to offer an alternative to the DTC industry.
The exact structure of Two-Front isn’t clear currently, but it appears the team is there to help propagate cases. As an out-of-network provider, they don’t take insurance, meaning that payments are made upfront. However, cheques are sent in the post. The team provides orthodontic support to assist with the development of treatment plans, similar to many other Invisalign consulting plans (like our services here at Straight Smile Solutions).
Cases last from six to twelve months, indicating that the brand likely focuses on simple and moderate complexity cases.
Joining Two-Front
One of the plan’s key benefits is that it encourages at least three to four visits as part of Invisalign consulting, rather than a smaller number, to help provide better results. Moreover, the brand aims to provide professional orthodontic support for its dental clients; however, additional guidance regarding how the platform operates may be useful for dentists to inform their decisions further.
Get Further Invisalign Consulting Support Today
If you want to learn more about two-front Invisalign or the different Invisalign consulting opportunities, please don’t hesitate to contact our friendly experts here at Straight Smile Solutions today. We understand how important it is to have the right knowledge when it comes to your own cases, and so we have summarized the main things you need to know to help.
Bimax Protrusive Mechanics
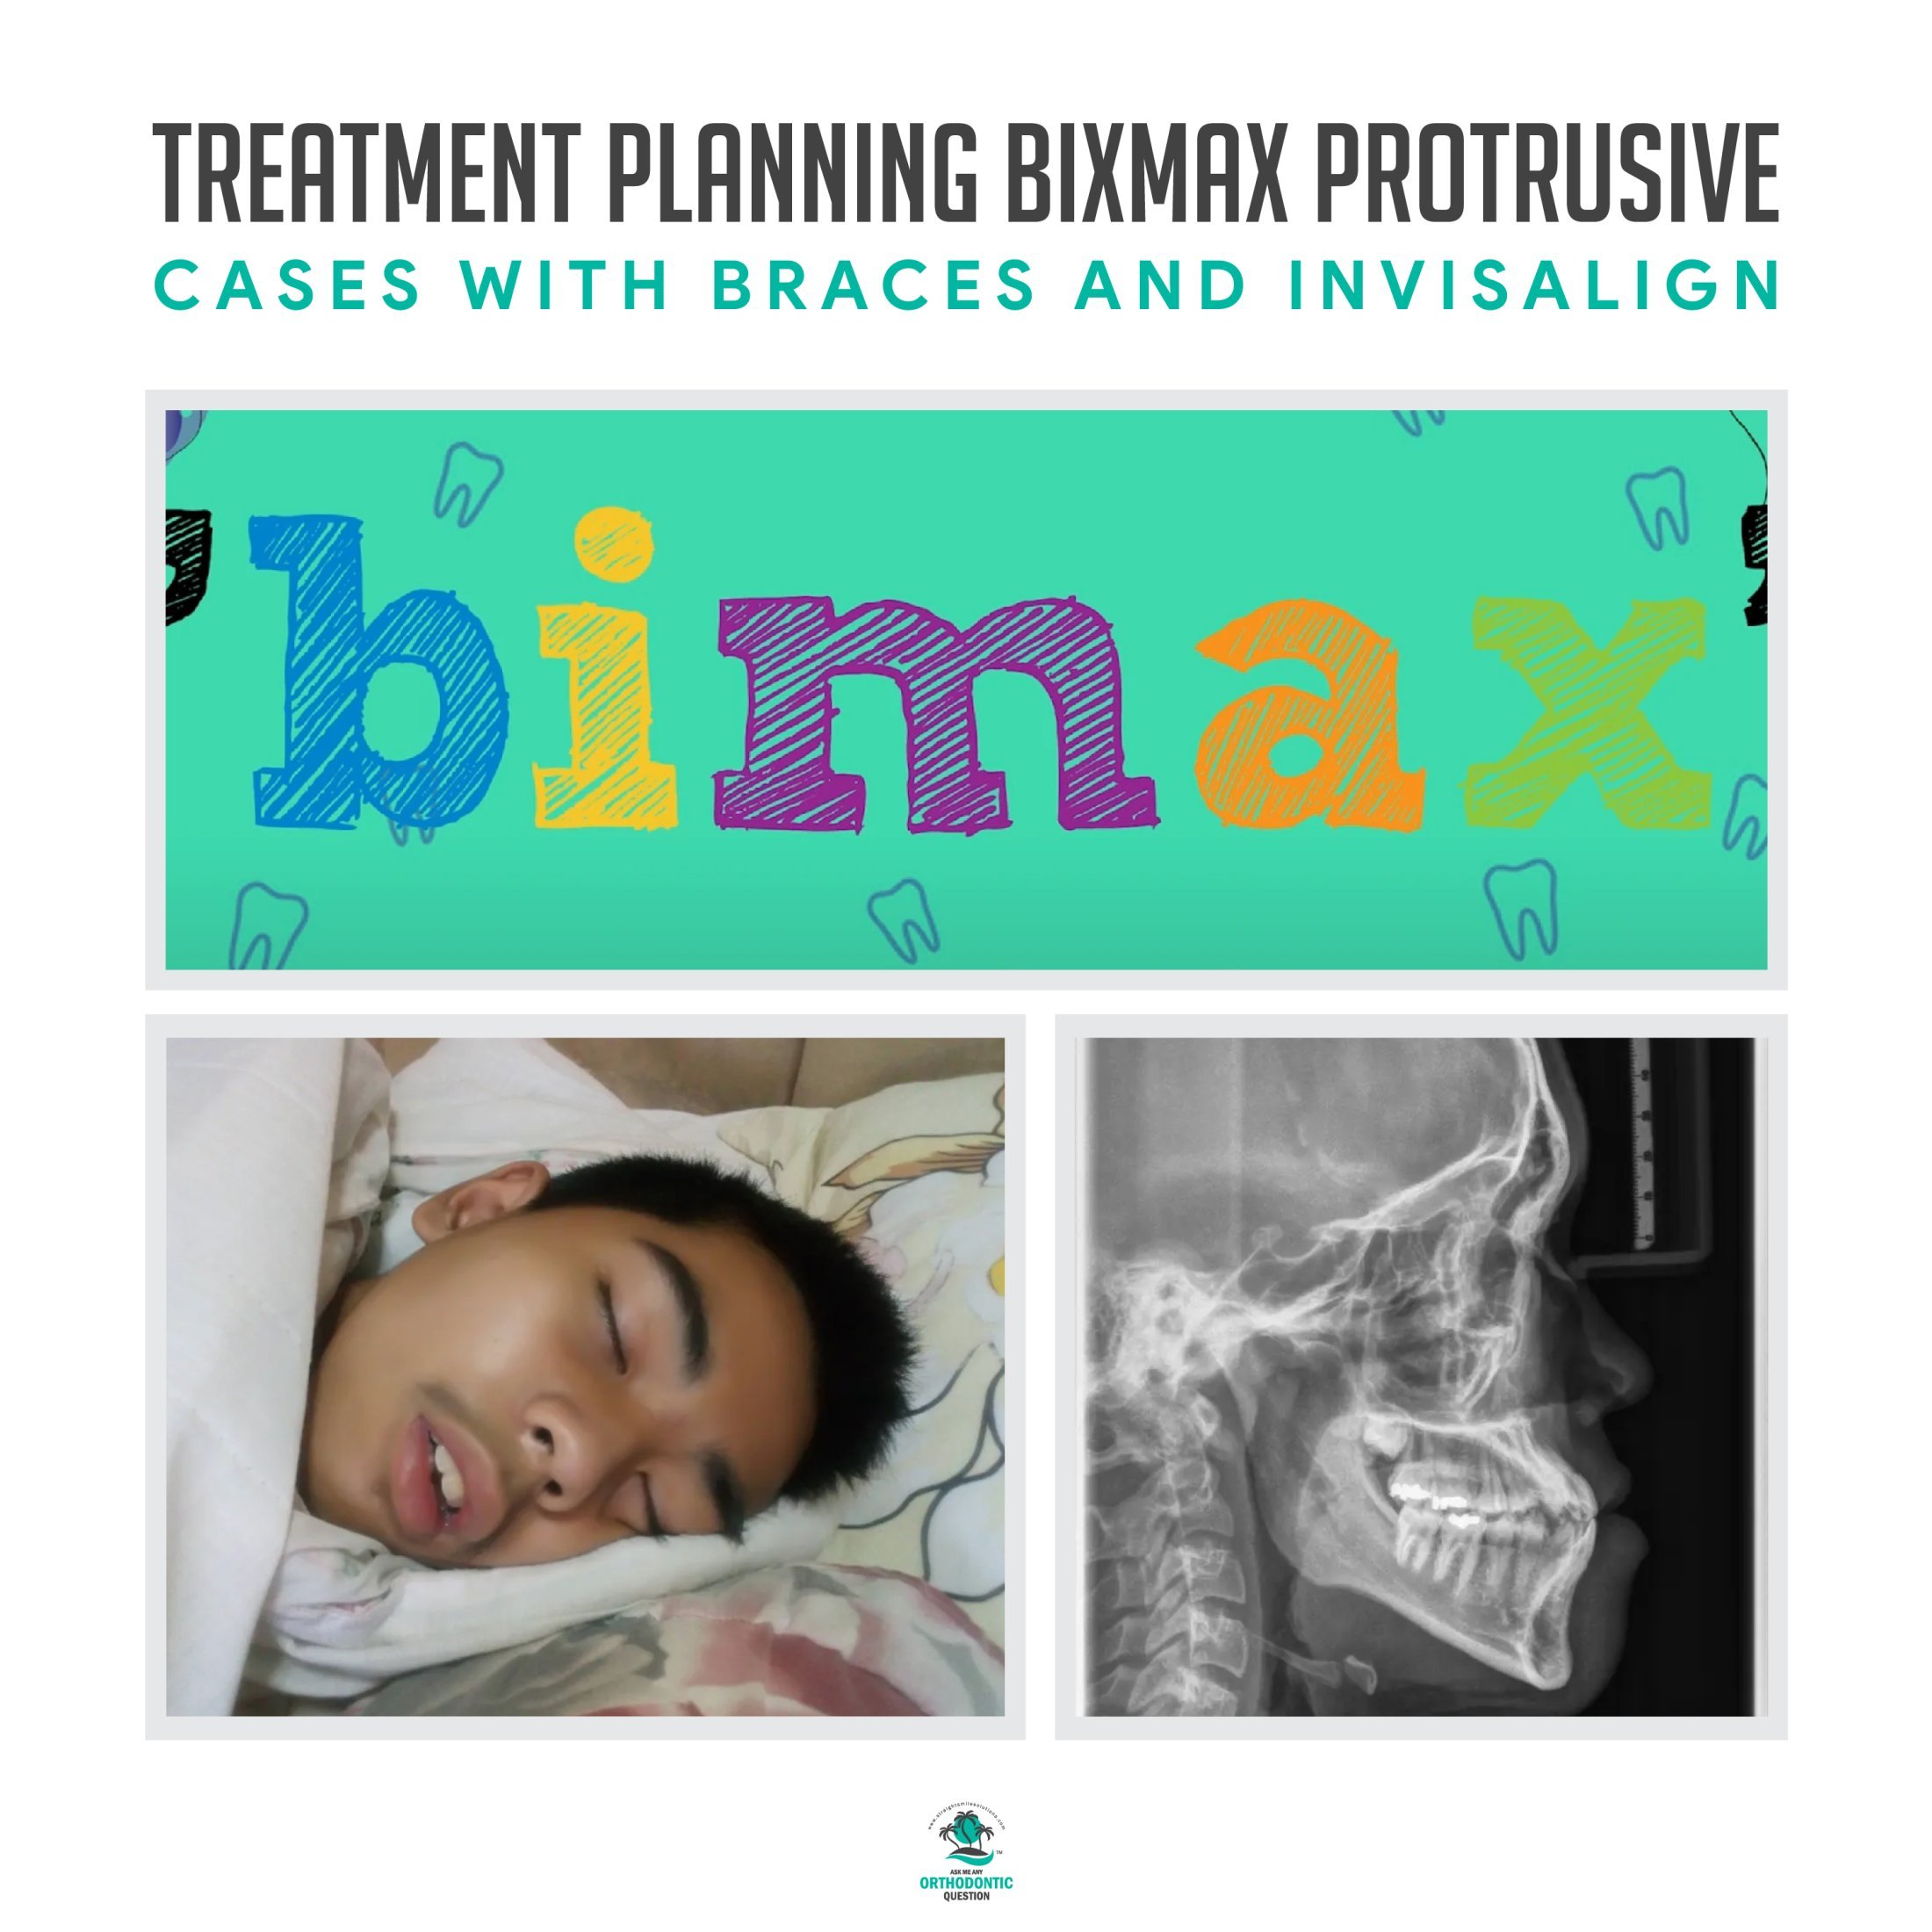 Treatment Planning Mechanics for Bi Max Protrusive Cases in Braces and Invisalign
Careful treatment planning is essential to achieve optimal results in orthodontic treatment for patients with a bimaxillary protrusion. Bimaxillary protrusion refers to the condition where both the upper and lower jaws are positioned forward, causing a prominent appearance of the lips and an increased overjet. This article will discuss the treatment planning mechanics for bimaxillary protrusive cases using traditional braces and Invisalign.
Understanding Bimaxillary Protrusion
The Bimaxillary protrusion can have various causes, including skeletal discrepancies, dental factors, and soft tissue imbalances. Conducting a thorough diagnosis and analysis is crucial to determine the underlying factors contributing to the protrusion.
Traditional Braces for Bimaxillary Protrusion
Archwire Selection
In cases of bimaxillary protrusion, it is common to begin treatment with a rectangular stainless steel archwire. This wire provides better control and allows for torque expression, which is crucial for correcting the protrusive position of the anterior teeth.
Anchorage Control
Anchorage management is vital in bimaxillary protrusion cases, as there is a risk of proclaiming the posterior teeth further during retraction of the anterior teeth. Various techniques can be employed to reinforce anchorage, such as temporary anchorage devices (TADs), intermaxillary elastics, or headgear.
Anterior Teeth Retraction
Mechanisms like sliding mechanics or mini-implants can be used to address the excess protrusion of the anterior teeth. Sliding mechanics involve friction between the brackets and the archwire to retract the anterior teeth gradually. Mini-implants, also known as temporary skeletal anchorage devices, provide stable anchorage for controlled retraction.
Conclusion
The treatment plan for maxillary protrusive cases depends on whether the patient is a child or an adult. In children, the assessment includes lip competency, profile satisfaction, and potential airway problems. If the child is lip incompetent and requires retraction of the maxillary incisors, treatment options may involve clear aligners or braces. Clear aligners should be comprehensive and customizable to allow precise control over tooth movement, while braces may require expanders and mechanics like long ties to retract the posterior teeth before aligning the front teeth. Premolar extractions may be necessary in adults who cannot undergo jaw surgery or sequential distalization. Airway assessment and consideration of sleep-disordered breathing screening and orofacial myofunctional therapy are important in both child and adult cases. Individual patient characteristics and preferences should be considered, and consultation with an orthodontic specialist is advised to determine the most suitable treatment approach for maxillary protrusive cases.
Is Palatal Expansion Possible with Braces and Wires On?
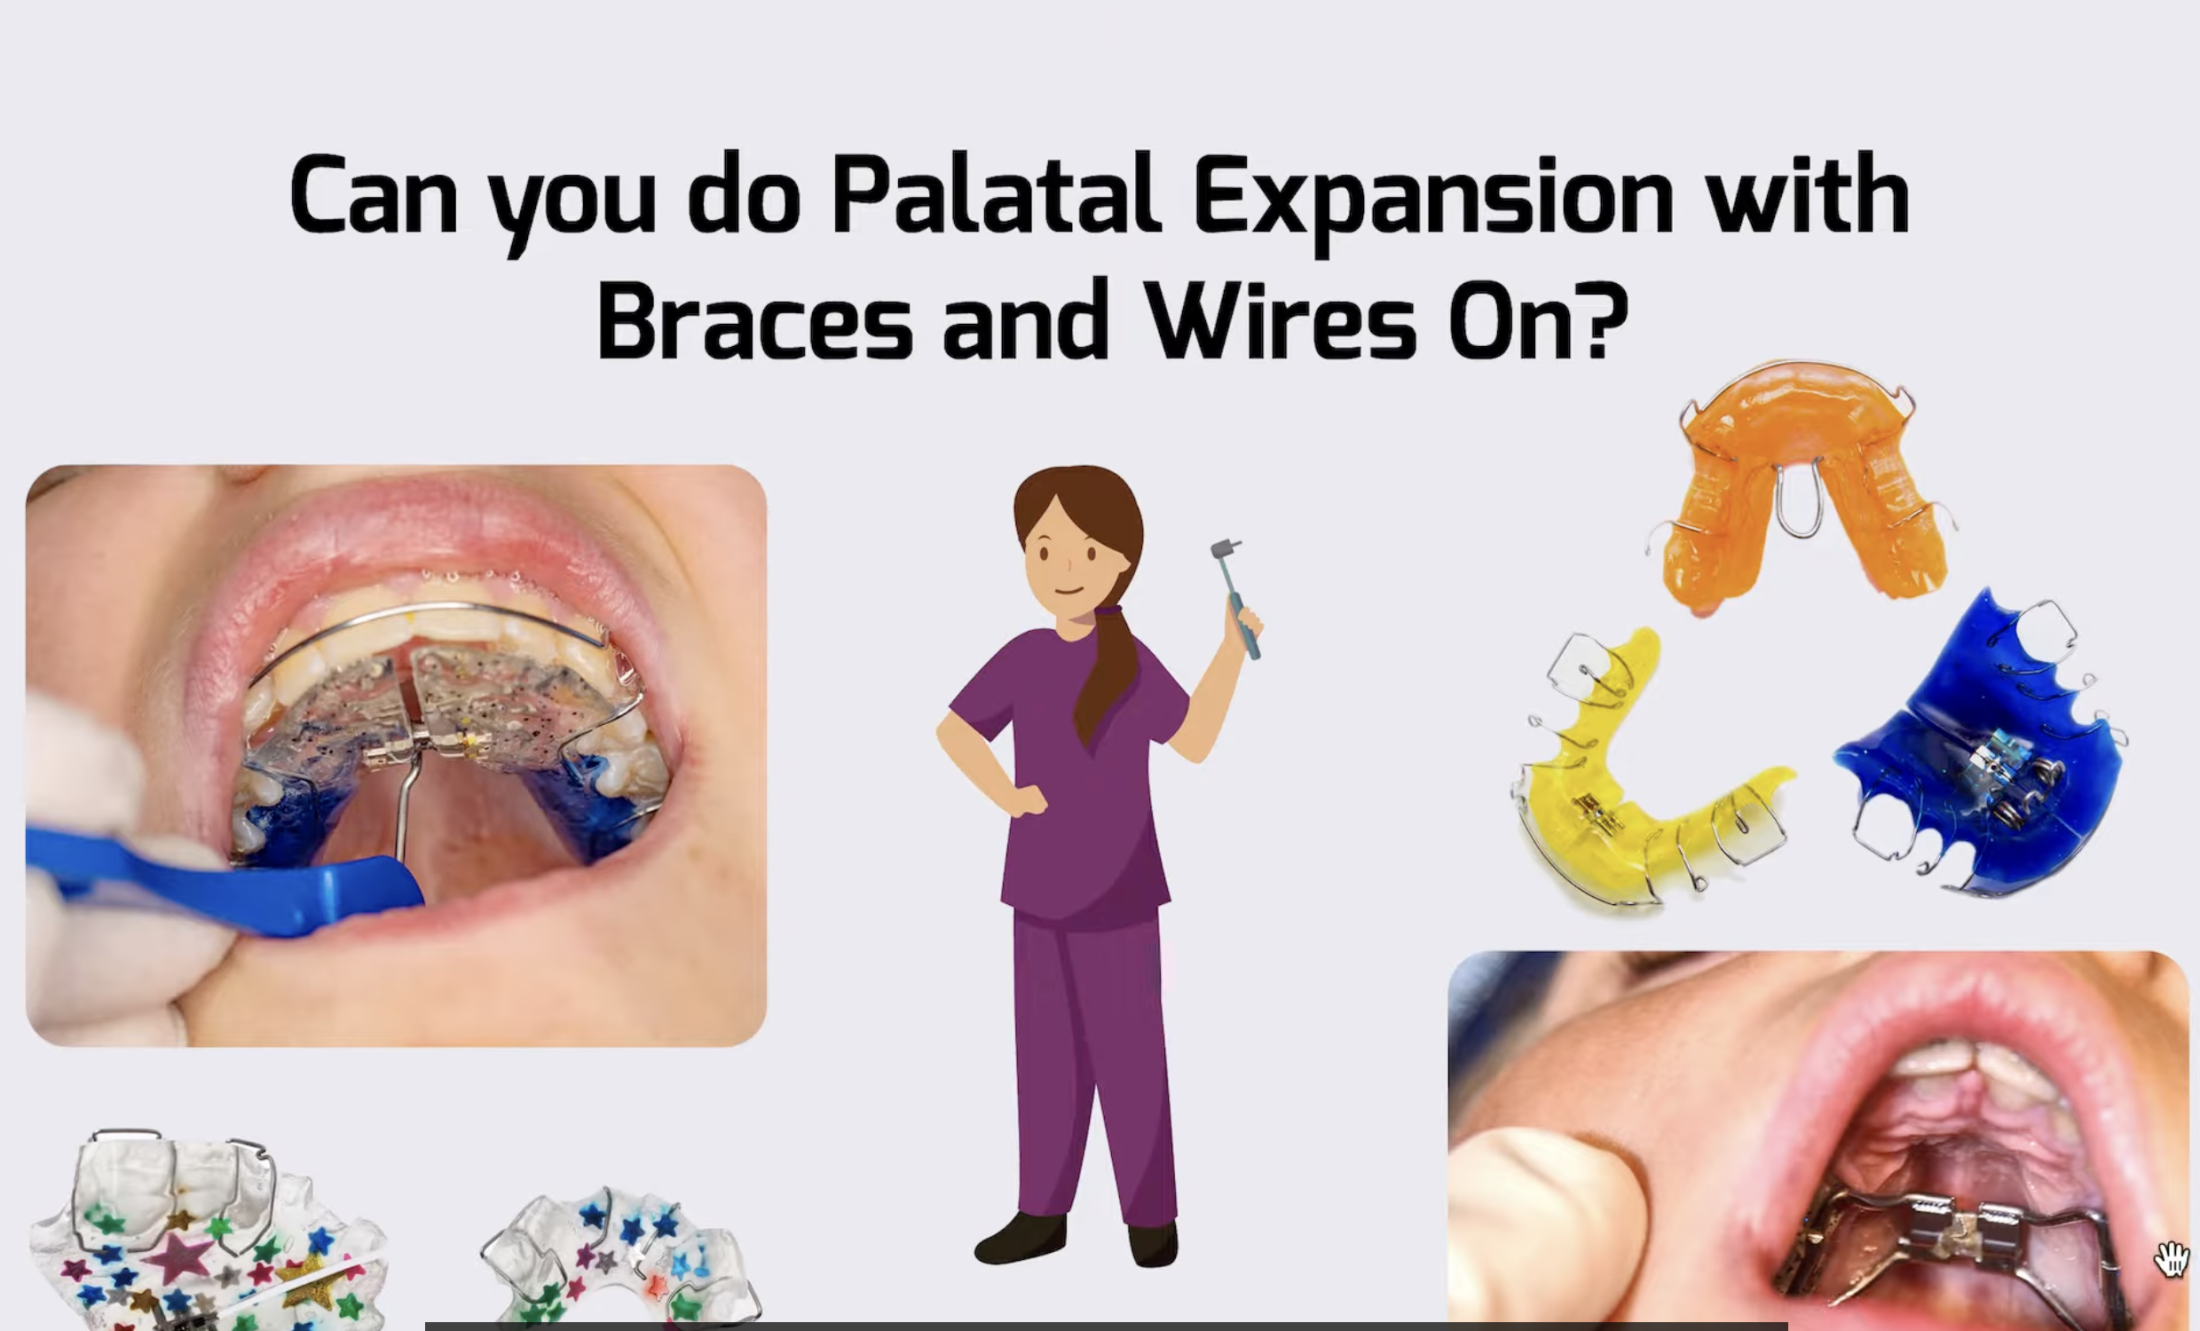
Is Palatal Expansion Possible with Braces and Wires On?
Have you ever wondered whether you could do a palatal expansion on a braces or wires patient? In many cases, once you’ve already installed braces as part of a treatment plan, it becomes a little difficult to work out whether or not you can still do a palatal expansion. However, our experts are on hand today to help you find out a bit more about this topic and whether palatal expansion is possible alongside your braces / wires treatment plans.
Can You Do Palatal Expansion with a Braces / Wires Treatment Plan
Palatal expansion is absolutely possible with braces and wires in place. However, it’s worth considering that you’ll need to take a more specific approach to make this work. Most often, a rapid palate expander (RPE) or fixed expander will be best suited to this requirement.
If you’re doing palate expansion with wires, it’s worth considering that a heavy wire can really complicate things. As such, in this scenario, going for thinner wires – e.g., a 14 – may be more practical.
It may also be possible to work with a Schwartz retainer, depending on the circumstances. If you have any questions about how to proceed, make sure to contact our experts here at Straight Smile Solutions today!
Final Thoughts
If you’ve been wondering whether or not you can do a palatal expansion with braces or wires on, there’s some good news: yes! With the right treatment plan, it’s absolutely possible to do a palatal expansion, usually with a fixed expander or a rapid pallet expander.
If you have any further questions about developing a palatal expansion treatment plan, please don’t hesitate to contact our team at Straight Smile Solutions for further support.
What You Need to Know About Kobayashi Hooks and Ligature Steel Ties
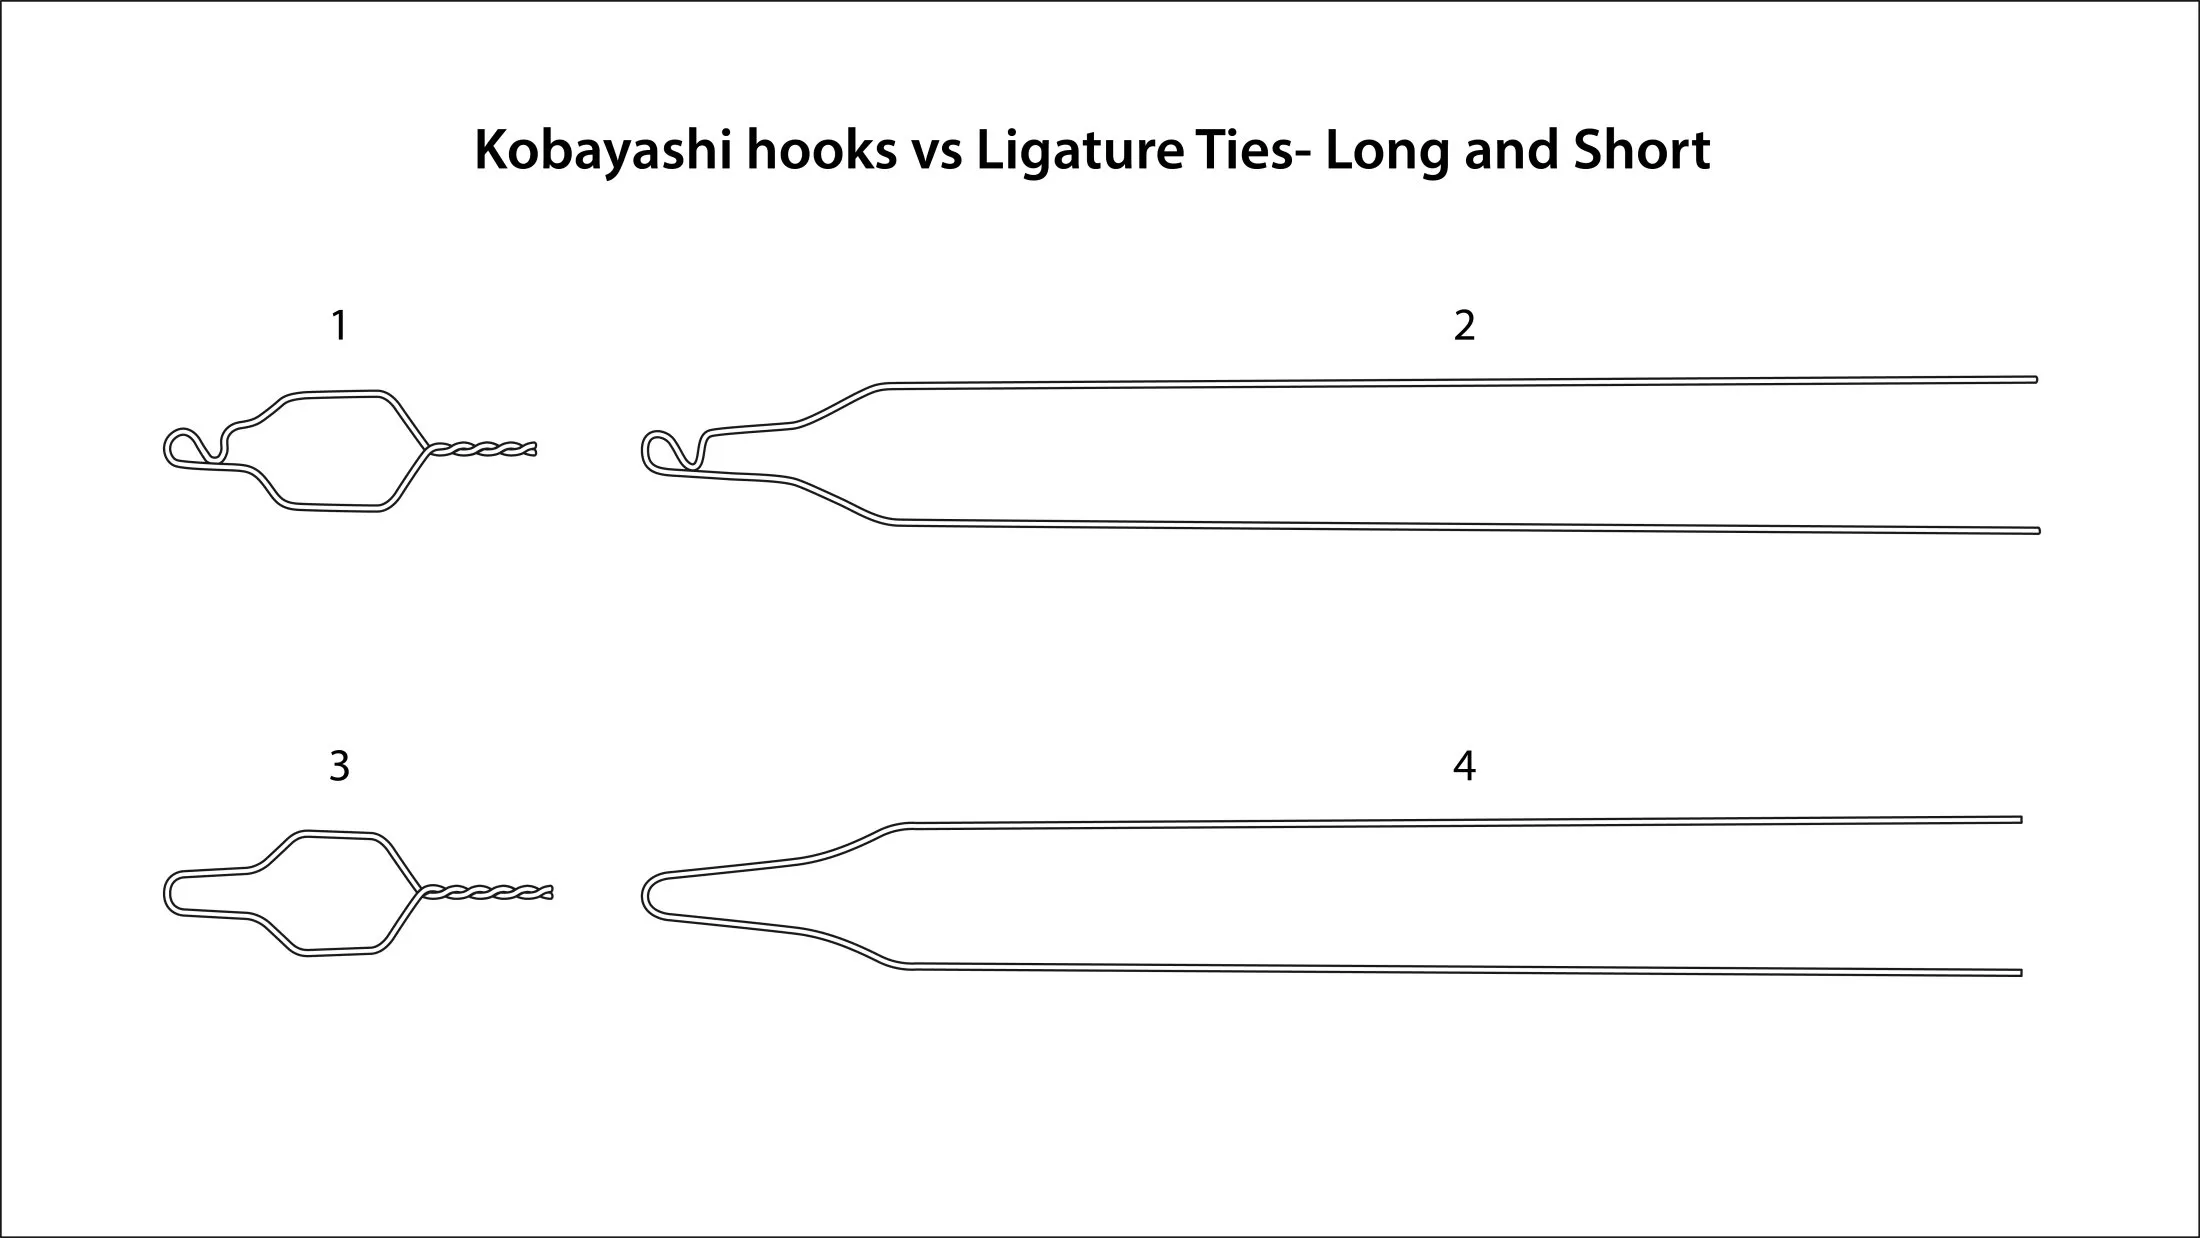
What You Need to Know About Kobayashi Hooks and Ligature Steel Ties
Have you ever wondered about the main differences between Kobayashi Hooks and Ligature Steel Ties? These two techniques can offer various pros and cons, and keeping this in mind as part of your orthodontics treatment planning can help. Fortunately, we’ve summarized some of the key things you should know about using Kobayashi Hooks and Ligature Steel Ties in orthodontics to help.
The Differences Between Kobayashi Hooks and Ligature Steel Ties
If you’ve been wondering about the main differences between Kobayashi Hooks and Ligature Steel Ties, there are several key things to keep in mind.
Kobayashi Hooks are predominantly used as an add-on hook, which can potentially bother the patient, but they do make working with elastics easier. Hooks may be needed on almost any tooth, depending on the patient’s requirements, which is where the Kobayashi Hooks come in. They are very similar to Ligature Steel Ties, but their function is to hook an elastic on.
By contrast, a Ligature Tie is used for many different applications, such as under tie, lace back, or long tie cases. Moreover, these can be used in scenarios when an o-ring doesn’t fully engage, preventing you from proceeding with the treatment plan.
It’s worth noting that both options can come in different gages, depending on your choice of distributor. Ligature ties may be more effective on the lighter side for short options; meanwhile, a mid to heavy gage may be more effective for long Ligature Ties.
Find Out More with our Straightwire Classes
If you’d like to find out more about Kobayashi Hooks and Ligature Steel Ties in orthodontics cases, make sure to check out our classes or view more of our Straightwire videos on our YouTube channel.