StraightSmile Solutions®
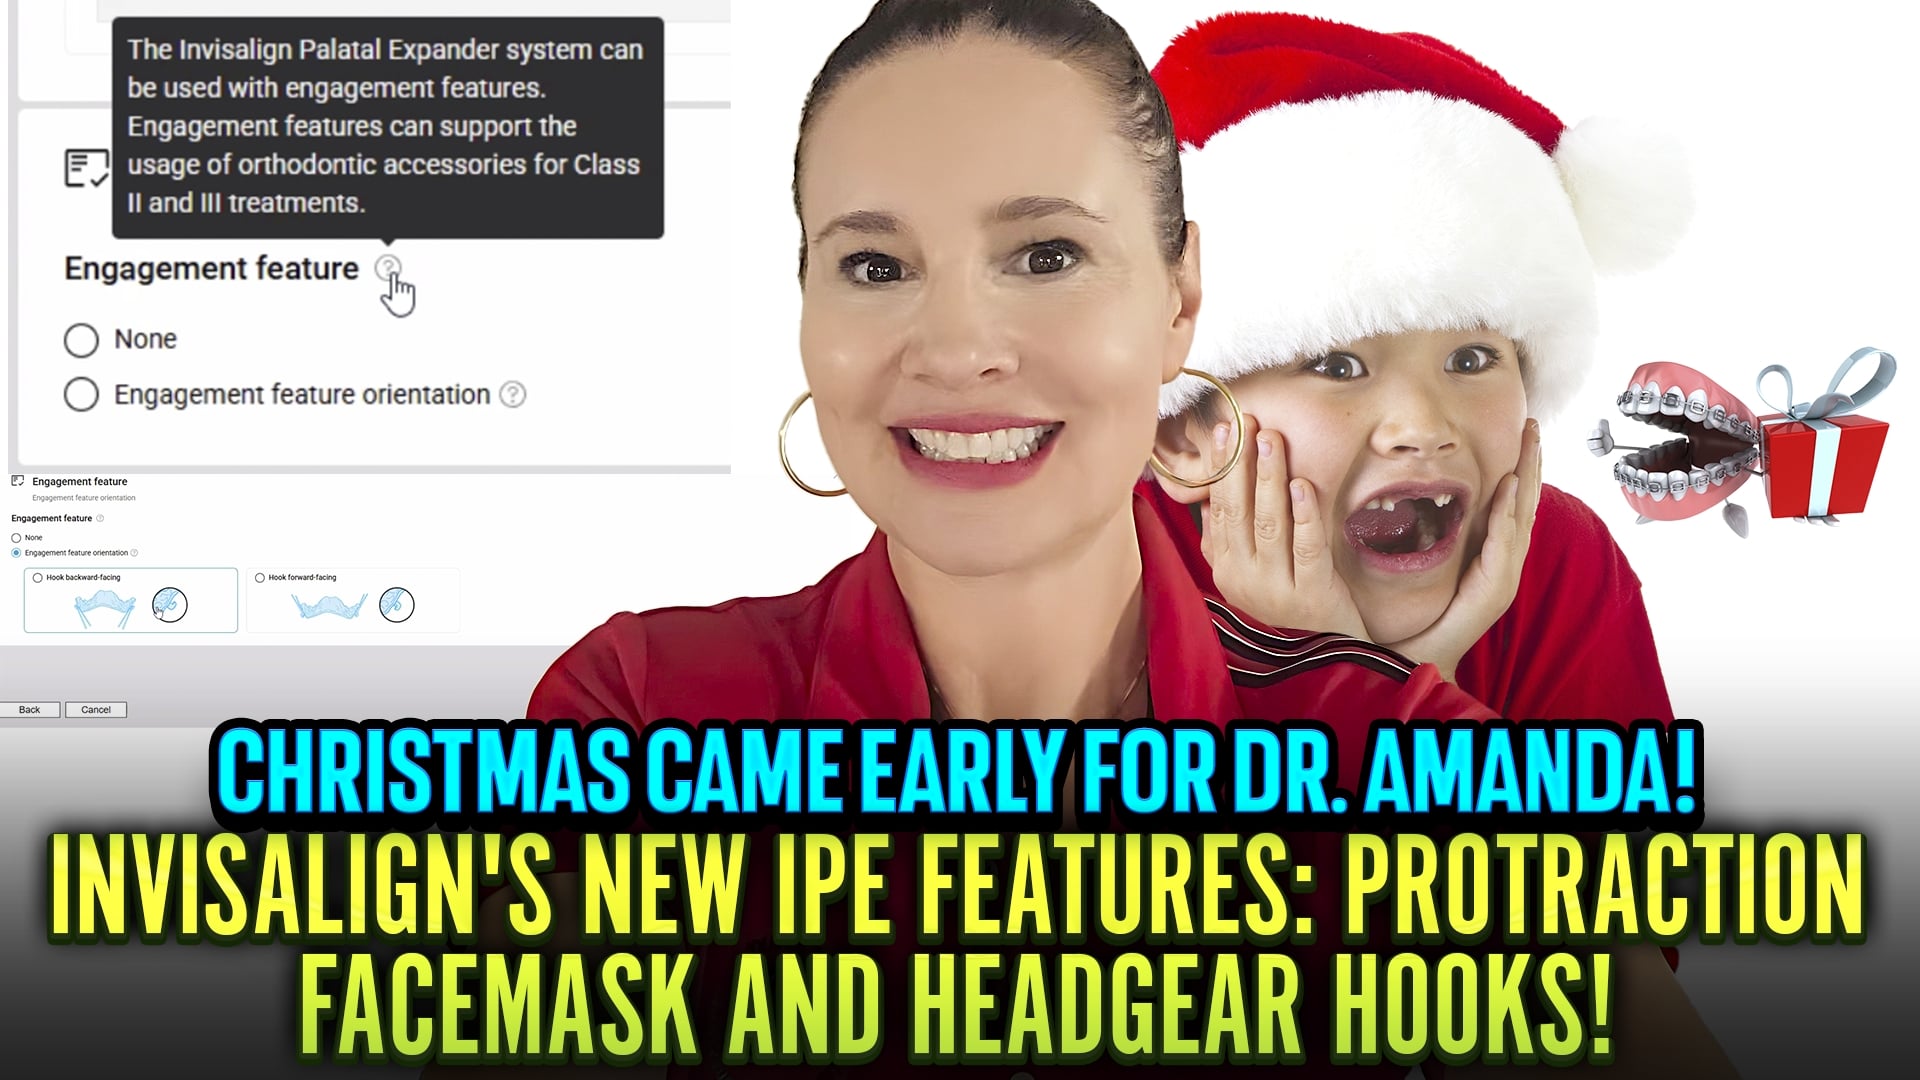
Thank You, Invisalign! Protraction Facemask Hooks on IPE!
I. Introduction
- Dr. Amanda from StraightSmile Solutions is celebrating Christmas that came early in March.
- Align Technology finally released something she’s been asking for for years: auxiliary hooks on the Invisalign Palatal Expander (IPE) for facemask use.
- Smart orthodontists have been jerry-rigging this for decades. Now it’s official.
II. The Innovation
- These are auxiliary hooks on the IPE, not on the aligner itself.
- Why not on the aligner? Aligners are too soft to handle 8-16 ounces of extraoral traction force per side.
- The IPE can handle that force. The aligner cannot.
- Now you can do protraction facemask therapy directly off the expander.
III. What This Means Clinically
- Before: Facemask patients needed traditional appliances (Kloehn-type, Nance with hooks, etc.).
- Then switch to IPE later. Two appliances. Two fees. More chair time.
- Now: One appliance does both. Expand AND protract simultaneously.
- Saves money, saves time, saves hassle.
IV. Headgear vs Facemask – Know the Difference
- Headgear = goes BACK. Retracts maxilla. Rarely indicated.
- Facemask = goes FORWARD. Protracts maxilla. For Class III, a deficient maxilla.
- These hooks support protraction facemask use forward movement only.
- Very few patients need retraction. Dr. Amanda rarely uses it.
V. How to Use It
- Follow standard facemask protocol: loosen sutures FIRST with expansion.
- Don’t start protraction immediately. Wait until sutures are opening about one-third to halfway through expansion.
- Verify with occlusal X-ray or CBCT if needed.
- Then engage the facemask at 8-16 ounces per side.
VI. The Financial Win
- IPE: ~$700. Facemask appliance: ~$150. Elastics, etc.
- Previously: Two separate appliances = $1,100-1,200+.
- Now: One appliance does both. Significant cost savings for patients and practices.
- More cases become affordable. More kids get treated early.
VII. The Align Technology Relationship
- Dr. Amanda acknowledges that Align has been “very kind” lately, no harassment for using screenshots.
- They’re realizing she helps doctors do better Clinchecks, be happier, and spend more money with them.
- Her Christmas wish for 2027? Let other scanners (Medit, 3Shape) work with Invisalign.
- She could bring thousands of doctors in if they’d open that door.
VIII. The Bottom Line
- This is a game-changer for Phase 1 Class III treatment.
- Expansion and protraction in one appliance. Simplified mechanics. Lower cost.
- Thank you, Align Technology. Now about that scanner compatibility…

How to Do Proper Informed Consents in Braces, Invisalign, and Aligners to Avoid a Lawsuit
How to Do Proper Informed Consents in Braces, Invisalign, and Aligners to Avoid a Lawsuit
I. Introduction
- Dr. Amanda from StraightSmile Solutions continues her series on avoiding lawsuits and board complaints.
- Informed consents aren’t just paperwork; they’re your first line of defense.
- And no, you can’t delegate the responsibility.
II. The Golden Rule: It’s YOUR Job
- Doesn’t matter who the office manager is. Doesn’t matter who the treatment coordinator is.
- You are the dentist. You are legally responsible.
- Never trust a verbal “Yeah, it’s signed.” Walk your boots over and see it yourself.
- Check the name. Check the age. Check the signature. Check the lines.
III. The Verbal Check-In
- After they sign, sit down with them. “Any questions on any of these lines?”
- Most will say no. That’s fine. But you asked.
- Then sign below it yourself, date, print your name, even if there’s no line.
- This documents that YOU verified consent before touching the patient.
IV. Minors and Authorization
- Under 18? Can’t sign. Period.
- Verify who’s signing. “Are you the parent?” Document the relationship.
- If you’re unsure, stop. Sort it out before proceeding.
V. Highlighting the Risks
- Every case has risks: root resorption, impactions, perio, decalcification, caries.
- If a tooth is tipped, overlapping, or has existing recession, call it out.
- Use a highlighter. Put stars next to high-risk items. “Hey, I want to go over a few things that stood out to me.”
- This isn’t scaring them. It’s informing them. And it covers you.
VI. The Three-Way Documentation Rule
- Important risks should appear in THREE places:
-
- The informed consent
- The treatment plan
- A supplemental consent if needed
- Patients should initial each line item, not just sign the bottom.
- If your consent form doesn’t have line-item initials, consider updating it.
VII. Risk-Benefit-Alternatives
- PARQ? Risk, benefits, alternatives, it’s part of informed consent.
- They need to know what could go wrong, what could go right, and what other options exist.
- Document that conversation.
VIII. Language and Translation
- If English isn’t their first language, ask: “Would you like this translated?”
- Don’t rely on Google Translate for legal documents.
- Have a translator if needed. Ask your attorney about requirements in your state.
IX. The Bottom Line
- Ortho is a marathon, not a sprint.
- Don’t rush starts just to hit production numbers.
- One missing signature, one missed conversation, one “I didn’t know” from a patient, and it could cost y
 ou everything.
 - Run your cases by an orthodontist who knows what they’re looking for. Engines won’t look out for you.

Orthodontic Problems and Damage with GLP-1s? Dr. Amanda’s Evidence-Based Hypothesis
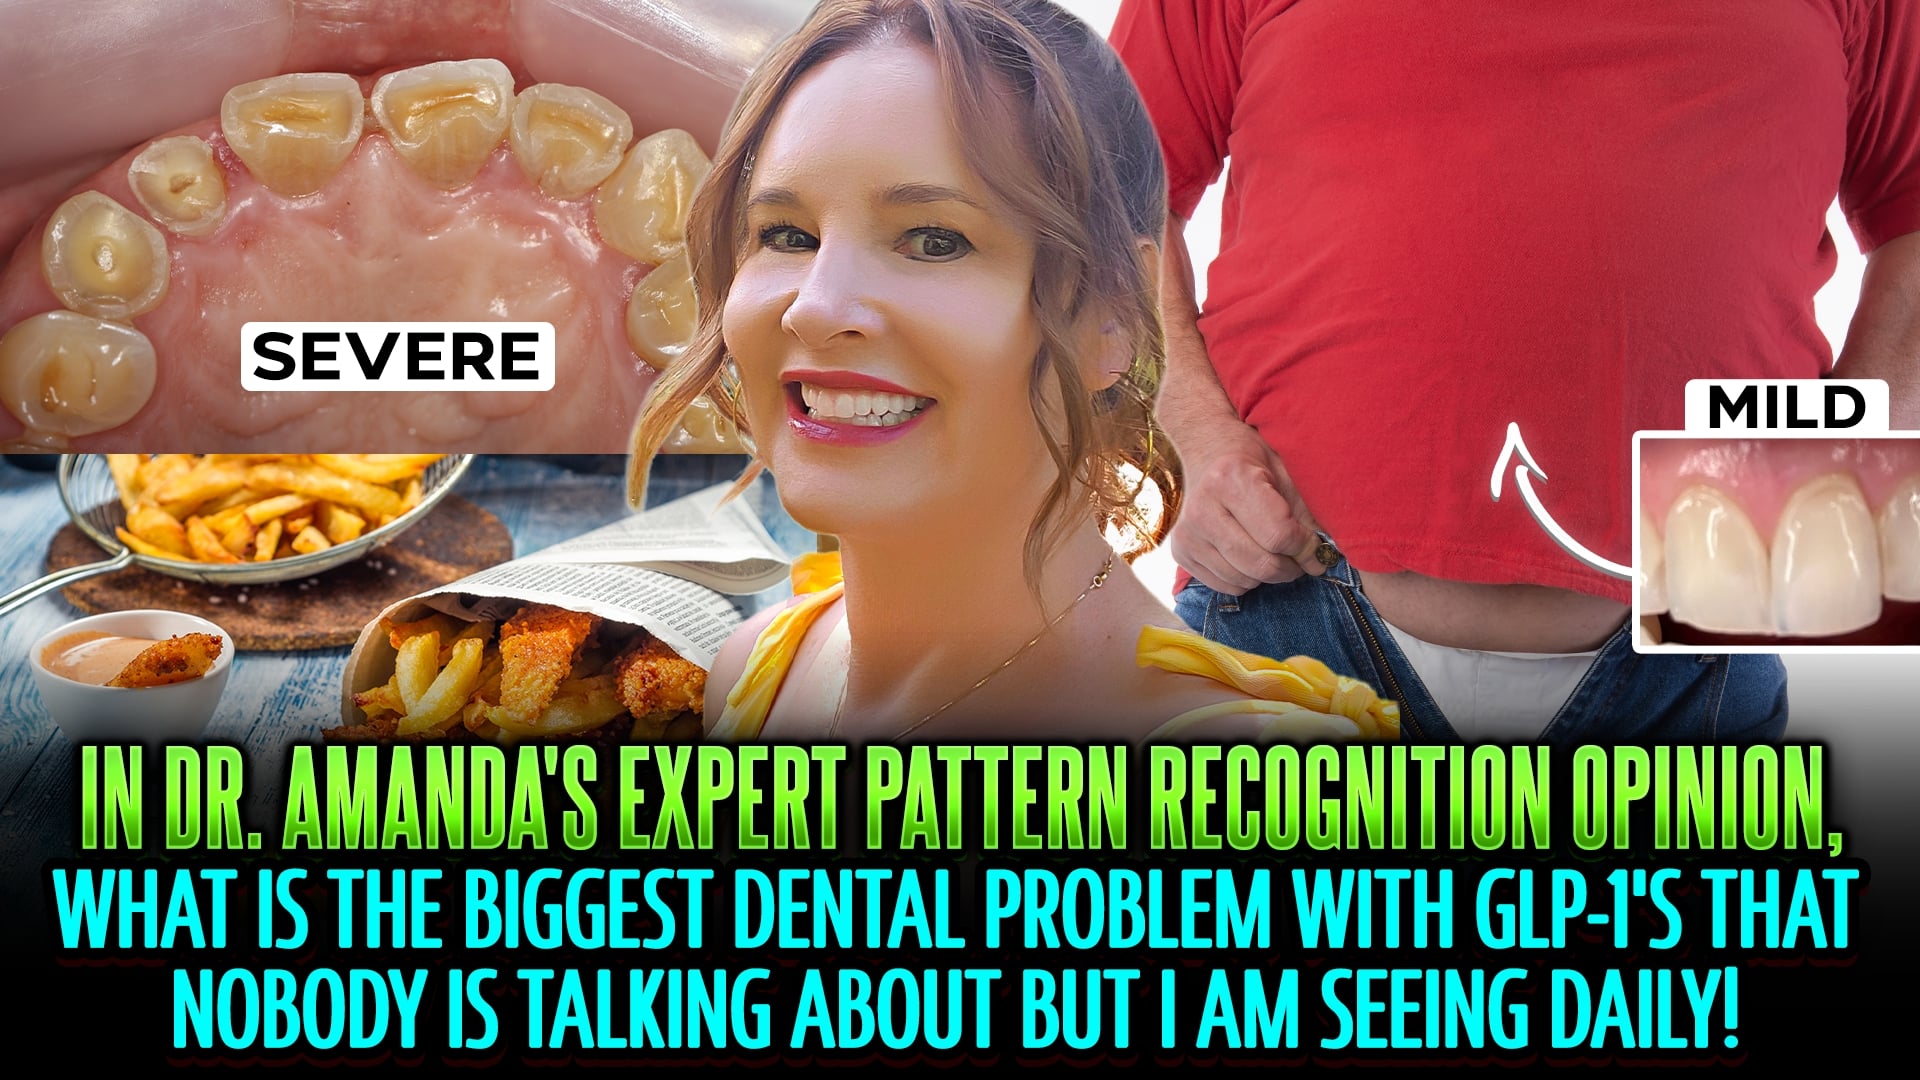
I. Introduction
Dr. Amanda from StraightSmile Solutions addresses an emerging concern: GLP-1 medications and their impact on orthodontic treatment.
With 10% of Americans on or recently on these drugs, dentists need to understand the implications.
This isn’t anti-GLP-1, she’s a fan and user herself. But ignorance isn’t an option.
II. The GLP-1 Phenomenon
These drugs are “obnoxiously accessible” and changing patient physiology at scale.
They alter the gut, the oral biome, and daily eating patterns.
Patients save money on food and Starbucks, but their oral environment shifts dramatically.
III. The Oral Health Connection
GLP-1s can make saliva more acidic consistently, not just occasionally.
Acidic saliva bathing teeth 24/7 creates erosion risks.
Unlike bulimia (lingual-only erosion), GLP-1 erosion can appear anywhere.
It’s subtle. You might not see it in photos. You have to look.
IV. The Aligner Problem
Now imagine aligner trays sitting in that acidic saliva all day and night.
Trays trap acid against teeth, accelerating erosion, especially on incisors.
Dr. Amanda is seeing this pattern repeatedly: cases that start fine, then suddenly develop unexplained erosion months in.
Question these patients: “Are you on GLP-1s?” The answer is increasingly yes.
V. Clinical Signs to Watch
Erosion that appears mid-treatment without an obvious cause
Lingual and facial surfaces are both affected
Progressive demineralization despite good hygiene
Patients may not volunteer GLP-1 use; you have to ask
VI. Monitoring Protocol
The doctor must personally check each patient at every visit.
Don’t delegate aligner check-ins entirely to assistants.
Sixty seconds: check fit, check tracking, check TEETH.
Look for erosion. Feel for texture changes. Document everything.
VII. The Bottom Line
GLP-1s aren’t going away. They’re becoming standard of care for weight management.
Orthodontic treatment on these patients requires heightened vigilance.
Acidic saliva + aligners = accelerated erosion risk.
Ask the question. Monitor closely. Document findings.
And yes, patients can still have treatment, but you need to know what you’re dealing with.
Size and Strength of Elastics for Straight-Wire Braces: Triangle, Box, Class 2, Class 3
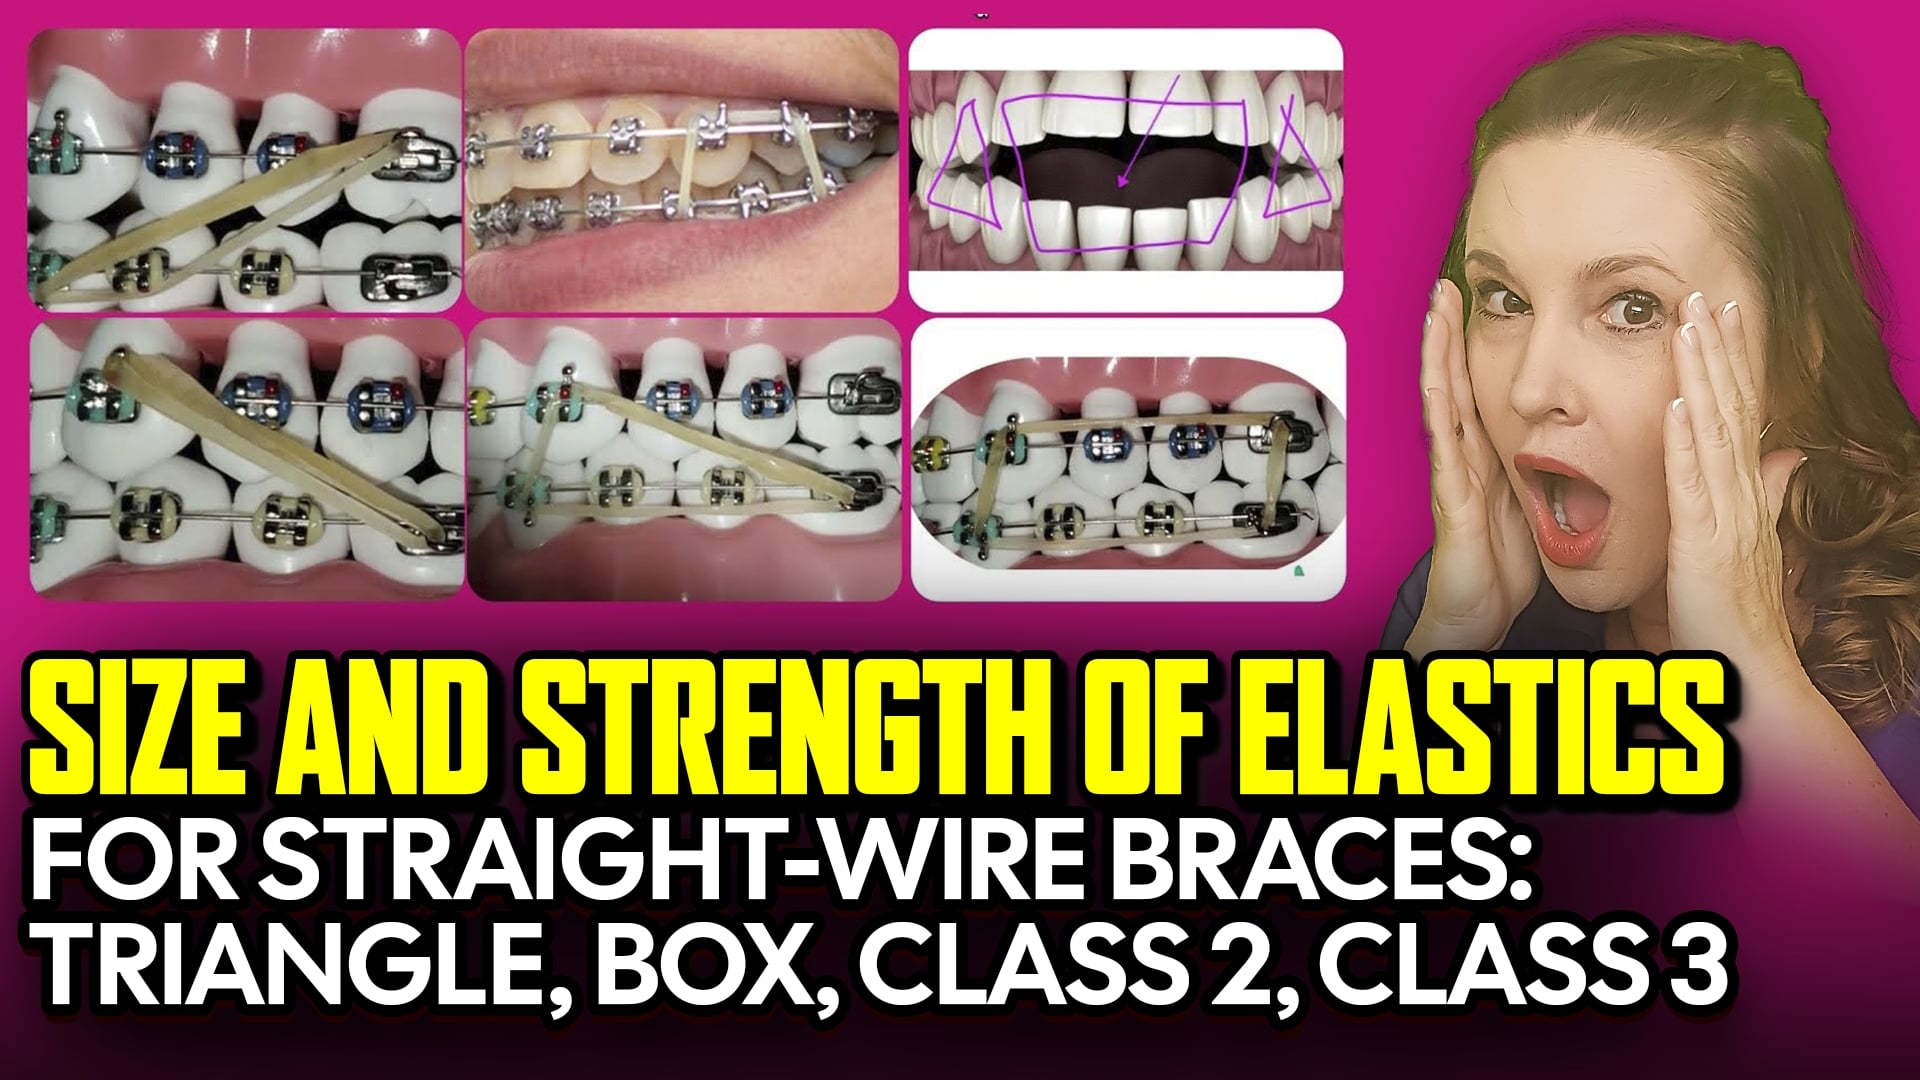 Size and Strength of Elastics for Straight-Wire Braces: Triangle, Box, Class 2, Class 3
I. Introduction
Dr. Amanda from StraightSmile Solutions tackles another elastic question, this time focusing on size and strength.
Picking the right elastic depends on what you’re trying to accomplish and what wire you’re on.
Think of it like trying on shoes: you have to find the right fit.
II. Elastic Classifications
Class 2 elastics: From upper anterior to lower posterior
Class 3 elastics: From lower anterior to upper posterior
Triangle elastics: Hook on three different points; orientations vary
Box elastics: Can be anterior, posterior, or anywhere in between
Posterior box: Back teeth only
Anterior box: Front teeth only
All serve different purposes depending on your mechanics
III. Wire Size Determines Strength
Light wires (12, 14, 16): Use LIGHT elastics 2 to 2.5 ounces
Medium wires (18, 16×22, 17×25): Use MEDIUM elastics around 4 ounces (3.5 to 4.5 range)
Never put heavy force on light wires. That’s how things go wrong.
If you’re on the fence, stock multiple strengths and let the case guide you.
IV. Diameter: Matching the Span
Common diameters: 3/16 inch, 1/4 inch, 5/16 inch
3/16: Typically for triangles and tighter configurations
1/4: The workhorse most common for class 2 and class 3
5/16: For longer spans when you need more reach
The bigger the span between hooks, the larger the diameter needed
The elastic should be TIGHT at rest. If it’s slack when the mouth is relaxed, it’s not working.
V. The Patient Factor
Patients must be able to put elastics on comfortably.
If it takes 30 minutes to hook one, it’s too tight.
When in doubt, give two diameters: slightly bigger for daytime, tighter for nighttime.
Compliance improves when patients can actually manage the mechanics.
VI. Stocking Smart
Don’t buy in major bulk, as elastics expire in 1-2 years. Latex degrades.
Non-latex options? “Terrible,” says Dr. Amanda.
Stock light, medium, and heavy in 3/16, 1/4, and 5/16.
One pack lasts a patient about two weeks.
Consider smaller quantities from eBay or other sources instead of ortho distributors forcing bulk buys.
VII. Conclusion
Match strength to wire size. Match the diameter to the span.
Test for comfort and resting tension.
Stock smart, not sorry.
Elastics are simple mechanics, but only if you pick the right ones for the job.
Dr. Amanda’s 2026 Myobrace (MRC) BioTrainer Update – Picking the Right Appliance for Early Phase 1
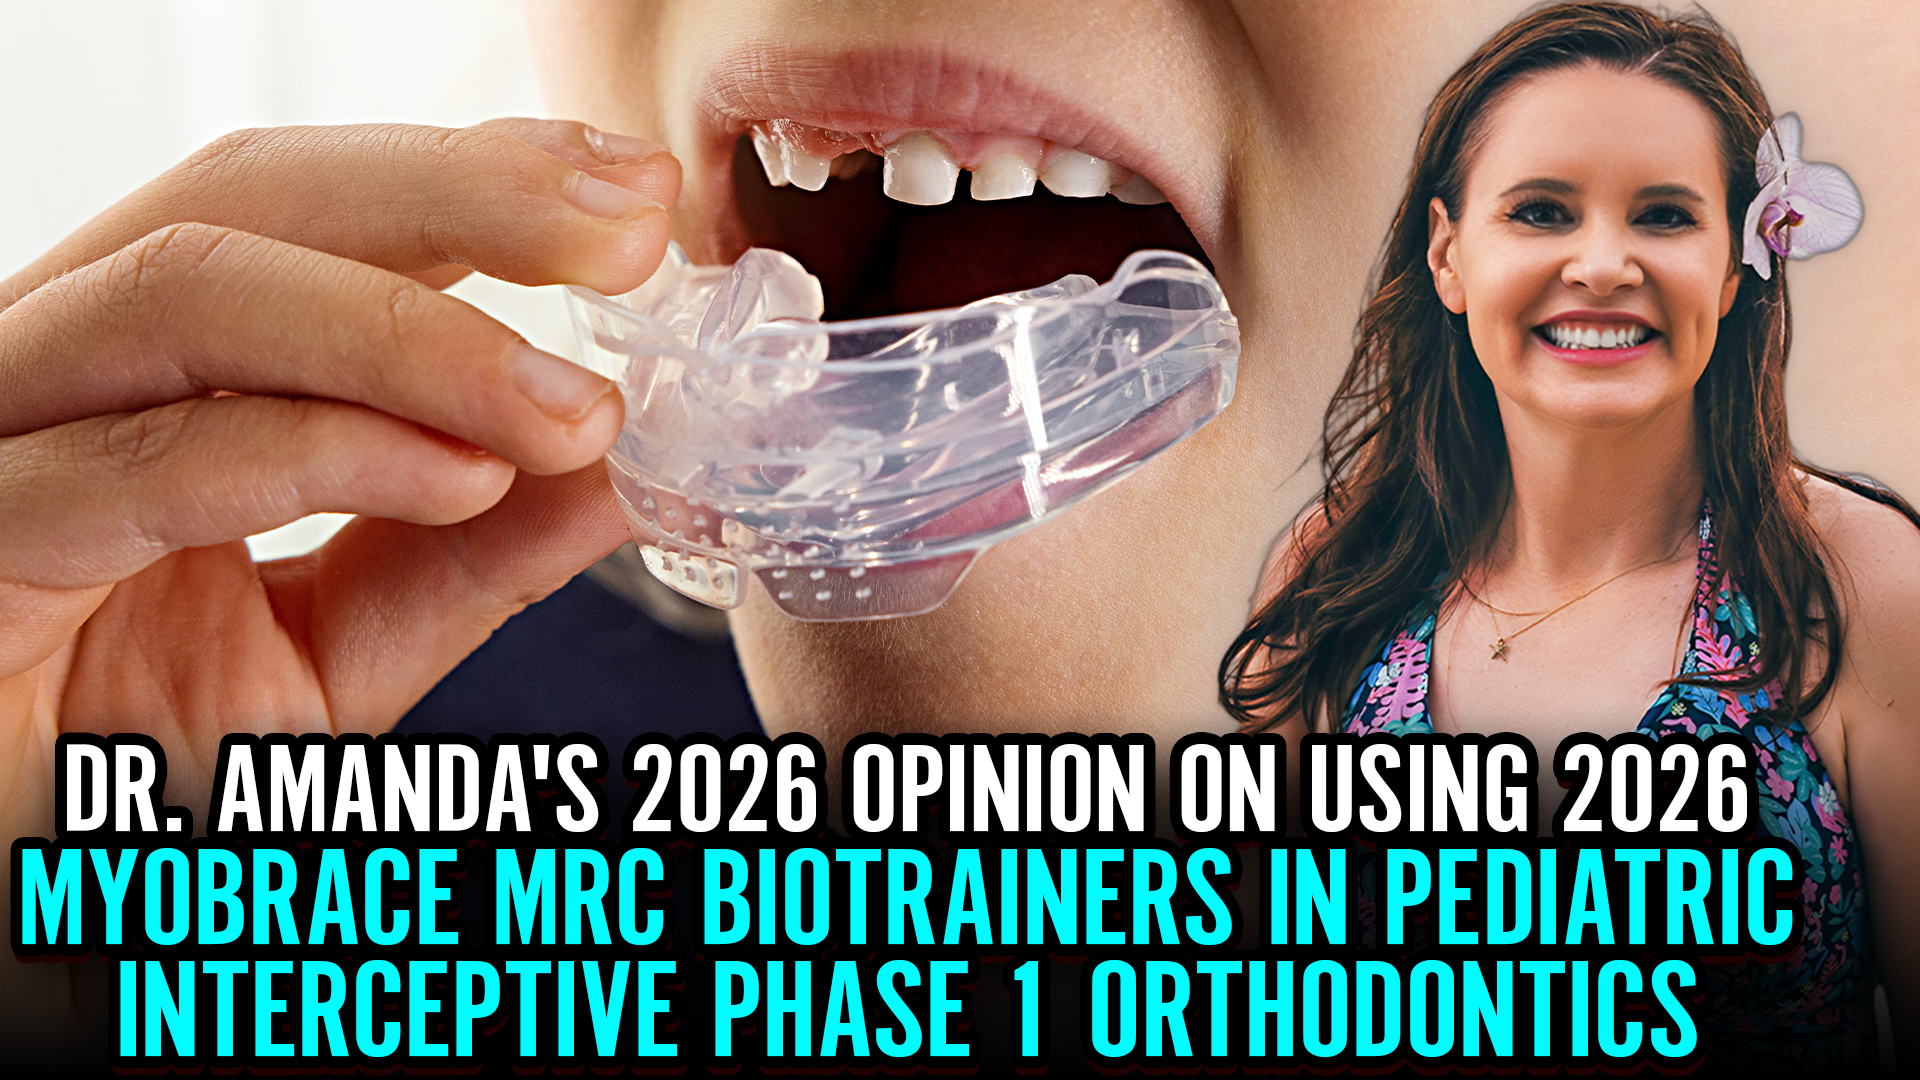
I. Introduction
- Dr. Amanda from StraightSmile Solutions addresses the ongoing question about Myobrace/MRC appliances for early Phase 1 treatment.
- Despite years of outreach, MRC has been consistently uncooperative, refusing even a free audit of their courses.
- So, she cannot recommend specific MRC products. But she can share what she knows about pre-orthodontic trainers in general.
II. The Company Problem
- MRC has been “extraordinarily rude” for over a decade at conferences, via email, even when she offered to visit Australia on her own dime.
- Other companies (Healthy Start/Ortho-Tain) she knows well but can’t discuss due to pre-COVID litigation.
- Her point: If a company won’t educate a willing orthodontist with 24 years of experience, something’s off.
III. When Trainers Actually Work
- Bio-trainers can work—but only with:
- The right patient
- The right parent
- The right doctor
- The right product
- Best candidates: Neurodivergent and special needs patients (including spectrum) who happily wear them while gaming.
- Must start EARLY, age 2 or 3, before baby teeth fall out.
- Must address habits, myofunction, airway, posture, and nasal breathing simultaneously.
IV. The Reality Check
- These are marathons. You won’t see major changes in 6 months, 1 year, or even 3 years.
- They deliver IMPROVEMENT, not PERFECTION.
- American parents want perfection. When the trainer series ends, and teeth aren’t straight, who pays for braces or Invisalign to finish?
- You need an “out clause” in your treatment plan, with clear terms for switching modalities.
V. The Compliance Litmus Test
- Smart doctors use trainers as compliance indicators, not profit centers.
- Start at age 3-6, pre-ortho. Charge a minor cash fee or even give it.
- See if the child can wear an oral appliance consistently.
- If they pass this test, they’re likely compliant for Phase 1.
- Dr. Amanda chats with the patient alone if they buy in, compliance follows.
VI. Financial Caveats
- You will never profit using only trainers. Impossible.
- Companies make money on expensive certification courses, not the appliances themselves.
- Lab fees are low ($50-$150), but the upfront course cost is where they get you.
- Dr. Amanda just wanted to take the course. They wouldn’t let her.
VII. Conclusion
- Trainers have a place as early intervention, as compliance tests, and as gentle starts.
- But they require the right family, realistic expectations, and a clear finish-line plan.
- MRC may never let Dr. Amanda in the door, but her advice stands: Use trainers wisely, document everything, and know when to pivot to traditional orthodontics.
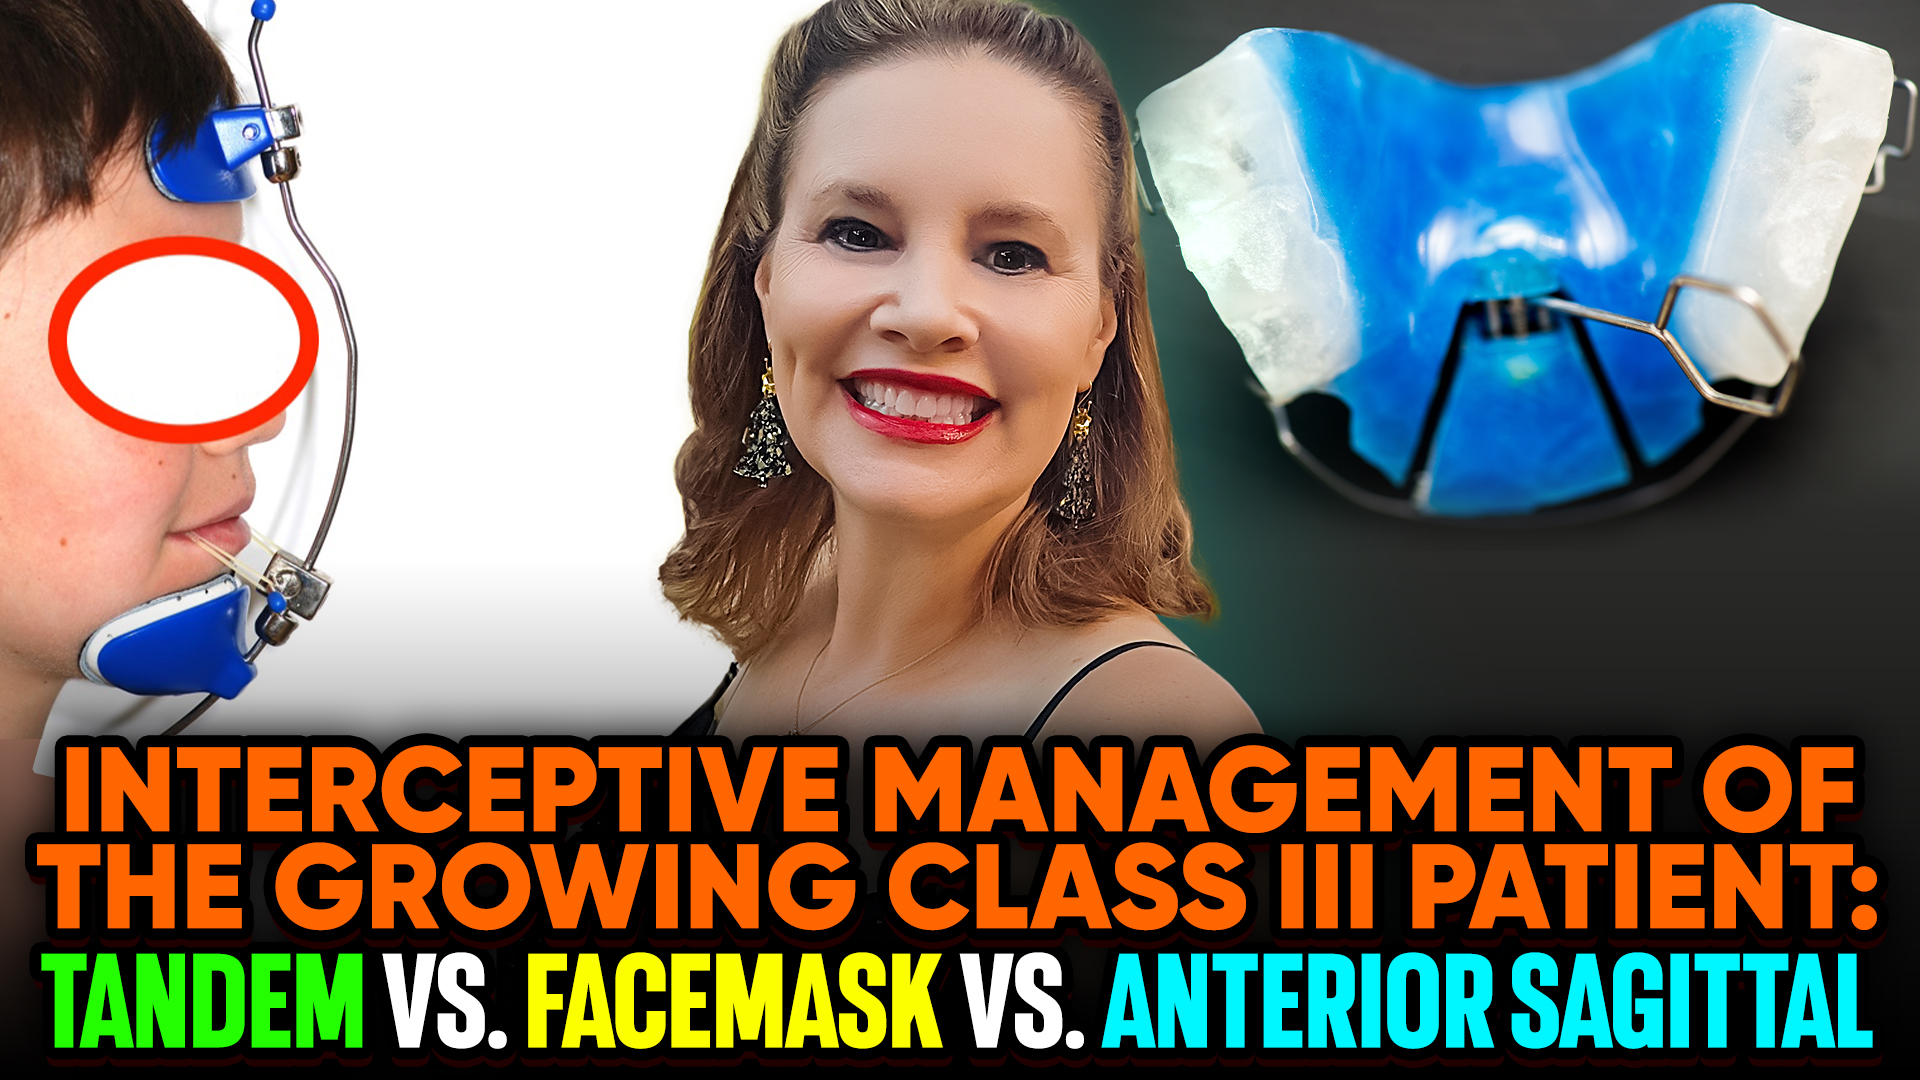
Interceptive Class 3 Cases: Protraction Facemask, Tandem vs Anterior Sagittal
I. Introduction
- Dr. Amanda from StraightSmile Solutions clears up a common point of confusion: Protraction facemask/Tandem appliances and anterior sagittal appliances are not the same.
- They may look similar on the surface, but they produce completely different results.
II. The Fundamental Difference
- Protraction facemask and Tandem appliances create SKELETAL changes.
- Anterior sagittal appliances create DENTAL changes only.
- This distinction matters for diagnosis, treatment planning, and long-term outcomes.
III. Anterior Sagittal: What It Actually Does
- This appliance moves teeth specifically, proclining incisors that were retroclined.
- No skeletal change occurs. SNA, SNB, and maxillary position relative to cranial base remain unchanged.
- Nothing this appliance does can’t be done with braces or aligners.
- It’s useful for:
- Minor arch development when combined with expansion screws
- Starting the process of moving trapped teeth forward
- Creating tongue space
- But it will not grow a maxilla. Period.
IV. Protraction Facemask and Tandem: Real Skeletal Change
- These appliances actually grow the maxilla forward—not the mandible.
- Average skeletal advancement: 1.8mm of true maxillary translation.
- That 1.8mm is permanent. The whole jaw moves, not just the teeth.
- This increases nasopharyngeal and/or oropharyngeal dimensions by pulling the entire maxilla and soft palate forward.
- Result: Improved airway, reduced clockwise mandibular rotation, better A and B points.
V. The Mechanics Matter
- Sutures must be loosened first, usually with expansion, before protraction works
- Tandem is similar but bulkier; Dr. Amanda prefers a facemask for better compliance.
- Both require Phase 1 timing (under age 9-10) when class III presentation is typically small SNA or bimaxillary retrognathia.
- After protraction, the mandible may catch up on its own or may need a twin block or MA.
VI. What Doesn’t Work for Airway
- Elastics and headgear tip the occlusal plane.
- They don’t grow jaws. They don’t help the airway.
- If airway is your goal, mechanics that actually move jaws are non-negotiable.
VII. The Bottom Line
- Anterior sagittal = tooth movement. Fine for minor proclination, but no skeletal effect.
- Protraction facemask/Tandem = true maxillary advancement with airway and structural benefits.
- Know which type of class III you’re treating before choosing your tool.
- And remember: Anterior sagittal is just a placeholder for what braces or aligners could do anyway. Real class III correction requires real skeletal change.
How to Remove the Bonded Retainer without Damaging Enamel
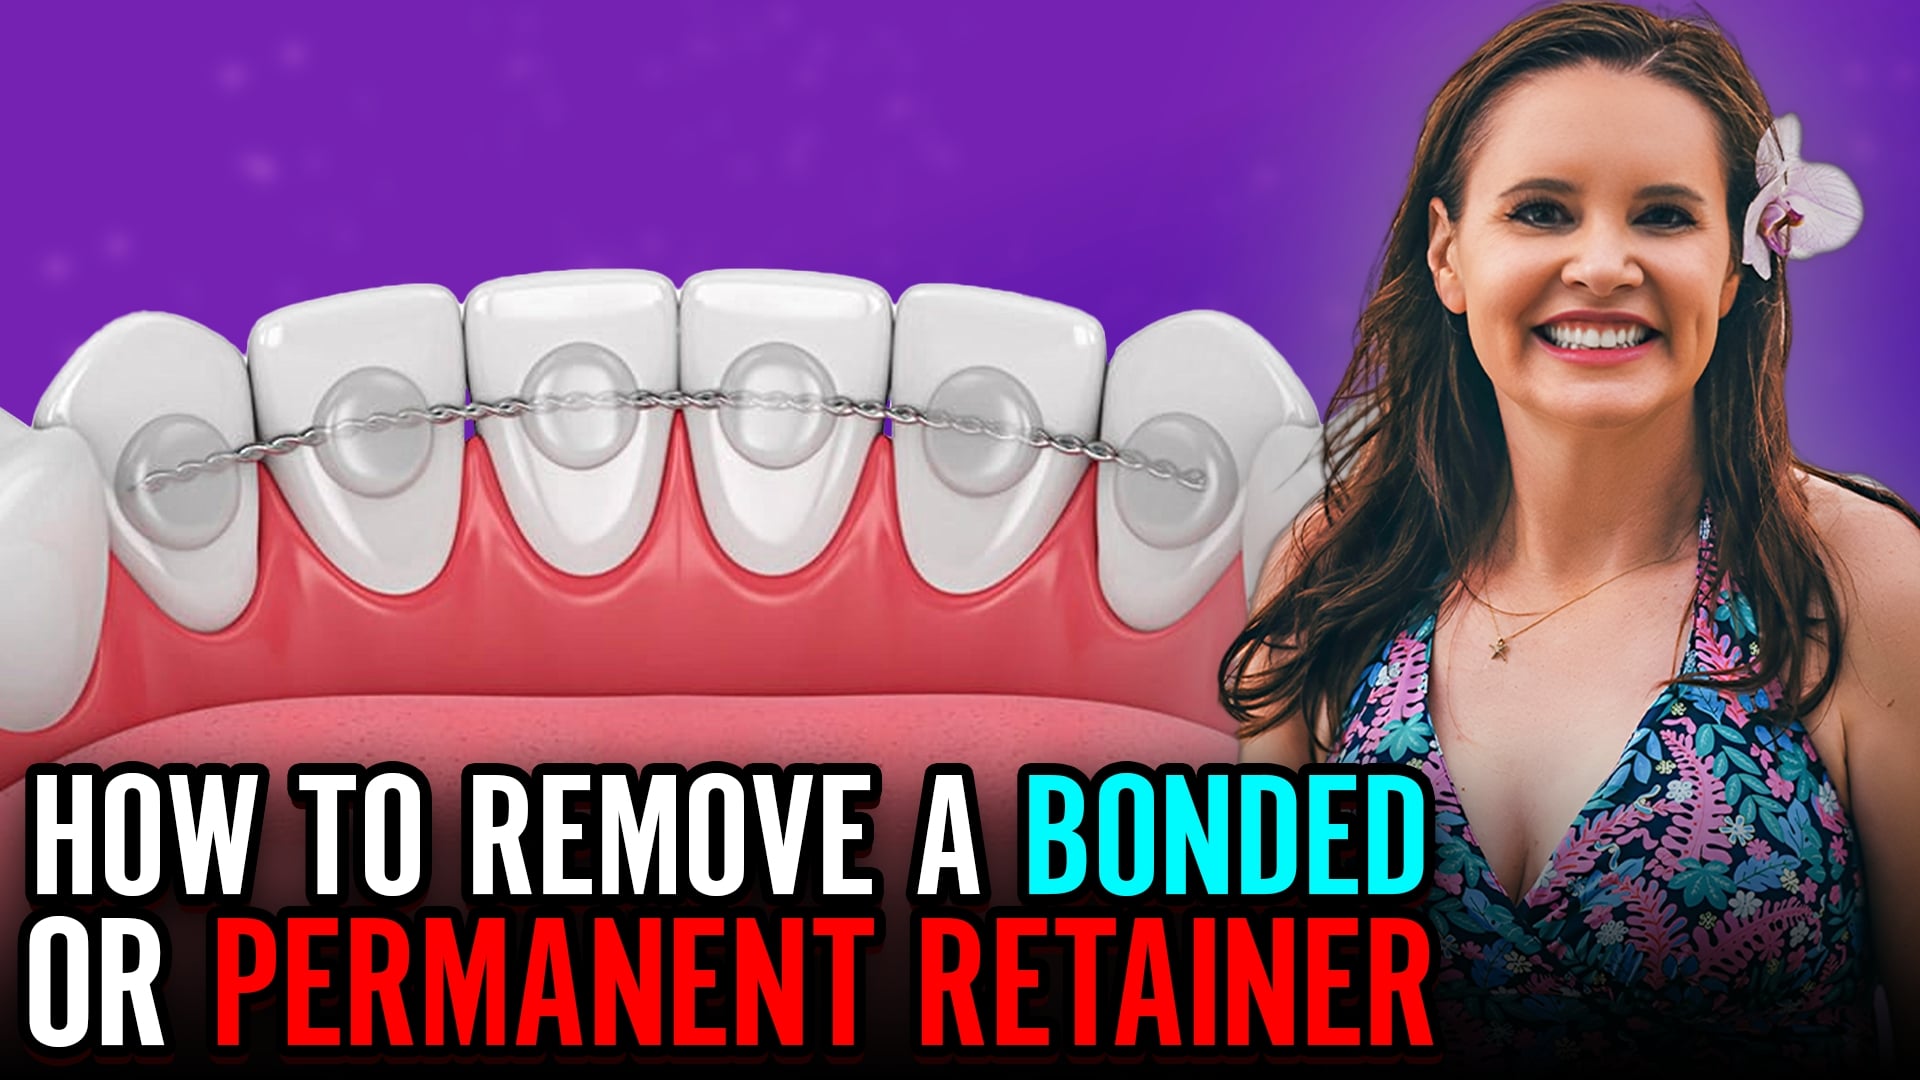
I. Introduction
Dr. Amanda from StraightSmile Solutions answers a common clinical question: How do you remove a bonded permanent retainer safely?
The short answer: It depends. And the long answer starts with understanding how it was placed.
II. Reverse Engineering the Removal
Removal technique varies based on:
How the retainer was constructed
What it’s made of (braided wire vs. stainless steel bar)
How it was bonded (multiple small blobs vs. mesh pads on two teeth)
The patient’s periodontal status, root length, and mobility
General rule: Take it off the same way it went on—just backwards.
III. Different Retainers, Different Approaches
Braided wire with six separate composite blobs? More complex.
Stainless steel bar with mesh pads on just two teeth? Easier.
For young patients with long roots and stable perio, Dr. Amanda may use an adhesive remover with a claw to pop it off.
But if there are periodontal issues, trauma, mobility, or fremitus? No popping. She switches to a football bur and carefully removes each blob sequentially.
IV. The Enamel Preservation Protocol
How do you know you’re not taking enamel with the composite?
Dentistry 101: Composite feels and sounds different than enamel under a bur.
Composite powders; enamel doesn’t. The sound changes as you approach the surface.
Technique:
Work dry for better visibility
Get close, then stop
Use an explorer for the scratch test to locate enamel
Switch to finer burs (greenies, brownies, white stones)
Use a black light to check for remaining composite
It’s really not that hard when you’re paying attention.
V. The Bottom Line
Removing bonded retainers without damaging enamel comes down to technique and attentiveness.
Work backwards from placement. Read the tooth. Listen to the bur. Test as you go.
If a dentist doesn’t know how to remove composite without touching enamel, that dentist has a problem.
Done properly, you shouldn’t be taking off any enamel at all.
Managing Retained E’s with No Roots – Mandibular Bolton, Invisalign, Braces, Expander Mechanics
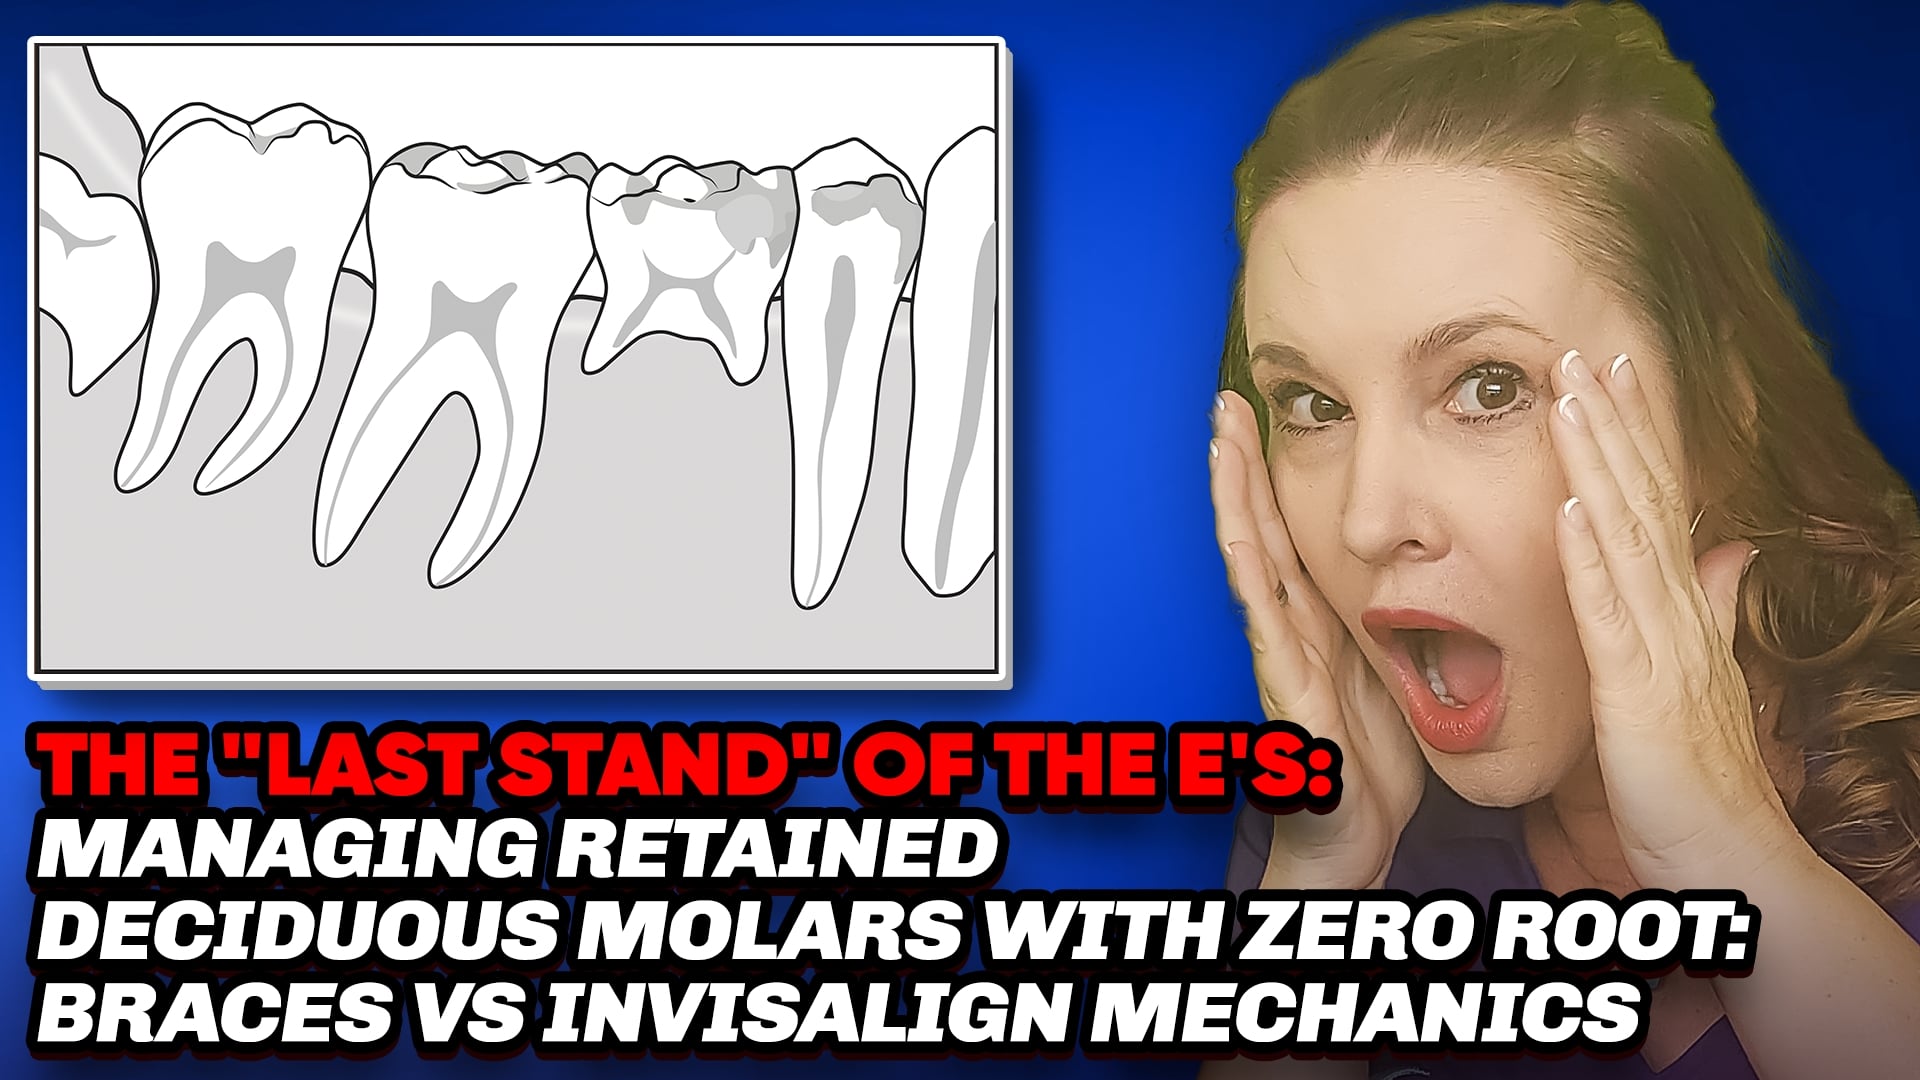
I. Introduction
● Dr. Amanda from StraightSmile Solutions tackles the retained primary second molar, the “E” tooth.
● These baby molars sometimes have no permanent successor, and they can last a lifetime with good care.
● But in orthodontics, they create unique challenges and unique opportunities.
II. The Bolton Factor
● Primary molars are roughly 10-11mm wide. Premolars? About 7-8mm.
● That’s a 2-3mm discrepancy per side up to 5mm of mandibular Bolton excess.
● Teeth need to fit like gears. An extra lower tooth structure pushes you toward Class III.
● But if the patient started Class II, that extra lower length might actually help.
III. Keep or Pull? It Depends on Occlusion
● Class I with peg laterals? That’s already a mandibular Bolton. Add retained E’s, and you’ve got 7mm of excess—a nightmare.
● Class II patient? Those E’s become an asset, adding exactly what you need.
● You can’t decide without understanding the whole occlusion picture.
IV. When Extraction Makes Sense
● Sometimes the roots are stumpy and won’t survive orthodontic forces anyway.
● In crowding cases, you can’t upright curves and level without engaging the tooth, which accelerates loss.
● If it’s going to fail, better to extract on your terms.
● And if you need IPR, why shave healthy enamel when you can reduce a doomed tooth instead?
V. The Chop and Keep Strategy
● Numb it up. Take a bur. Reduce the E mesially and distally.
● Create space for proper interdigitation while preserving bone.
● Now you have perfect space for an implant later, and everything fits as it should.
● Better than sacrificing healthy teeth to accommodate a dying one.
VI. Mechanics Matter
● Braces apply heavy force, which is risky for teeth with compromised roots.
● Aligners are gentler. Slow, low force is kinder to fragile E’s.
● Expanders can bypass the E entirely, working off molars to roll out the curve of Spee without direct force on the questionable tooth.
● Choose your mechanics based on the tooth’s prognosis.
VII. The Bottom Line
● Retained E’s aren’t automatically problems or gifts, they’re variables.
● Run the Bolton. Assess the roots. Look at the occlusion.
● Sometimes they’re keepers. Sometimes they’re space creators. Sometimes they’re both.
● When in doubt, run the case by an experienced orthodontist before committing.
Should You Start Comprehensive or Phase 2 Ortho? Or Wait for 7’s? — Impactions, Progress Panos

Should You Start Comprehensive or Phase 2 Ortho? Or Wait for 7’s? — Impactions, Progress Panos
I. Introduction
● Dr. Amanda from StraightSmile Solutions tackles the perennial question: When is it safe to start Phase 2 or comprehensive treatment?
● The answer hinges on those pesky second molars—the “sevens”—and whether they’re ready to play nice.
● Starting too early or too late can derail your case, waste time, and even put you at legal risk.
II. Phase 1 vs. Phase 2: A Quick Refresher
● Phase 1 focuses on front teeth, bite correction, transverse, AP, and vertical issues—plus creating space for canines.
● Phase 2 should be “easy breezy” if Phase 1 was done right. You’re simply utilizing the space already created.
● If a Phase 2 case looks like a train wreck, you likely missed something in Phase 1—habits, ENT issues, or growth problems.
III. The Second Molar Dilemma: When to Wait
● Second molars (sevens) are the usual holdup for starting comprehensive treatment.
● Look for symmetry. If all four are lagging, it’s probably genetics—not a red flag.
● Don’t start Phase 2 unless you’re confident all second molars will erupt within the next year—or you have a clear plan to remove an obstruction.
● Common obstructions: roots of first molars or third molars crisscrossing, vertical discrepancies, or over-eruption of opposing teeth.
IV. The Risk of Waiting With Active Treatment
● Here’s the hard truth: Leaving braces on or continuing active aligner treatment—while waiting for teeth to erupt is *below standard of care*.
● Why? Prolonged treatment increases root resorption risk. And if that happens, guess who’s liable?
● Patients have more access to information (and lawyers) than ever. Don’t give them a reason to come after you.
V. Taking a Break: The Sloppy Bonded Solution
● Sometimes, you need to hit pause. Take a break from active treatment while waiting for eruption.
● During breaks, use “sloppy bondeds” temporary bonded retainers made in-house, or simple vacuum-formed retainers.
● These aren’t meant to last forever; they’re psychological and space-holding placeholders.
● Important: You cannot charge extra for temporary retention. It’s part of the original treatment fee.
VI. Payment Plans and Pauses
● Extended payment plans get messy when treatment pauses. Patients often stop paying when they don’t see active progress.
● Consider third-party financing or build pauses into your initial treatment plan discussion.
● If parents are iffy about necessary X-rays for monitoring, reconsider taking them on as long-term patients.
VII. When Intervention Is Necessary: The Halterman Appliance
● Love a good Halterman for up righting funky second molars but it’s usually not needed if you catch things early.
● If you’re too late, Haltermans can work, but no promises. Some teeth fail despite your best efforts.
● Key rule: Everything else should be finished before you upright a molar. Use heavy 19×25 stainless steel and treat it like an exposure case.
VIII. The Bottom Line
● Keep your eye on second molars. They’re tricky and can sink a beautiful case.
● Intervene early, but not aggressively. Often, extracting a wisdom tooth and using the spacer technique is better than heavy mechanics.
● Serial Panos or CBCTs are essential for monitoring to make sure patients are on board with radiation.
● And remember: If you do it right, Phase 2 should be the easy part.
Master Straightwire Braces in 18 Months – No TADs, No Elastics
Master Straightwire Braces in 18 Months – No TADs, No Elastics
I. Introduction
● Dr. Amanda from StraightSmile Solutions drops a bold claim: If your braces cases are taking more than 18 months, you’re doing something wrong.
● She calls out the orthodontic industry for gatekeeping efficient treatment methods.
● The goal isn’t just to get from A to Z—it’s to do it efficiently, predictably, and without unnecessary complications.
II. Why Cases Drag On
● Often, extended treatment times are blamed on patient compliance.
● But Dr. Amanda argues that’s on you—you picked the wrong patient, failed to set boundaries, or aren’t managing compliance effectively.
● Compliance management isn’t optional; it’s standard of care.
● If you’re relying on stainless steel wires, TADs, or funky bends routinely, you’ve missed the mark.
III. The Real Solution: Proper Diagnosis and Phase One
● The need for TADs, loops, and gable bends disappears when you do Phase One orthodontics correctly.
● These “nightmare” adult cases are often the result of dropping the ball on early intervention.
● If you catch and treat issues early, you shape the arch naturally and avoid complex mechanics later.
IV. The Problem With Outdated Teaching
● Many orthodontic courses are still taught by “super old people” pushing stainless steel wires as the norm.
● Stainless steel should be a rare exception—not a routine tool.
● The industry has gatekept efficient, modern approaches for too long.
● Social media is breaking down those walls, but clinicians need to seek out better education.
V. How Dr. Amanda Teaches
● She trains clinicians exactly like residents are trained—through doing, learning, and referencing the literature.
● No gatekeeping. No fluff. Just practical, case-based learning.
● Whether you work with her for one month or eighteen, you’ll walk away with a simpler, faster approach to tough cases.
VI. Call to Action
● Ready to stop overcomplicating orthodontics? Visit StraightSmileSolutions.com.
● Bring your hardest cases—Dr. Amanda will show you how to make them significantly easier.
● Stop letting cases drag on for years. Master straightwire braces in 18 months or less.